|
|


|
|
|
|
Homebrew Wired Remote for Canon EOS 350D Camera
author: Martin "mpot" Pot
date: 12 July 2006
This article provides details on building a homebrew wired remote for a Canon EOS 350D digital SLR camera
(known as the EOS Digital Rebel XT in some markets),
using a two-stage push button switch to provide functionality of the camera shutter button.
This DIY remote will work with many of the Canon EOS cameras (including 300D, 350D, 400D and others).
Apparently it will also work with Pentax K100D/K110D, *istDS/*istDS2, *istDL/*istDL2 and K10D cameras.
Introduction
Canon sells a wired remote control to suit the EOS 350D,
known as the "Canon Remote Switch RS-60E3".
A wired remote control can be very useful when taking photos with the camera
mounted on a tripod, particularly with longer exposures, as it avoids
physically touching the camera, and possibly moving the camera while depressing the shutter
button.
I already have the RC-1
infrared wireless remote control, but also wanted a wired remote, to provide more
control over the shutter operation (ie, operate the auto-focus separately from the shutter),
particularly when using the camera on a tripod.
In those situations, the infrared
wireless remote control is not very convenient, as the infrared sensor is on the front
of the camera, thus making it difficult to use while physically standing behind the camera.
Numerous people have built their own remote controls, but all the designs that I have
seen use two separate momentary switches to control the auto-focus and shutter action - both
of which are handled by the single shutter button on the camera body itself.
Rather than have two separate buttons for activating the auto-focus and the shutter,
I wanted to reproduce the functionality
of the camera body shutter button, and have a single button, with a half-press controlling
the auto-focus, and a full-press controlling the shutter.
This page provides details on the construction of the wired remote control
that I built, and shows how a two-stage momentary switch was built, to
simulate the two-stage functionality of the camera shutter button.

completed remote
The completed remote (shown above) is compact, robust, and works very well, providing
the same functionality as Canon's RS-60E3 remote.
While building my own remote will not save you large sums of money (the RS-60E3 is relatively
cheap at approx AU$35), you will get the satisfaction of having built the remote myself,
and can customise the physical shape and size to suit your own requirements.
Wiring Details
The Canon EOS 350D DSLR camera has a 2.5mm stereo socket on its left side, immediately
adjacent to the USB socket.
This socket is designed to accept the plug for Canon's RS-60E3 remote control unit.

schematic for EOS remote control
SW1 and SW2 are momentary action switches, and SW3 is a DPST (double pole single throw) switch.
SW1 shorts out the sleeve and ring connections, resulting in the camera
auto focus (AF) being activated, while SW2 shorts out the sleeve and tip connections,
activating the shutter.
In other words, a half-press of the shutter button is equivalent to closing SW1,
while a full press of the shutter button is equivalent to closing SW1 and SW2
(or by closing SW3).
SW3 is designed to allow the shutter to be locked open when the camera is in BULB mode,
while SW1 and SW2 are designed for activating the shutter button remotely.
Two-Stage Momentary Switch
I couldn't find any readily available two-stage momentary action switches, and
set about building one, using two switches in tandem.
While having a look through my junk box, I found some micro switches
that were originally used as position sensors in some electromagnetic appliance
(I don't recall what they are from, but probably from an old printer or similar appliance).
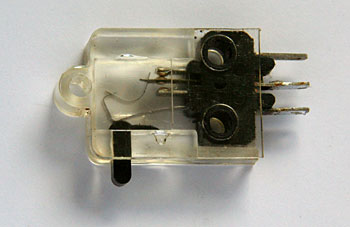
micro switch
These switches are reasonably compact, measuring 30x22mm, with a thickness of 7mm,
and have a nice "clicky" action due to the metal spring inside it,
thus providing good tactile feedback when depressing them.
After some trial and error, I found that by having two of these next to each other,
at slightly different angles, I could mimic the action of the shutter button,
with a partial button press resulting in one switch closing, and a full press
resulting in both switches closing.
Construction
As I couldn't find any suitable cases in my shed, I built a custom case using
some 1.5mm thick aluminium angle iron.
The two micro switches were attached to one side using a single nut and bolt.
A hole was drilled in the aluminium to facilitate a white plastic button
(scavenged from the front panel of a broken UPS some time ago), which depresses
the two micro switches.
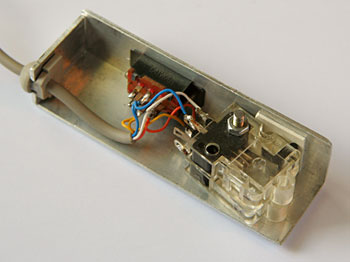
switches mounted inside one half of the case
The photo above shows the two micro switches mounted against the side
of the case, as well as the DPDT switch used to lock the shutter open.
The aluminium case consists of two identical halves, which fit together to
provide a strong case for the remote.
The width and height were determined by the micro switches, but
I specified the length at 80mm, simply because anything smaller wasn't comfortable
to hold in my (large) hands.
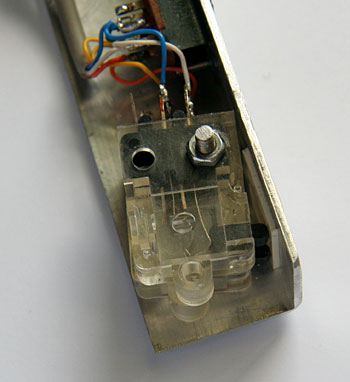
two switches mounted with different offsets
The two micro switches were mounted at slightly different angles,
as shown above.
This results in the top micro switch being closed when the button is partially depressed,
and both micro switches being closed when the button is fully depressed.
The single bolt through both micro switches allows the positioning of the
switches to be easily adjusted to provide the correct amount of travel of the button.
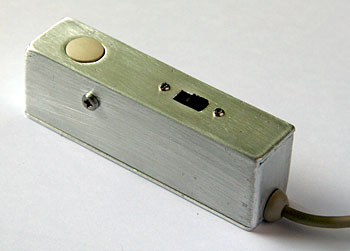
completed case
The width of the aluminium case is just large enough to allow the two
micro switches and a nut to be enclosed, with another nut on the outside
of the side of the case holding both sides of the case together.
The cable was created using the cord from an old Microsoft mouse, as it provided a robust
and flexible cable. The cable-entry grommet from the mouse end of the cable
was re-used, providing a robust cable entry point into the aluminium case.
The length of the cable is arbitrary, but I measured mine so that
when the camera is on my tripod, and the remote is plugged into the camera, and
hanging down towards the ground, the remote just doesn't reach the ground.
This ensures the remote won't hit the ground if I'm shooting outdoors,
and I drop the remote while it is tethered to the camera.
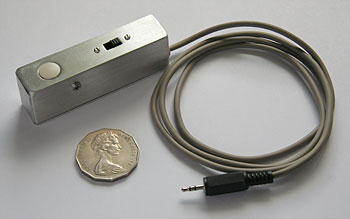
completed remote and cable
(with 50c piece for scale)
The 2.5mm stereo plug was the only component I had to purchase (AU$1.30), as everything else was
scavenged from various appliances and other devices.
I was intending to use a right-angle 2.5mm stereo plug, but that would have involved a
longer drive to another electronics shop. I may still source a right-angle plug
at a later date.
Canon's RS-60E3 remote has a 600mm long cable, but I decided to make mine a little longer,
at approx 1 metre.
Testing the Remote
Ensure SW3 is off, and using a multimeter to confirm that the remote is functioning correctly by
measuring continuity between the various contacts on the 2.5mm stereo plug
while depressing the remote's shutter button halfway down and fully down.
Similarly, confirm that SW3 shorts out the sleeve, ring and tip contacts.
Using the Remote
Always turn the camera off before inserting or removing the 2.5mm plug from the
camera, and ensure SW3 (the toggle switch) is off.
Once the remote is plugged in, turn the camera on,
and depress the remote's shutter button halfway down.
This should trigger the auto-focus, in exactly the same way as if you had pressed the
camera's shutter button half way down.
Fully depressing the remote's shutter button should cause the camera to take a photo.
For much longer exposures, put the camera into BULB mode, and SW3 can be used
to hold shutter open for as long as you want.
(To test, put the camera in BULB mode, lens cap on, lens set to manual focus,
and confirm the shutter opens when SW is turned on, and that the shutter closes
when SW3 is turned off.)
References
Other Homebrew Remotes
last updated 24 Mar 2026
|
|
|
|
|
|
|
|
|


