Creating a Backup Image of a PC
This page describes how to create a complete backup image of a PC,
with focus being given to imaging a Linux PC.
Background Information
There are many different ways to backup a PC.
An offline cold backup involves taking the PC offline, with an exact copy of the
contents of the HDD being made.
Cold backups are typically performed using some form of software to image
either the entire HDD, or each partition on the HDD.
Online backups (also known as a hot backup) involve making a backup of a PC without
interrupting its operation.
There are many methods for achieving this on a linux box, including
tar, rsync, etc.
A full backup refers to a complete backup, ie, everything is backed up.
Incremental backups involve only backing up the changes since the previous backup,
and can provide a very efficient method to repeatedly backup a PC without
creating an excessive volume of backups.
There is no single "correct" way to backup a PC - it's really a matter of
selecting the appropriate method that suits your requirements.
This page details the process required to create a complete backup image of a
PC, using freeware utilities.
While the example provided below involves imaging a linux PC, the same approach
can certainly be used to create a backup image of a Windows PC.
The partition table will be backed up, including information about any
extended partitions.
Then Partition Image will be used to create a compressed image of each partition, thus
consuming far less disk space than an uncompressed complete copy of
each partition (such as a partition copy created using dd).
Software Used
A bootable CDROM called System Rescue CD
is invaluable, as it contains all the tools and utilities required to manipulate partition tables,
format partitions, as well as saving a partition to an image file,
and restoring an image to a partition.
The following utilities on the System Rescue CD are particularly useful in the
context of imaging PCs:
- partimage
- Partition Image
- cfdisk
- Curses based disk partition table manipulator for Linux
- fdisk
- Partition table manipulator for Linux
- dd
- convert and copy a file
- sfdisk
- Partition table manipulator for Linux
Note that Partition Image provides functionality to image a partition to a file
on a local disk, but can also create image files on another server over the network,
providing you are running a partimage server on another PC.
This tutorial assumes image files are being created on a local disk.
Imaging the PC
HDD Names
Linux uses a very different naming convention than Windows for hard drives.
The hard drives are named after their physical connection.
Sample hard drive names are as follows:
|
/dev/hda
|
master device on primary IDE channel
| |
/dev/hdb
|
slave device on primary IDE channel
| |
/dev/hdc
|
master device on secondary IDE channel
| |
/dev/hdd
|
slave device on secondary IDE channel
| |
/dev/sda
|
first SCSI hard drive
| |
/dev/sdb
|
second SCSI hard drive
| |
...
|
|
Each partition on a HDD is named by appending a number
to the end of the HDD name, ie, /dev/hda1
is the first partition on /dev/hda,
which is the master device on the primary IDE channel.
For the purposes of this tutorial, a second HDD was added to a linux PC, to allow
partitions to be imaged to the second HDD.
The linux PC has the following devices:
|
/dev/hda
|
HDD being imaged
| |
/dev/hdc
|
target HDD onto which images will be written
| |
/dev/hdd
|
CDROM drive (containing SystemRescueCD)
|
Using the System Rescue CD
Boot the PC using the SystemRescueCD.
When prompted for a keymap selection, just hit "Enter" to use the default
speakup-us keymap
(or select another if it's more appropriate).
Once you have a root@sysresccd prompt, you're ready to get started.
Prepare Destination Drive
The destination HDD (in my case, this was /dev/hdc)
must be prepared to allow images to be written to it.
If this HDD already has a filesystem on it, and has sufficient space, then
there should be no need to re-partition it or re-format it.
Note that repartitioning the HDD will typically result in all data on it being lost.
I used cfdisk to create a single 4GB FAT32 partition on
/dev/hdc, and then formatted it using
mkdosfs -F 32 /dev/hdc1
A FAT32 filesystem was chosen, as it will allow this partition to be read if/when
the HDD is placed into a Windows PC.
If you prefer an ext3 filesystem, format it using mkfs.ext3 /dev/hdc1
after creating the partition.
Mount The Destination Drive
To be able to access any partition on the backup drive, it must be mounted.
First create a mount point:
mkdir /mnt/hdc1
Then mount the target partition using the mount point:
mount /dev/hdc1 /mnt/hdc1
Confirm the partition has been mounted and is available by running
df -h. The output should include a line for
the newly mounted partition, and should also show the amount of available
space on it, similar to this:
  Filesystem            Size  Used Avail Use% Mounted on
  ...
  /dev/hdc1             4.0G  4.0K  4.0G   1% /mnt/hdc1
The above output shows that the /dev/hdc1 partition is mounted
on /mnt/hdc1 and has approximately 4GB free space.
Review The Source HDD
The HDD being imaged (/dev/hda) has three partitions on it,
namely the root partition (/),
the /boot partition, and a swap partition.
Below is a screenshot showing the partitions on this HDD, as displayed
by cfdisk:
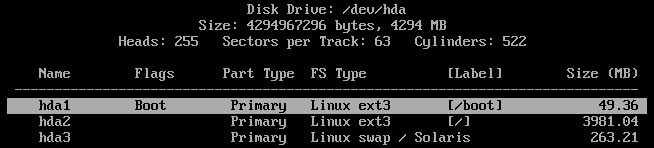
/dev/hda partition table displayed in cfdisk
Backup the Partition Table
To backup the partition table to a file, we can use dd as follows:
dd if=/dev/hda of=/mnt/hdc1/my-hda.mbr count=1 bs=512
Linux treats a filesystem or a partition as a file, and the syntax above
specifies the input file to be the /dev/hda partition,
and the output file is a file on our target HDD.
The other parameters specify that only a single block should be copied,
and we're forcing the filesize to be 512 bytes.
The output filename is arbitrary, so give it a suitable name that
indicates which HDD it relates to. A ".mbr" file extension
indicates it contains details relating to the master boot record.
Backup Extended Partition Information
If you have any extended partitions on the HDD being imaged, the details of the
extended partitions can be saved as follows:
sfdisk -d /dev/hda > /mnt/hdc1/my-hda.sf
This will dump the partition table contents into the file we specify,
in a format suitable for easily rebuilding the partition table.
Again, the output filename is arbitrary, so use a suitable filename.
Using Partition Image
To create an image of each partition, we can use Partition Image
(included on the System Rescue CD),
which can be started by running partimage from a command prompt.
Note that when Partition Image is running, you can still get to a command prompt
by hitting Alt-F2 to select virtual console #2 (there are six available virtual
consoles when booting with the System Rescue CD).
You can then revert back to the previous virtual console by hitting Alt-F1.
Backup Each Partition
In partimage,
select the partition to be imaged (ie, each partition on /dev/hda
except the swap partition), and specify a filename located on
the previously mounted HDD (ie, /dev/hdc1 mounted as
/mnt/hdc1).
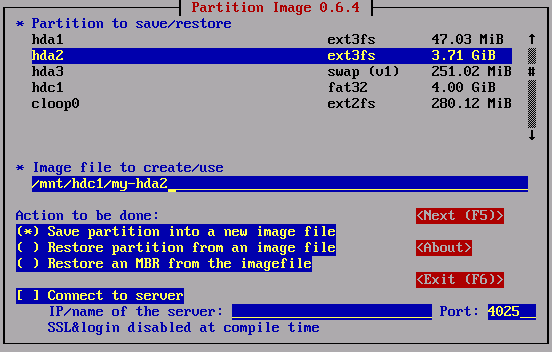
specifying the destination image file in partimage
After hitting F5, the next screen allows various options to be specified
to determine how the file will be created.
The compression options allow you to select between speed and filesize, and
you can also specify the maximum image filesize.
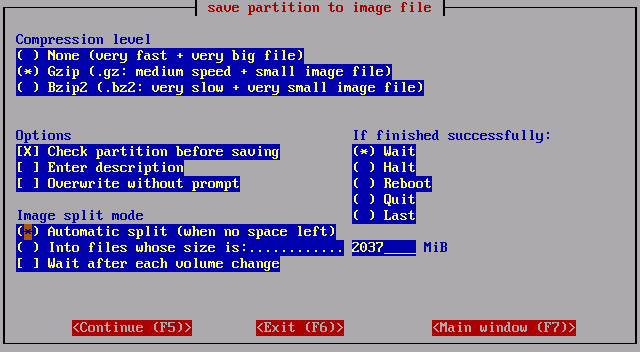
specifying filesize options in partimage
The next screen allows a description to be specified for the image
(assuming the "Enter Description" checkbox was left enabled on the previous screen).
If desired, enter a description, and hit the OK button to continue.
Note that this screen may take a little while to be displayed while
partimage examines the partition you've specified, particularly if
you leave the "Check partition before saving" option enabled.
The next screen shows information about the partition that is going to be imaged.
The screenshot below shows the details for the /boot
partition.

partition information in partimage
After hitting the "OK" button, the imaging process will begin, with
the progress being displayed on the screen.
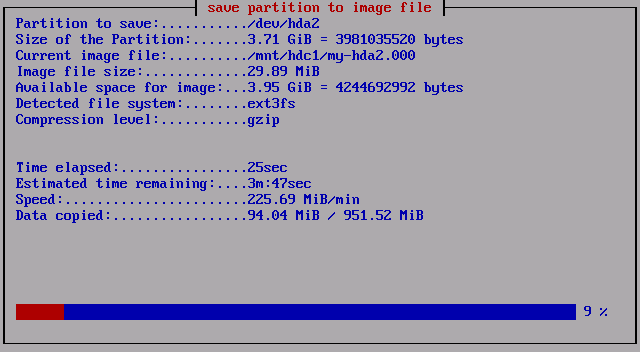
progress information in partimage
Once the process is complete, a confirmation dialog will be displayed.
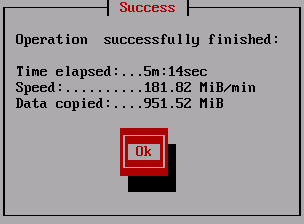
confirmation dialog in partimage
This process must be repeated for each additional partition on the
HDD, with a unique image file being specified for each.
As mentioned earlier, the swap partition cannot be imaged, but it can easily be re-created.
Storing image Files
The process described above will result in several files being created on
the destination HDD, namely one file for the partition table,
one for the extended partition information, and one file for each
partition which was imaged.
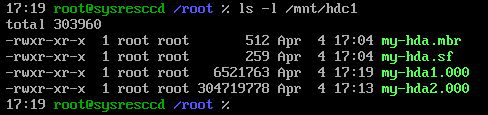
list of files which were created
From the above file list, we can see that the 3.7GB /dev/hda2
partition, which contained approximately 952MB of data, has been compressed into a
290MB (304719778 bytes) image file, and similarly for the /dev/hda1
partition.
Use of bzip2 compression would have resulted in an even smaller image file,
but the imaging process would have taken longer to complete.
The image and partition files should now be placed somewhere for safekeeping,
possibly being burnt onto some form of removable media (ie, cdrom or dvd).
Restoring From Images
Restoring from these images is just the reverse of the process described above,
with the System Rescue CD containing all the utilities required to do this:
- use dd to restore the partition table
(dd if=/mnt/hdc1/my-hda.mbr of=/dev/hda)
- use sfdisk to restore the extended partition information
(sfdisk /dev/hda < /mnt/hdc1/my-hda.sf)
- create swap structure on the swap partition (mkswap /dev/hda3)
- reboot
- restore each partition using Partition Image
last updated 10 Apr 2006
|

