|
Using Wireless Networking Antennas
(first published January 2012)
Over the years, I have received quite a few emails from people, asking how they need to connect a
biquad antenna,
collinear antenna
or some other antenna to their computer.
This page is designed to provide that information - to clarify just how these antennas are typically used.
Connecting an Antenna
You cannot connect an antenna directly to your computer's USB socket or ethernet socket.
You need a wireless radio to handle the 802.11b/g communications, and the antenna needs to be connected
to this radio.
In addition, the wireless radio also needs to be connected to your computer, to allow your computer
to send and receive network traffic through the wireless radio.
Many wireless radios have built-in antennas or factory-attached antennas, typically low-gain rubber ducky antennas.
In some cases, factory-attached can be removed, allowing you to connect a larger, higher-gain antenna to the
antenna socket.
You cannot use an external antenna with a wireless radio that has non-removable antennas, unless you want to open up
the wireless radio and start hacking it with a soldering iron!
(If you are looking for a slight improvement in performance with the default rubber ducky antennas,
then a parabolic reflector behind the rubber ducky
may be sufficient.)
Pigtails
To connect an external antenna to a wireless radio, an appropriate adapter cable is also required.
These cables are typically referred to as "pigtails", and many types are available.
Get a short pigtail, as they are typically made from thin coax that has a relatively high attenuation (ie, loss).
You will need to get a pigtail with a suitable connector to suit the socket on your wireless radio,
and the other connector on the pigtail needs to suit the one on your antenna.
If you want to locate the antenna further away from the wireless radio,
low-loss coax (such as CFD-400 / CNT-400) is recommended, to ensure you do not lose too much signal in cable losses.
Connecting to your Computer
The wireless radio also needs to be connected to your computer.
This is typically done via an ethernet cable.
For example, the UltraWAP shown in the images below has a single ethernet socket on it, allowing it to be connected
to a single computer, or to an ethernet switch.
The PCMCIA card shown below needs to be plugged into the PCMCIA socket typically found on laptops.
Example Usage Scenarios
The image below show the components needed to connect a biquad antenna to an
UltraWAP 802.11b/g wireless AP/bridge.
The biquad has a female N connector on the end of its short length of coax, and the UltraWAP has a removable
rubber ducky antenna
connected to an rpSMA socket.
An rpSMA to male N connector pigtail
is required, and the factory rubber ducky antenna
needs to be removed to allow the pigtail to be connected.

using a biquad with an UltraWAP wireless AP / bridge
The image below shows a biquad antenna connected to the UltraWAP.

using a biquad with an UltraWAP wireless AP / bridge
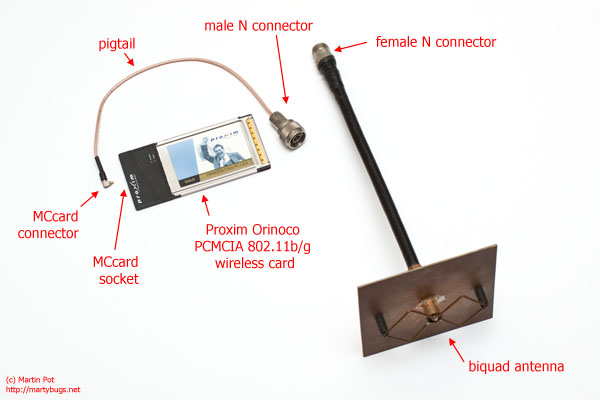
Another option is to use a PCMCIA wireless card.
The image below shows the components required to connect a biquad antenna to a
Proxim/Orinoco 802.11b/g wireless PCMCIA card.
Many wireless PCMCIA cards use an MCcard socket, and when a cable is plugged into it, the internal antenna in the card is disabled.
An MCcard to male N connector pigtail
is required to connect the biquad antenna to this particular card.
using a biquad with a PCMCIA wireless card
The image below shows the biquad antenna connected to the Proxim/Orinoco PCMCIA card.

using a biquad with a PCMCIA wireless card
Credits
All photos are copyright Martin.
last updated 24 Mar 2026
|
|


