|
|
|
|
|
|
Custom Polyurethane Engine Mount
This page describes the creation of a custom polyurethane engine mount for a Nissan U12 Pintara,
as a replacement for rubber engine mounts with a short lifespan.
Introduction
Rather than regularly replacing the rear rubber engine mount on my U12 Pintara,
I decided to go down the homebrew path, and had an engine mount cast in polyurethane.
Breaking Mounts
In the 7 years that I have owned my U12 Pintara,
I have replaced the rear engine mount about five times.
The rear mount has most of the engine weight resting on it, and tends to
absorb most of the engine movement during acceleration and braking
(the U12 has a transverse engine, and thus the engine tends to "rock" from
front to rear during braking and acceleration).

broken engine mount
I sourced the first replacement mount from Nissan, at a cost of approximately
AU$115. About a year later, the same mount was over AU$200 from Nissan, and
cheaper non-genuine mounts were very hard to find.

another view of a broken engine mount
Typically, when the rubber of the engine mount starts tearing and collapsing,
it can result in the mount resting on the lower cross-member, resulting in a lot
of engine vibrations being transmitted into the chassis.
A broken rear mount also results in a lot of engine movement, particularly during
acceleration and braking.
It can also cause excessive wheel hop, particularly in front-wheel drive cars.

yet another broken engine mount
Apparently it's a common problem, and I have heard from numerous other people
that they have had similar issues with their U12s.
Alternatives
After-market engine mounts made of polyurethane are available for some cars,
but I was unable to find anything specifically for the U12 Pintara.
I found some discussions on the
ANTRX forums about custom
polyurethane engine mounts, and found some webpages from other people who had done similar things,
and decided to give it a try.
Custom Mounts
You'll need to find a workshop that does custom polyurethane casting,
and they should be able to cast a new mount relatively cheaply.
My custom mount was cast by Peter at
Advanced Polymer Technology,
for AU$60, and I got the mount back within a week.
Advanced Polymer Technology is located in Armadale, approximately 25km south of Perth,
in Western Australia, a convenient 10 minute drive from my house.
Advanced Polymer Technology provide polyurethane linings and products for various industries,
and also can do custom polyurethane parts, including engine mounts.
Note that you'll need a spare engine mount, as it'll typically take a few days to get
a mount cast in polyurethane.
Alternatively, you'll need to have your U12 off the road for a week or so, while
the mount is being cast.
Another option is to source another mount from your local wreckers, and get it
cast in polyurethane.
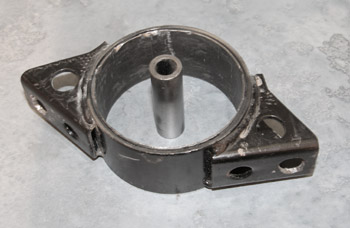
mount with rubber removed
The first step is to remove the mount from the car, and strip all the rubber out of it,
just leaving the outer ring, and the centre pin.
I used a sharp wood chisel to remove the bulk of the rubber, and then used
a rotary wire brush in a drill to clean up the centre pin, and some carving drill bits
to remove the remaining rubber from the outer ring.
Peter welded a washer to the middle of the centre pin, to ensure it would not move sideways
in the mount once it was re-cast with polyurethane.
After a brief discussion with Peter, it was decided to use 70 Shore A hardness polyurethane.

newly cast polyurethane mount
Installing the Mount
Installation of the mount is the reversal of removing it.
I find it easier to remove the mount by removing the entire lower cross-member, while
supporting the engine weight with a jack.
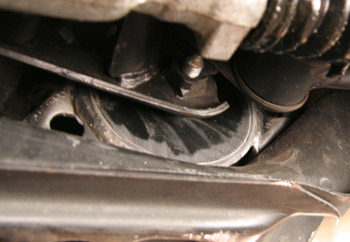
polyurethane mount installed
Due to the location of the installed mount, I found it rather difficult to take a decent
photo of the new mount, and the above photo is the best I could manage.
Initial Impressions
With the new mount installed, it was immediately obvious that there was far less engine movement.
Bear in mind that immediately prior to installing the polyurethane mount, I had been driving
around for several months with a mount that was very damaged, and thus allowed significant
engine movement forwards and backwards.
Overall impressions of the polyurethane mount are very positive, with the driving experience
significantly improved due to the vastly reduced engine movement, which results
in a lot less driveline lash.
This is particularly noticeable when
accelerating and braking, and is also noticeable through the movement of the gearstick.
However, due to the relatively hard grade of polyurethane (70 Shore A), some engine vibrations
are transmitted into the chassis.
This is particularly noticeable when starting the car, or when moving off from a standstill if
you allow the revs to drop a little too low.
Bear in mind that the engine vibrations when driving with a broken mount were often much worse,
as the engine would be resting on top of the cross-member, without the mount providing any damping
of the vibrations at all.
The vibrations were particularly noticeable at idle, with the air conditioner on, and would
result in the entire car shaking.
A Softer Polyurethane
The first mount was 70 Shore A hardness, and was quite hard,
with a hard finger press into the side of the polyurethane resulting in negligible movement.
Not only that, but the original rubber mount is not a solid mount, but has some cutouts on the sides
to provide more damping, at the expense of additional movement.
In an effort to reduce the engine vibrations, I had another mount cast in a softer grade
of polyurethane, namely 65 Shore A hardness.
This was noticeably softer, with the polyurethane yielding somewhat when being pressed with
my fingers.
At the recommendation of Peter (from Advanced Polymer Technology), I also drilled several 10mm
diameter holes through the mount, to allow for further flexibility in the engine mount.

polyurethane mount with drilled holes
After installing this softer mount, the engine vibrations were significantly reduced,
while still providing the benefits of reduced engine movement.
Conclusion
Even though it took two attempts (at AU$60 each), it has certainly been a worthwhile effort
to get an engine mount cast in polyurethane, as the total cost is still less than the
AU$200+ for a genuine rubber mount from Nissan, and the polyurethane mount should last a lot longer
than any rubber mount.
The polyurethane mount has significantly reduced engine movement, while still insulating
the chassis from the engine vibrations.
Front-wheel drive cars can be prone to wheel hop, but reducing the engine and gearbox
movement with a stiffer engine mount also helps to reduce the wheel hop.
References
Other Custom Polyurethane Engine Mounts
last updated 3 Oct 2012
|
|
|
|
|
|
|
|
|

