discussion, gear, and photography journal
Selling Unedited Images and Out-Sourcing Post-Processing

Selling Unedited Images?

Digital Photography School posted an article some time ago by Elizabeth Halford titled Should we ever sell raw, unedited images? The article compared the raw unedited images to food ingredients, and editing the photos (aka post-processing) is equivalent to using the food ingredients to cook a meal.
A more recent post on DIY Photography by Caleb Kerr provides similar arguments for not wanting to provide raw unedited photos.

I whole-heartedly agree with the argument that Elizabeth presents in that article, and would never provide raw unedited photos to a client, as the processing of the images is an important part of the photography process for myself as the photographer, and allows me to ensure the resulting photos look the way I want them to look.


Samples - Unedited vs Edited

Here are some examples of unedited photos (straight out of the camera) vs the edited version.
I've selected a variety of photos from the last few years - and many are from a mission trip to West Timor last year.

West Timor team photo
Editing JPGs in Adobe Camera Raw

Introduction

If you're a Photoshop user, you should be familiar with using Adobe Camera Raw (ACR) to edit your RAW images. Did you know that you can also use ACR to edit JPG files and other image formats? THis allows you to still use ACR for the intial post processing of images for which you don't have a RAW version, such as photos taken with your phone camera.


Using Adobe Camera Raw for Editing RAW Images

I use Adobe Photoshop CS6 for editing and post-processing my photos, with all initial adjustments being done in Adobe Camera Raw 9.1.1, and additional editing before opening the photo in Photoshop. There is plenty of information on the web about the benefits of shooting RAW with your camera, so I won't detail that here - but the key benefits relate to the additional information available in the RAW image that can be leveraged by ACR to allow easy recovery from under or over exposure, correction of white balance, and much more.


No RAW Image? Edit the JPG in ACR

Sometimes you won't have a RAW image available - for example, when you want to post-process a photo taken with your phone. Remember that the best camera is the one that's with you - and most people have their phone in their pocket all the time.

Many people do not realise that you can edit JPG and other image formats in Adobe Camera Raw too. Opening a RAW image in ACR is just a matter of double-clicking it in Windows Explorer - but how do you open a JPG or TIFF image in ACR? Double-clicking it in Windows Explorer will open it in the default image viewer, and opening it in Photoshop will bypass ACR.

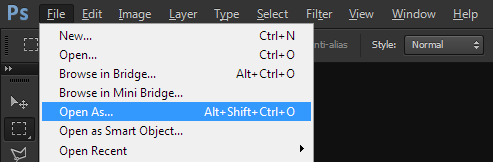
To open a JPG or TIFF image in ACR:
  • open Photoshop
  • File -> Open As
  • select image file
  • change "Open As" to "Camera Raw"
  • click "Open" to open file
  • use ACR for initial post-processing
  • click "Open Image" to open in Photoshop
  • complete the rest of your post-processing in Photoshop
File -> Open As menu item in Photoshop CS6

file dialog in Photoshop CS6


Limitations

Opening a JPG or TIFF image in ACR doesn't magically give you a lot more detail or the ability to recover many stops of over or under exposure, as a JPG or TIFF image doesn't have sufficient information in it. However, you can still benefit from the adjustments available in ACR to do your initial post-processing.

Not all the functionality of ACR is available when opening a JPG file, such as the following:
  • white balance presets not available (only Custom, As Shot, Auto)
  • picture styles
  • colour profile
  • only open a single file at a time

Alternative Ways to Open JPGs in ACR

It is possible to configure Photoshop's default behaviour to open all JPG and TIFF files in ACR if that's what you want. See here for details on changing Photoshop's default behaviour.
In newer versions of photoshop, you can open a JPG or TIFF image, and then apply ACR as a filter, as detailed here.
levitating

Some time ago I posted some photos showing myself and kids levitating in the back yard.
Due to the interest generated by those photos, I decided to create this tutorial to describe how you can achieve similar results using Photoshop.

Note that this tutorial assumes the use of Photoshop CS4. Some steps may be slightly different in other versions of Photoshop.
Similar results can also be achieved using most other image editing packages.
Faking Tilt-Shift - a Tutorial for Realistic Miniaturised Photos

Digital tilt-shift effects can be digitally applied to a photo, to give it the appearance of being a miniature model. I've previously blogged a tilt-shift photo of South Perth.

The photo below shows a ferry heading into South Perth, with the Perth city skyline in the background, and has been digitally tilt-shifted using the advanced technique described below (click image for a larger version).

ferry approaching South Perth
South Perth, Western Australia
Canon EOS 350D, 70-200mm f/4L @70mm, 1/500 sec, f/8, ISO100

This blog entry provides details on how to easily apply a basic tilt-shift effect to a photo, as well as details on a more advanced technique (using Photoshop CS2) that provides more realistic-looking miniaturised tilt-shift photos.
learn more about your camera and how to use it
making photo books? save with Blurb discount coupons
Blurb
[ MartyBugs home | blog | about this site | copyright | disclaimer | privacy | appreciation | contact details | site map ]
web by mpot.  all content and images are copyright © 2001-2025 .
all rights reserved.  unauthorised duplication, reproduction or distribution is prohibited.
martybugs.net