posted Sunday, 15 February 2009, 19:32 (+0800), by Martin
There is something nice about the retro look of a Polaroid photo,
and using the free Poladroid application, you can easily re-create the nostalgic
look of Polaroid photos, complete with scratches and fingerprints.
While similar results can be achieved in Photoshop or another image editing package, the free Poladroid application provides a very easy way to produce consistent results with minimal effort.
Here are some examples of the Polaroid-looking images generated by the Poladroid application:
The Poladroid website claims Poladroid is "The easiest and funniest Polaroid(tm) Image Maker", and after trying it out, I have to agree that it's certainly very easy to use.
Poladroid is available for both Mac OS X and Windows XP or later. When I first heard about Poladroid several months ago, it was only available for the Mac OS. The Windows version is a more recent development.
At the time of writing, the latest version available, 0.9.5r5b, was still a beta version. That's the version used to create the sample Polaroid photos shown in this post.
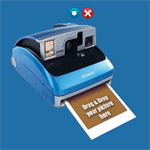
To create your own Polaroids using Poladroid, download the application and install it. When you run it, you'll see a window that looks like a Polaroid camera.
Just drag and drop one or more photos onto the Poladroid application to start processing.
Each developing Polaroid shows up as a separate window, and just like the real Polaroid photos, they take a few minutes to develop (I timed it at 3 minutes and 30 seconds).

Once the image has finished developing, a red bow is displayed at the bottom right of that image, and the final result is saved to your "My Pictures" directory (the default location can be specified in the Poladroid configuration).
You don't have to wait for the first photo to finish developing before starting another - just drag another photo onto the Poladroid application window, and it'll process multiple photos at the same time.
Note that you can only process 10 photos per session, and you will need to restart the application to reset the counter. This is designed to mimic a real Polaroid camera with a 10-photo cartridge. However, I found this limitation unnecessary and annoying.
The original image is cropped almost square by Poladroid, and you're unable to specify which parts of the image are cropped, as Poladroid always crops equal amounts off each side (or top/bottom for images in portrait orientation). If this is an issue, then it's easy enough to crop the image square prior to processing it with Poladroid.
The user-adjustable options in Poladroid are accessible by clicking the blue and white circle that's displayed just above the Polaroid image, and selecting "Settings" from the context menu.
There are very few configurable options to influence the output of Poladroid. The amount of vignetting can be adjusted, and you can also optionally turn on "stripes" either on the photo, and/or on the paper. The "stripes" option will apply scratches and fingerprints to random locations on the resulting image, to add additional authenticity and realism.
The default destination directory can be changed through the Poladroid configuration options, the cute sound effects can be disabled, and you can adjust the amount of rotation used for the thumbnails during processing (although this has no effect on the resulting output images).
The Poladroid application introduces some random colour effects to provide realistic-looking Polaroid photos. Processing the same original photo multiple times in Poladroid will provide different results due to the randomness of the colours.
After processing the same photo numerous times in Poladroid, it seems that there are about seven possible colour variations, as shown below.


This means that if you're not happy with the initial results from Poladroid (not all colour schemes suit every photo), try re-processing the same original photo in Poladroid again, until you end up with a colour scheme that you're happy with.
Here are some more examples of what you can achieve with the Poladroid application:
While similar results can be achieved in Photoshop or another image editing package, the free Poladroid application provides a very easy way to produce consistent results with minimal effort.
Some Example Polaroids
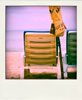
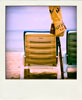
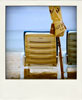
Here are some examples of the Polaroid-looking images generated by the Poladroid application:

storm clouds over the Royal Perth Yacht Club
|
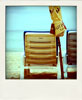
beach chair
|
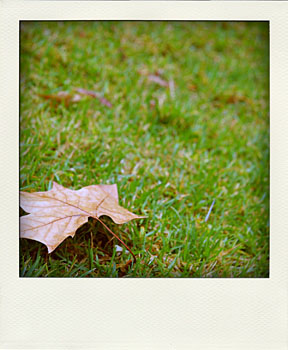
lonely autumn leaf
|
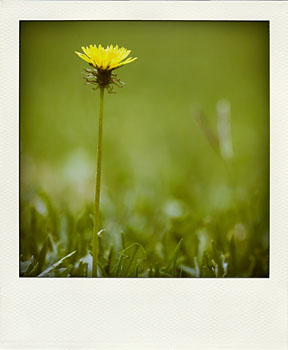
Taraxacum flower
|
The Poladroid Application
The Poladroid website claims Poladroid is "The easiest and funniest Polaroid(tm) Image Maker", and after trying it out, I have to agree that it's certainly very easy to use.
Poladroid is available for both Mac OS X and Windows XP or later. When I first heard about Poladroid several months ago, it was only available for the Mac OS. The Windows version is a more recent development.
At the time of writing, the latest version available, 0.9.5r5b, was still a beta version. That's the version used to create the sample Polaroid photos shown in this post.
Using the Poladroid Application To Create Your Own Polaroids
To create your own Polaroids using Poladroid, download the application and install it. When you run it, you'll see a window that looks like a Polaroid camera.
Poladroid application
Just drag and drop one or more photos onto the Poladroid application to start processing.
Each developing Polaroid shows up as a separate window, and just like the real Polaroid photos, they take a few minutes to develop (I timed it at 3 minutes and 30 seconds).
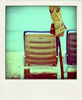
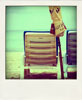
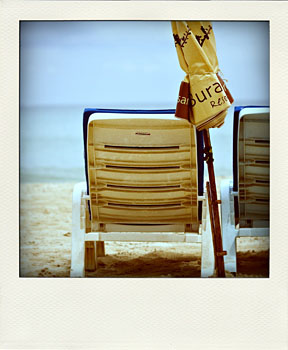
developed Polaroid at left, centre and right show Polaroids at various stages of developing
Once the image has finished developing, a red bow is displayed at the bottom right of that image, and the final result is saved to your "My Pictures" directory (the default location can be specified in the Poladroid configuration).
You don't have to wait for the first photo to finish developing before starting another - just drag another photo onto the Poladroid application window, and it'll process multiple photos at the same time.
Note that you can only process 10 photos per session, and you will need to restart the application to reset the counter. This is designed to mimic a real Polaroid camera with a 10-photo cartridge. However, I found this limitation unnecessary and annoying.
The original image is cropped almost square by Poladroid, and you're unable to specify which parts of the image are cropped, as Poladroid always crops equal amounts off each side (or top/bottom for images in portrait orientation). If this is an issue, then it's easy enough to crop the image square prior to processing it with Poladroid.
Configurable Options
The user-adjustable options in Poladroid are accessible by clicking the blue and white circle that's displayed just above the Polaroid image, and selecting "Settings" from the context menu.
There are very few configurable options to influence the output of Poladroid. The amount of vignetting can be adjusted, and you can also optionally turn on "stripes" either on the photo, and/or on the paper. The "stripes" option will apply scratches and fingerprints to random locations on the resulting image, to add additional authenticity and realism.
The default destination directory can be changed through the Poladroid configuration options, the cute sound effects can be disabled, and you can adjust the amount of rotation used for the thumbnails during processing (although this has no effect on the resulting output images).
Colour Variations
The Poladroid application introduces some random colour effects to provide realistic-looking Polaroid photos. Processing the same original photo multiple times in Poladroid will provide different results due to the randomness of the colours.
After processing the same photo numerous times in Poladroid, it seems that there are about seven possible colour variations, as shown below.
original image
seven colour variations
This means that if you're not happy with the initial results from Poladroid (not all colour schemes suit every photo), try re-processing the same original photo in Poladroid again, until you end up with a colour scheme that you're happy with.
Some More Examples
Here are some more examples of what you can achieve with the Poladroid application:

sunset through the dune grass
|

ant exploring flowers
|

leaving dust in my wake
|

dirty car
|


I'm just wondering... whose fingerprints does it leave on the output image?