|
posted Thursday, 06 December 2012, 20:58 (+0800), by Martin
Tracking Memory Cards
When you are on a photoshoot, juggling multiple memory cards for your cameras, you need to be able to
quickly and easily identify which memory cards have already been used and are full, and which memory
cards are still empty and ready to be used.
You do not want to have to try each memory card in your camera, to see if it already has photos on it.
An Easy Solution
I have been using a quick and easy solution for the last few years
that allows me to instantly see if a memory card has been used, or if it is empty.
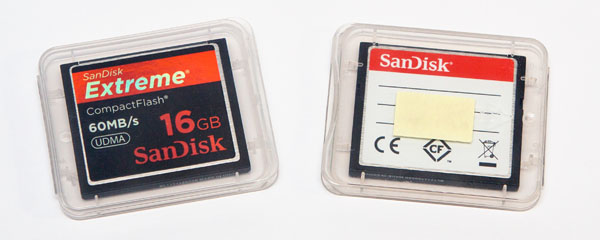
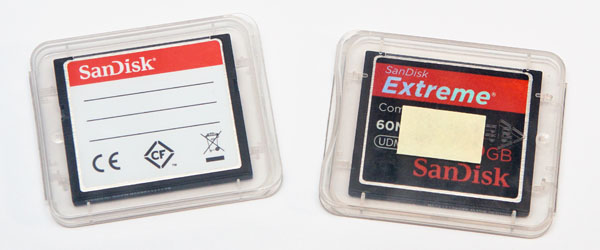
I cut up the sticky part of a post-it note, and stick one piece on the inside
of the compact flash memory card cases.
When putting a memory card into a case, facing the front of the card towards the
post-it note label indicates the card is full, and facing the back of the card towards
the post-it note label indicates the card is empty.
This method allows me to easily identify which memory cards are full, and which memory cards are empty,
just by looking at the case.
Have a look at the photos below to see how it works.
two empty memory cards in their cases
(front of memory cards facing AWAY from the label)
two full memory cards in their cases
(front of memory cards facing TOWARDS from the label)
posted Saturday, 08 October 2011, 16:05 (+0800), by Martin
Wrist Strap
I have been using a DIY wrist strap on my camera for the last couple of months, and
I am finding that it works very well for me.
When on a photowalk or a photo shoot, I wasn't using the camera's neck strap,
and typically just would let it hang down, getting in the way.
This wrist strap allows me to completely remove the neck strap, provides
some security against dropping the camera, and adds some wrist support when holding the camera
up to my eye.
I have used it on a couple of photo shoots and a photowalk, and am not missing the neck strap at all.
The problem with many of the commercial hand/wrist straps is that the top normally attaches to the strap mount,
while the bottom attaches to the tripod mount underneath the camera.
Because I don't use a battery grip, such a strap would be too small for my large hands,
and it could potentially foul the tripod mount.
This DIY camera wrist strap only attaches to the top strap mount on the camera body,
and is adjustable to fit any size wrist and hand.
It allows me to leave my tripod quick-release plate screwed onto the base of the camera body,
and I can clip the camera onto my home-made rapid strap without having to remove the wrist strap
from the camera.
Credit
I first saw this DIY camera wrist strap
here
on Jan Christian's blog.
While Jan used red paracord for his strap (which works well with the red strip on some Canon L lenses),
I decided to use a more subtle black paracord for my wrist strap.
Making Your Own Wrist Strap
Jan specifies 550lb 7-core paracord,
which can easily be sourced on eBay or elsewhere on the internet.
The ends of an appropriate length of paracord (approx 60-70cm) are tied with a
lanyard knot.
The strap is then looped through the top right
strap mount on the camera body using a simple
lark's head knot.
As it will probably be a tight fit through the strap mount on the camera,
use one of the inner strands of paracord to help pull it through.

pull the strap through the strap mount
| |
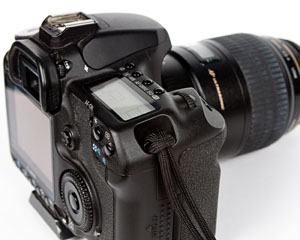
lark's head knot on the camera
|
The length of the strap can then be adjusted to suit your wrist size
by moving the lanyard knot.
As Jan says,
you need to adjust it to find the
"sweet spot where there's a little tension on the strap but enough slack so
that you can still manipulate the buttons on the camera".
Once suitably adjusted, cut any excess off the ends, and melt them to prevent fraying.
If necessary, the strap can easily be removed from your camera at any time, without
having to undo the lanyard knot.
the finished product
| |

using the strap
|
If any locals who know me personally are interested in trying one of these wrist straps,
I have plenty of black paracord, as 30 metres was the shortest length I could find on
eBay at the time!
posted Saturday, 12 September 2009, 12:10 (+0800), by Martin

Canon 430EX mounted on a clamp,
triggered remotely by a Canon 580EX
Last month, I described how you can make a
cheap flash clamp
for holding a remote flash, using cheap clamps and a 1/4" bolt, available from your local hardware
for a few dollars (as per the photo on the right).
However, with the full weight of a flash attached to the end of the clamp handle,
particularly if the flash is mounted on top of a wireless trigger,
the clamp and flash isn't particularly stable.
To improve the stability of the flash clamp, another 1/4" bolt can be added to the
clamp, much closer to the jaws of the clamp.
Mounting a flash on this bolt closer to the clamp jaws provides a more stable solution,
as the majority of the weight is now attached to the clamp much closer to the jaws.
If using wireless triggers to trigger the flash, the flash can be attached to the trigger's
hot-shoe, and the trigger then attached to this new bolt on the clamp.
Alternatively, the wireless trigger could be attached to the bolt on the end of the clamp handle,
and a PC sync cable can then be used to connect the trigger to the flash, as shown in the photo below.

improved version of the cheap flash clamp for holding a remote flash,
with a Canon 580EX II being triggered by a Phottix Tetra wireless flash trigger
posted Wednesday, 12 August 2009, 19:53 (+0800), by Martin
Canon 430EX mounted on a clamp,
triggered remotely by a Canon 580EX
A large clamp provides a very flexible method for mounting a flash,
and certainly won't break the bank!
Using a large plastic clamp from my local hardware store, along with a 1/4" bolt, a nut, and a wing nut,
I made this flash clamp in just a few minutes, and it only cost me a few dollars.
The built-in flash on most cameras is quite limiting, and a dedicated flash can provide
a lot more flexibility and control of the lighting.
However, moving the dedicated flash off the camera hot-shoe, and having it
remote from the camera provides a whole new range of lighting options.
The popularity of David Hobby's Strobist blog,
where he provides lots of useful information about flash photography, particularly
off-camera flash photography, confirms that lots of people are getting interested in it.
Assuming you already have a flash unit, you need some way to trigger the flash
remotely from your camera.
I have a set of the cheap
Cactus wireless flash triggers
(from Gadget Infinity),
as well as a set of Phottix Tetra wireless flash triggers.
Instead of using wireless flash triggers, I can also use the built-in infrared communications capabilities in Canon flashes,
and mount a Canon 580EX flash on my camera, and use it to remotely trigger a Canon 430EX or 580EX flash.
As you won't always have the luxury of a voice-activated light stand (ie, a person to hold the flash),
you'll often need some way of mounting the remote flash, and you may not (yet) have
purpose-built light stands in your camera bag.
I came across these plastic clamps at my local hardware, and they were less than AUD$2 each.
The handles of the clamp already had a small hole, which I drilled out to fit the 1/4" bolt.
After inserting the bolt from the inside of the handle, the nut was firmly tightened to hold the
bolt in place.
posted Tuesday, 31 March 2009, 22:16 (+0800), by Martin
I've previously written about how you should
Tag Your Camera
by adding a cheap pet tag containing your contact details.
If your camera is ever mis-placed, or stolen and discarded,
with your contact details attached to it, you have a chance of
getting your camera back.
That blog post continues to be particularly popular, so I thought
I'd do a followup post.
I've found a source of cheap pet tags, so there's definitely no excuse
for not having a pet tag on your camera!
The tag shown in my previous post
was a computer-engraved tag, and I wasn't particularly happy with it,
as the engraving wasn't very deep, making it a little difficult to read,
and I suspect it'll get worse when the tag has some scratches from wear-and-tear.
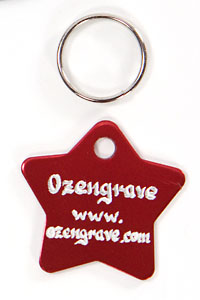
Egon from
Ozengrave, located in Queensland, Australia,
sells hand-engraved annodised aluminium pet tags for just AUD$5.95 each,
with free postage to anywhere in Australia.
Postage overseas is just AUD$3.
Ozengrave
provides a choice of over 40 shapes, ranging from a circle, heart, star and more,
with most shapes available in a choice of sizes and colours.
posted Saturday, 20 December 2008, 20:45 (+0800), by Martin
After seeing this great idea
Rich Legg's blog
a few months ago, I recently headed down to my local pet shop,
and had a pet tag engraved with my contact details, for my camera.
It has my website address on one side, and my name and mobile phone number on the other side.
The photo below shows the tag on the strap of my Canon 50D. It's securely attached,
and is located so that it won't get in the way.

add a name tag to your camera
This is the smallest tag that they had available (22mm diameter), and coloured tags are also an option,
as well as various assorted shapes.
The coloured tags appear to be annodised aluminium, and the engraving would
be a little more readable on the coloured tags, as it would expose
the bright aluminium underneath the colour.
The tags are computer-engraved, and you can choose the font, as well as select a clip-art
if desired.
The cost was just AUD$11.95, and it took only a few minutes to enter my details into the computer
and get it engraved.
Tagging your camera in this way ensures your contact details are permanently attached to the camera,
and I hope anyone who ever finds my camera, if it goes missing, is honest enough to contact me ;-)
posted Monday, 24 March 2008, 17:00 (+0800), by Martin
For anyone who has a set of extension tubes, here's a cheap and easy way to
protect them in your camera bag.
Just slide the extension tubes into a neoprene stubby/can holder.
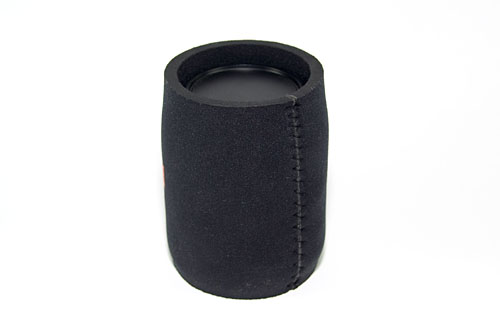
extension tubes securely protected inside a stubby holder
The thick neoprene provides a very thick and robust holder, protecting your
extension tubes from getting scratched in your camera bag.
A stubby holder is also significantly cheaper than a lens case designed specifically
for photographic gear, particularly if you can get the stubby holders for nothing,
as many companies give stubby holders away as promotional items, or alternatively, they
can be purchased cheaply at many retail outlets as souvenir items.
|
|