posted Monday, 26 July 2010, 19:50 (+0800), by Martin

Introduction
This is the first article in a series that I am writing as I teach camera basics and camera operation to my children, in particular to my 11 year old son who wants to buy his first DSLR. My children have been using cameras for a while (with some good results), but typically use full-auto mode, or rely on me to adjust the settings for them.
I thought it would be worthwhile to write a series of blog posts on this subject, to help other people who might be interested, and because one of the best ways to ensure you understand something is to try to explain it to others.
Exposure Defined
The exposure of a photo determines how dark or light a photo will be when it is captured by your camera's sensor (or film, if you are old-school).
There are three factors that affect the exposure of a photo: I'll briefly describe each of these (more detail on each in future blog posts), and how they work together to determine the exposure.
Aperture
The simplest way to describe aperture is to say that the aperture is the size of the hole in the camera lens through which light enters when taking a photo.
The table below summarises the effect of aperture:
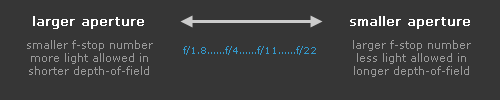
impact of varying the aperture
Shutter Speed
The shutter speed is the length of time that the camera's shutter is open, ie, how long the camera's sensor is exposed to light through the lens.
The impact of varying the shutter speed is shown in the table below:

impact of varying the shutter speed
When hand-holding a camera, you should typically keep your shutter speed at approximately 1/focal-length to minimise blur caused by camera shake. That means if you are using a lens with a focal length of 100mm, you should keep your shutter speed at least 1/100 seconds or less.
(Note that I am ignoring crop factors and their effect on field-of-view and effective focal length for now, but will revisit it in a future blog post.)
ISO
With film cameras, the ISO specifies the sensitivity of the film to light, while with digital cameras, it specifies the sensitivity setting for the camera.
Refer to the table below to see the impact of increasing or decreasing the ISO:
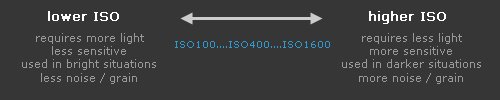
impact of varying the ISO
Interaction Between Aperture, Shutter Speed and ISO
Aperture, shutter speed and ISO all affect the exposure of a photo.
Assuming the ISO is not changed, to achieve the same exposure while varying the aperture:
- increasing the aperture one stop (ie, open up the aperture) means you need to increase the shutter speed by one stop (ie, use a shorter shutter duration)
- decreasing the aperture one stop (ie, stop down) means you need to decrease the shutter speed by one stop (ie, use a longer shutter duration)
- increasing the shutter speed by one stop (ie, use a shorter shutter duration) means you need to open up the aperture by one stop
- decreasing the shutter speed by one stop (ie, use a longer shutter duration) means you need to stop down the aperture by one stop
Exposure Analogy
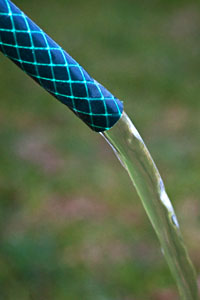
There are a number of analogies that are often used when explaining the concept of exposure. One such analogy is a garden hose, where:
- the diameter of the hose is the aperture
- the length of time that the hose is left running is the shutter speed
- the water pressure (which determines the speed of water through the hose) is the ISO
Next Steps
I am intending to write further blog posts about aperture, shutter speed, ISO, and other concepts in the future, as I continue this series on photography basics.
Be sure to subscribe to ensure you don't miss out on any future posts.


Excellent - I will be taking note of future tutorials.