|
posted Sunday, 30 June 2019, 13:10 (+0800), by Martin

darter in front of the Crawley Edge Boatshed
Crawley, Western Australia, 2008-01-03
Canon EOS 350D, 10-22mm @22mm, 1/125 sec, f/4.5, ISO200
The Crawley Edge Boatshed is apparently one of the most photographed locations in Perth,
and it has recently been getting more media attention, as it is now also
one of the most popular selfie locations around Perth
(ref:
abc.net.au,
theconversation.com).
As a result of its popularity, the City of Perth is intending to spend AUD$400,000 on public toilets
in the near vicinity of the boatshed
(ref:
thewest.com.au,
PerthNow.com.au,
news.com.au).
I have photographed the boatshed multiple times, including:
- photowalk on 3 January 2008 (photos)
- photowalk on 14 November 2008 (photos,
blog post)
- photowalk on 16 July 2011 (photos)
- wedding on 1 October 2011 (photo)
- photo walk on 19 April 2014 (photos)
For more information on the Crawley Edge Boatshed, see
or search social media for #blueboathouse

Crawley Edge Boatshed
Crawley, Western Australia, 2014-04-19
Canon EOS 50D, Sigma 35mm f/1.4 DG HSM Art @35mm, 1/400 sec, f/5.6, ISO100
posted Monday, 04 September 2017, 21:23 (+0800), by Martin
As a photographer, I think it's important to think about how you can give back.
This applies whether you are a hobbyist, keen enthusiast, part-time, professional, or some other type of photographer.
This can take many forms and shapes, and I've mentioned some of them below.
Ways To Give Back
- Donating Photos or Services to Charities and Non-Profits
I will normally let charities and non-profit organisations use my photos at no cost, with an appropriate credit,
providing they ask for permission, and they agree to my terms and conditions.
If they're not making money from the use of my photo, then I can't expect them to pay for the photo.
Conversely, if any commercial organisation contacts me for the use of any of my photos, then I expect to be
paid for the use of the photo.
- Donating Photos or Services to Government Organisations
The same reasoning as above applies.
Here's an example of one of my photos being used by
the Australian Department of Environment and Conservation.
- Releasing Photos under GPL / CC licenses or other similar licenses
You can upload photos to flickr.com, Wikipedia and various other repositories using GPL and Creative Commons licenses.
These licenses allow people to use your photos for free, providing they adhere to the restrictions
of the licenses.
You can choose how loose or restrictive a license you want to release your photos under.
- Contributing Photos to Wikipedia and Similar Repositories
When I first started getting into photography, I was often frustrated at the poor quality of many of the photos
in Wikipedia articles, so I have made it a point to contribute
better-quality photos to Wikipedia articles where I could.
This could be a matter of pulling appropriate photos from your archives, or it could mean going out of your way
to specifically take photos of places, animals or things specifically where you've noticed they are lacking.
Have a look at at Wikipedia articles for places you're familiar with, animals you have as pets, cars,
your cameras, or any other things that you may have photos of or could take photos of - and you might be surprised
at the wide range of articles that could do with better photos.
- Sharing Photography Resources Online
Share photography-related information, tutorials, how-tos, and other information online via a blog, videos or via some other means.
I have been publishing a series of blog posts titled
Understanding Your Camera that I have been
writing as I teach camera basics and camera operation to my children.
- Sharing Your Knowledge at a Photography Club and/or with a Group of Friends
Join a photography club and share your photography skills and knowledge,
get involved at your local school and teach the children
photography skills,
or go out shooting with some friends and help each other improve your and their photography skills.
I try to regularly go on photowalks with friends,
as it gives us an opportunity to get out and take photos, share ideas, tips and tricks, see other people's compositions,
and learn other things from each other (as well as socialise and have fun).
A Wikipedia Example
Over the years, I've released a number of photos on Wikipedia under Creative Commons licenses.
One of the photos that has been widely used is one of my youngest daughter as a new-born, who was quite
jaundiced when she was born, and had to spend some time under lights during her first few days in hospital.

Samantha undergoing phototherapy to treat her jaundice
Canon EOS 350D, 17-85mm IS @70mm, 1/250 sec, f/5.6, ISO400
I took the photo in February 2007, and
posted
on Wikipedia in February 2008 under a
CC BY 3.0 Creative Commons license,
which allows anyone to use the image (including commercially) as long as they credit myself as the photographer.
The photo has been used on the english Wikipedia pages for
light therapy
and
neonatal jaundice,
as well as many Wikipedia pages in other languages.
A google image search for the photo shows it is also being used by many medical journals and articles,
and is even being used on the cover of a
book.
They are all valid uses of the photo - as long as the conditions of the CC license are being met (appropriate attribution).
My daughter featured in the photo above is now aged 10, and is quite proud of the fact that the photo of her is
being used so widely!
How Do You Give Back?
What about you? How do you give back?
What other ways of giving back can photographers consider?
posted Wednesday, 22 June 2016, 20:50 (+0800), by Martin
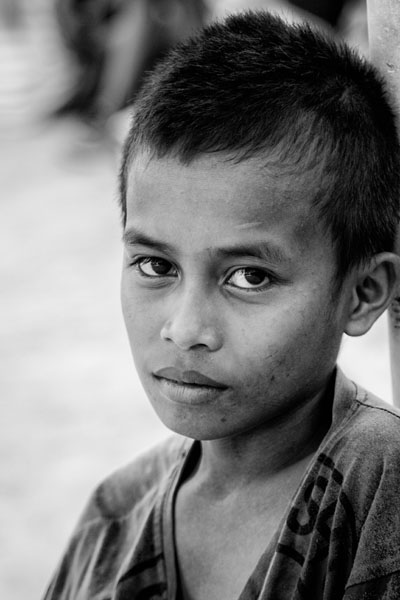
one of the New Hope boys
Wings To Work Mission Trip
As regular readers of this blog and people following me on social media will know, I recently
led a team of 12 on a mission trip to Kupang, West Timor.
The team consisted of myself, my wife, our four children, and another six members from our local church community.
We had some great experiences in West Timor, and spent time at the New Hope Home, Elpida School,
and travelled to a remote mission post to start building a school.
We are currently fund-raising for a roof over the concrete soccer pitch at Elpida School.
The soccer pitch is used for a wide variety of community events, from weddings to soccer competitions,
and a roof will keep the sun off, and allow for a wider use of the facility.
(I also visited West Timor in 2014 as part of another Wings To Work trip, and was involved in pouring the
concrete soccer pitch.)
If you are interested in donating some funds towards the New Hope Home or the roof for the Elpida soccer pitch, please
contact me for more information.
I hope to post some more photos of our experiences in West Timor on my blog in the coming weeks.
See below for a video of our trip, as well as an article about our trip that two team members, Dani and Trish,
wrote for a local mission publication.
As their article provides a great overview of our trip, I'm publishing it here too (with their permission).
posted Sunday, 06 October 2013, 15:07 (+0800), by Martin
While on a recent year 9 school camp out in the bush (about 400km north-north-east of Perth),l
I was asked to run a quick photography lesson.
The intention was to give the students some photography tips before they spent some
time shooting photos for a photography competition.
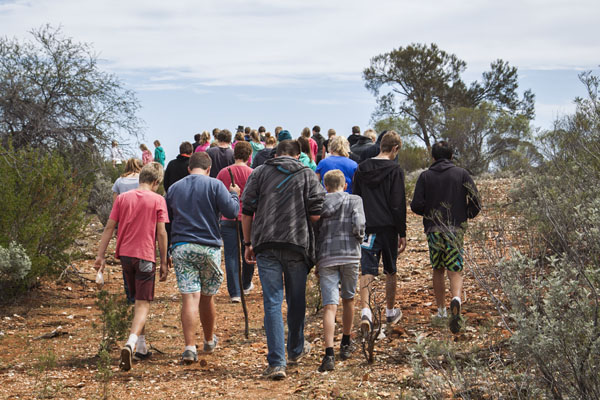
bushwalking
Mount Edon, Western Australia
I had prepared some brief notes before-hand, and thought it would be worthwhile posting them
here on my blog.
I started by talking through a number of photography rules.
Photography Rules
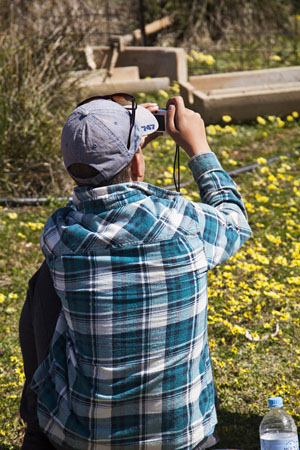
a student taking a photo
Warrdagga Rock, Ninghan Station, Western Australia
- There are exceptions to every rule.
I'm sure most of you have heard about the rule of thirds and numerous other photography rules.
Remember that these are only guidelines - they are not rigid rules that you must adhere to.
There are certainly situations where you can break these rules.
- It's not about the gear.
Having better / more expensive camera gear doesn't necessarily mean your photos will be better.
Know how to use your gear, and
understand the various settings, including all the
modes.
Know the limitations of your gear, such as the minimum focus distance,
maximum
ISO you can use before you get too much noise,
maximum aperture your lens supports, etc.
- It's all about the light.
Photography is all about capturing the way the light falls on something, so learn to appreciate shadows
and direction of lighting. The time of the day is also important, as it has a big impact on the lighting.
The golden hour is the first and last hour of sunlight in a day, and the blue hour is the time of twilight
in the morning and at night - both great times for photography.
- Don't share all your photos - share your good photos.
Only share your good photos. Don't share too many photos of the same thing, and cull out the bad photos
first. People aren't interested in seeing 50 photos of the same thing!
- Print more photos.
In this digital age, people don't print enough of their photos,
and only look at them on the screen.
Take the time to print some of your photos and hang them on your fridge or make a
photo board.
Make a photo book of your photos
from a holiday or trip.
- Take more photos.
The best way to improve your photography is to take more photos. Carry a camera with you,
and make a point of using it.
- Try different angles.
Too often people only shoot from eye height while standing. Vary your viewpoint by getting down low,
get up high and shoot down, get closer, etc.
- Be aware of the background.
Always think about the background when taking a photo. It is not ideal to have a sign post growing out of the back
of someone's head! If appropriate, use a large
aperture to decrease your
depth of field to blur the background.
- Shoot silhouettes.
When the sun is lower in the sky, try shooting
silhouettes by getting the sun behind the object or person that you are photographing.
- Take photos according to a theme.
As a photography exercise, it can be worthwhile to try taking a series of photos that all adhere to a specific
theme. For example, take photos of objects that are a specific colour, or look for a specific shape or pattern. Try
only long exposures, or try only short exposures.
- The best camera is the one that's with you.
That's a saying attributed to well-known photographer Chase Jarvis,
who emphasised
the fact that if you have a camera with you, you are more likely to take photos of things that matter.
(He created an iPhone app called "Best Camera", published a
book
of his iPhone photos, and created a
website to allow people to share their iPhone photos.)
In this modern age, many people have a capable camera built into the smart phone that in their pocket,
and many people need to use it more than what they do!
unknown
Warrdagga Rock, Ninghan Station, Western Australia
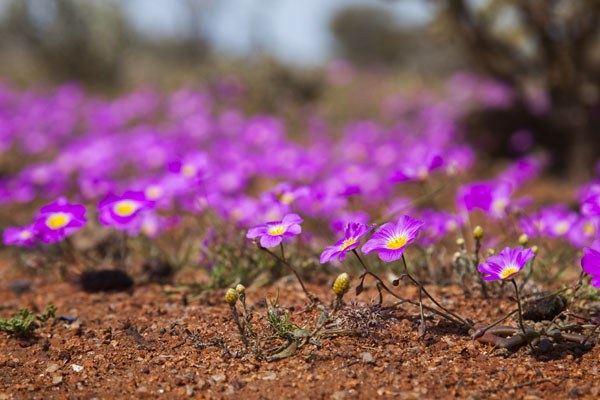
Tips for Shooting Wildflowers
I then followed up with some tips for photographing wildflowers.
- Think about the light source, light intensity, light direction, and shadows.
Bright sunlight will cause harsh shadows, especially if it is directly overhead.
An overcast day is great, as the clouds provide a soft diffuse light.
If there are no clouds around, create your own shade on the item being photographed.
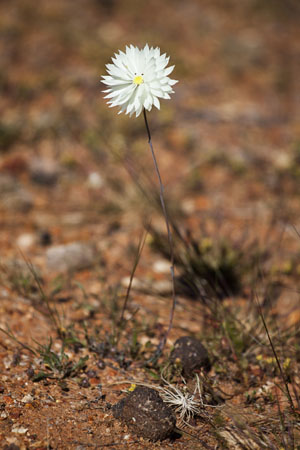
Everlasting (Rhodanthe chlorocephala)
Warrdagga Rock, Ninghan Station, Western Australia
- Watch your background.
You do not want a bright background when photographing wildflowers. Ideally, you want a background that is
darker than the flower, as it will help highlight the flower in the photo.
Use a short depth of field to ensure only the
flower is in focus, and everything in the background is out of focus.
- Watch your focus.
It is important to get the right part of the flower in focus.
- Think about your viewpoint.
Don't only photography flowers from above, looking down. Try getting right down on the ground,
so you can shoot the flower from ground level.
- Know your gear.
Know how your camera focuses, understand how to select different focus points, and know the minimum
focus distance of your camera/lens.
- Watch the wind.
Wind will blow flowers back and forth, and can make it challenging to get sharp photos.
Use a fast shutter speed to freeze the motion, try blocking the wind, and take multiple photos.
- Leave no trace - take only photos, and leave only footprints.
Watch where you step, to ensure you don't unnecessarily damage vegetation.
Don't litter, but take your rubbish with you, and don't pick any wildflowers.
posted Friday, 23 November 2012, 21:15 (+0800), by Martin
Background On The "Print-A-Day" Project
A couple of months ago, I did a " print-a-day" project for
a period of four weeks.
I got the idea from a
blog post
on The Online Photographer.
As I mentioned in my previous post
about this project, I decided to do this project
" as an exercise in improving your post-processing skills specifically in relation to achieving good photo prints".
It has been a while since I completed the project, but due to holidays, business travel, and other commitments,
I haven't yet had a chance to write about my experience with the print-a-day project.
However, this has given me additional time to reflect on the project. I still have all the prints hanging up in my home office,
and look at them on a regular basis.
Looking back at the project, I believe it was definitely worthwhile, and I have learnt some interesting lessons as a result
of the project.
The Photos from the Project
Here are the 28 photos I post-processed and printed during the 4 weeks of the print-a-day project.
Some of these photos have already been
featured here on my blog.


Completing the Project
I used a spreadsheet to keep track of the photos I was using in this project,
and also used it to record how much time I spent post-processing each photo.
The post-processing time for the photos ranged from 10 to 60 minutes, with most
photos typically taking about 15 minutes.
Finding the time to process and print a photo each day was relatively easy, as for three out of the four weeks of the project,
I was on holidays from work, and was mostly at home during the day.
Outside of holidays, it would certainly be more difficult for me to find the time each day to
process and print a photo, with work commitments, work-related travel, family commitments,
and other extra-curricular activities.
Lessons Learnt
This project taught me a number of lessons.
I have attempted to note down these lessons as a reminder for myself, and so readers of this blog can
benefit from them too.
- I don't print enough photos.
While I typically take plenty of photos, and post-process plenty of photos, I don't print photos very regularly.
Printing out photos and hanging them on your wall gives you a better appreciation for your photos,
and allows you to enjoy them more.
I am intending to regularly print some photos, and hang them on my
magnetic photo board.
- Pick photos that appeal to you.
Post-processing is always a lot more enjoyable if you are working on photos that you like, rather than photos
that you are post-processing because you have to (such as processing a big batch of photos after a family or wedding shoot).
- After processing, and before printing a photo, step away from the computer for a while,
or close the photo and do something else for a while.
Putting a photo aside for a while allows you to take a fresh look at the photo, and you will often see something
that needs further adjustment or correction, which you haven't noticed while you were working on the photo.
Spending too much time looking at colours can cause you to become somewhat
desensitised to them.
- What may look good to you at the time printing may look like it needs some remedial attention the next morning.
This is closely related to the previous point.
- Critically review your photos, your post-processing efforts, and your prints,
and be honest with yourself.
- Screen calibration and colour settings in Photoshop are very important.
I had just moved from an old PC and Photoshop CS4 to a new PC with Photoshop CS6, and had some initial teething
issues with monitor calibration and colour profiles in CS6 with some of the photos printed as part of this project.
Conclusion
I found the print-a-day project to be very rewarding, and can definitely recommend it to any photographer
who wants to improve their post-processing and printing skills.
If you want to improve your skills in this area, this can be a worthwhile project.
posted Friday, 03 December 2010, 22:28 (+0800), by Martin
While going through some photos taken last year in Sydney, I noticed that
I had a few photos where I had managed to catch someone else's flash.
Both photos were taken near the Sydney Opera House, looking towards
Circular Key, overlooking the Opera Bar.
In this first photo, I was taking a photo of Circular Key, and managed to catch
the flash of a lady who was taking a photo of her three seated friends.
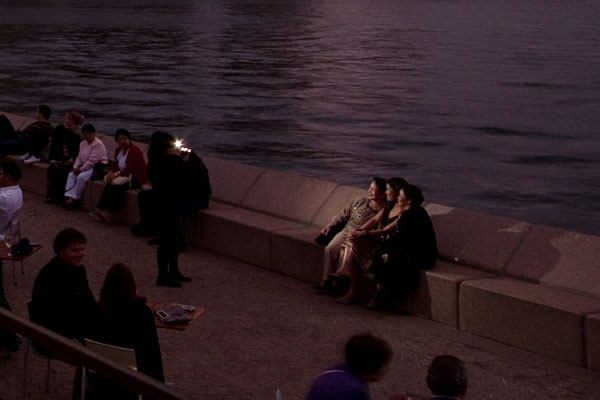
first flash catch: crop of photo, showing the flash catch

first flash catch: photo straight out of the camera
About 5 minutes later, I managed to catch the flash from someone taking a photo of another group.
posted Saturday, 21 August 2010, 16:15 (+0800), by Martin
Last year, my oldest son Ashley
won first prize in the
"Plant and Animal Habitats" category for Years 4 to 7 of Chevron Australia's
Focus Environment photography competition.
And earlier this week, we heard that he won in the student category in the
Curtin University National Science Week
photo competition,
winning an Apple iPad 32GB Wifi as his prize.
Here is Ashley (aged 11) posing with the iPad that he won in the Curtin competition,
displaying the
winning photo on the iPad:
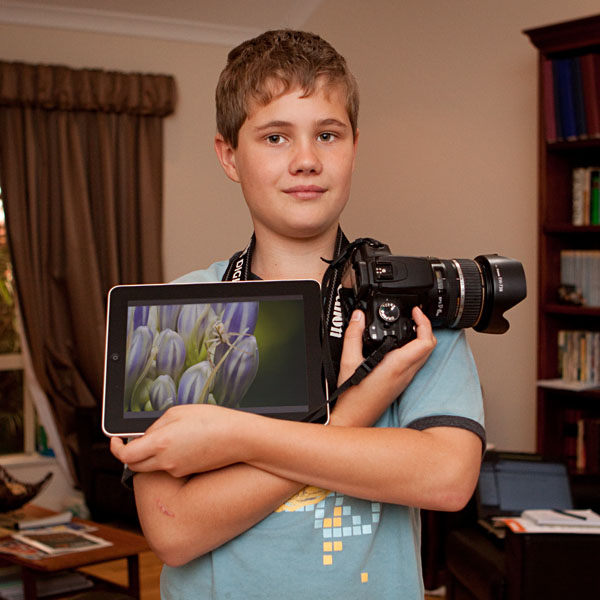
Ashley posing with his iPad and camera
posted Wednesday, 12 May 2010, 21:00 (+0800), by Martin
Chevron Australia's
FOCUS Environment Photographic and Caption Competition
is once again open to all Western Australian school students in Years 4 to 12.
The competition encourages students to be aware of the world around them and to make a commitment to
caring for the environment and safeguarding it for the future, and last year more than 900 entries were submitted.
There are three categories (see below) and three age categories:
Years 4 - 7
Years 8 - 10
Years 11 - 12
Each photo entered must be accompanied by a 25-word caption that is taken into consideration during judging.
Chevron are putting $30,000 towards prizes, with first place prize winners receiving $200 for themselves and $1500 for their school,
second place prize winners receiving $150 themselves and $1,000 for their schools,
and highly commended students will win $50 each.
All entries must be submitted on-line, with upto two entries allowed in each category.
The competition closes on Monday, 9th August, 2010.
Note that the competition is restricted to school students from Western Australia only.
posted Monday, 08 February 2010, 19:03 (+0800), by Martin
There is a saying which states that the eyes are the window to a person's soul.
It is important to know how to handle people's eyes in portrait photography, as
the way the eyes are represented in a photo can make or break the photo.
For example, Steve McCurry's
Afghan Girl photo,
which appeared on the cover of the June 1984
National Geographic Magazine,
was named "the most recognised photograph" in the history of the magazine.
This was primarily due to her piercing sea-green eyes, staring straight at the camera,
resulting in a very striking and appealing portrait.
Ensure Eyes Are In Focus
With portrait photography, it is important to ensure the eyes are in focus.
This is particularly important if shooting with a large aperture, when
the depth-of-focus is small.
A portrait with the eyes in focus will have more impact, will be more appealing,
and the eyes will help draw the viewer into the image.
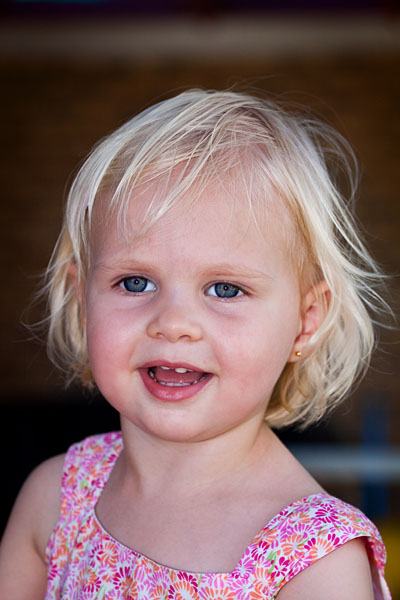
Samantha
Canon EOS 50D, 70-200mm f/4L @70mm, 1/640 sec, f/4, ISO200
To ensure your camera focuses on the eyes, configure it to use only one focus point,
and compose the shot with this focus point on the eyes, half-press the shutter button
to focus, and then re-compose and take the photo.
|
|


