|
posted Wednesday, 18 December 2013, 22:54 (+0800), by Martin

Introduction
This post provides a summary of each of the articles in a series that I am writing
as I teach camera basics and camera operation to my children, in particular
to my (then) 11 year old son who wants to buy his first DSLR.
My children have
been
using
cameras
for a while (with some
good results),
but typically use full-auto mode, or rely on me to adjust the settings for them.
I thought it would be worthwhile to write a series of blog posts on this subject,
to help other people who might be interested, and because one of the best ways
to ensure you understand something is to try to explain it to others.
I am intending to publish more articles in this series in the future,
and will update this post with details as additional articles are published.
Articles in this Series
- Understanding Your Camera: Exposure Basics
This introductory article covers the basics of exposure, as well as a description of aperture, shutter speed
and ISO, and the impact of varying each of these. The relationship between aperture, shutter speed and ISO is also described.
- Understanding Your Camera: Lens Aperture Demystified
This article discusses aperture in more detail, describing the mathematics behind aperture f-stops,
and the effect of aperture on depth-of-field in your photography.
A number of common aperture-related terms are explained.
- Understanding Your Camera: Explaining ISO
Historically, ISO refers to the numerical scale used to measure the sensitivity of photographic film to light.
The ISO scale is described, as well as the impact of varying the ISO, and some recommendations on selecting an ISO setting.

a 5 second shutter speed captures
the trails of the sparks
- Understanding Your Camera: Shutter Speed
The third factor affecting exposure, the impact of varying the shutter speed is described.
Sample photos using fast and slow shutter speeds demonstrate this impact, the mathematics
behind the shutter speed scale is briefly covered, and some guidance is provided on using
longer shutter speeds, including bulb exposure.
Some information about interpreting how your camera displays the shutter speed is also covered,
along with recommendations on selecting shutter speeds.
- Understanding Your Camera: Focal Length, Field of View and Angle of View Defined
A slight deviation, this post provides definitions and descriptions of some key concepts, namely
focal length, angle of view and field of view. Diagrams are used to more clearly explain each of these terms.
- Understanding Your Camera: F-Numbers, F-Stops and Stops
Continuing with definitions, this article covers f-numbers and f-stops, detailing exactly what a "stop" is,
and the use of fractional stops.

camera mode dial
- Understanding Your Camera: Camera Modes Explained
Confused by the various modes on your camera dial? In this article, each of the modes is described,
along with details of the situations in which each mode would typically be used.
- Understanding Your Camera: The Manual Mode Myth
Many photographers believe you are not a photographer unless you always use manual mode on your camera.
This article explores using manual mode vs using the smart electronics in your camera, and concludes
that the believe that you have to always use manual mode is a myth.
The use of manual mode is not completely discounted, as there are still situations where it is appropriate to use.
- Understanding Your Camera: Depth of Field
An important concept, depth of field is defined, and the factors which affect the depth of field are described.
This equips you with the knowledge to be able to control the depth of field in your photos.
- Understanding Your Camera: Revisiting Focal Length
Revisiting a concept previously covered, this article provides some more detailed information on the definition
of focal length, including how the effect of focusing impacts the focal point.

evaluative
metering
- Understanding Your Camera: Metering Modes
Understanding the various metering modes that your camera supports is important in knowing which
metering mode should be used in different situations.
Each of the metering modes is described, along with recommendations on situations when it should be used.
- Understanding Your Camera: Crop Sensors vs Full Frame Sensors
Confused about the differences between a crop sensor and a full frame sensor, and the pros and cons of each?
This article explains the differences, as well as the benefits and limitations of a camera body with a crop sensor
vs a full frame camera.
- Understanding Your Camera: Exposure Compensation
Exposure compensation allows you to adjust the default exposure selected by your camera, by several stops up or down.
There are situations where you need to be able to adjust the camera exposure up or down, depending on the scene being photographed,
and the lighting conditions, to achieve the results that you want.
This article describes how to use exposure compensation, and walks through several situations where it is useful.
- The Importance of Understanding Your Camera: A Practical Example
A practical example to demonstrate how understanding your camera's behaviour to expose for mid-grey,
and how to apply some negative exposure compensation allowed me to capture photos of a sunset at the beach.
This post will be updated as additional posts in this series are published.
You can subscribe to the RSS feed to be notified whenever a new post is published
on this blog, or you can subscribe via email
using the link shown at the top left of each page or by entering your email address in the form below.
After submitting your email address, you'll receive an email requesting confirmation of your subscription,
and will need to click the link in the email before your email subscription becomes active.
Your email address will not be shared, and will not be used for any purpose other than
to send you notification of updated content.
You can unsubscribe at any time using the unsubscribe link in the bottom of each email.
posted Sunday, 01 December 2013, 14:22 (+0800), by Martin
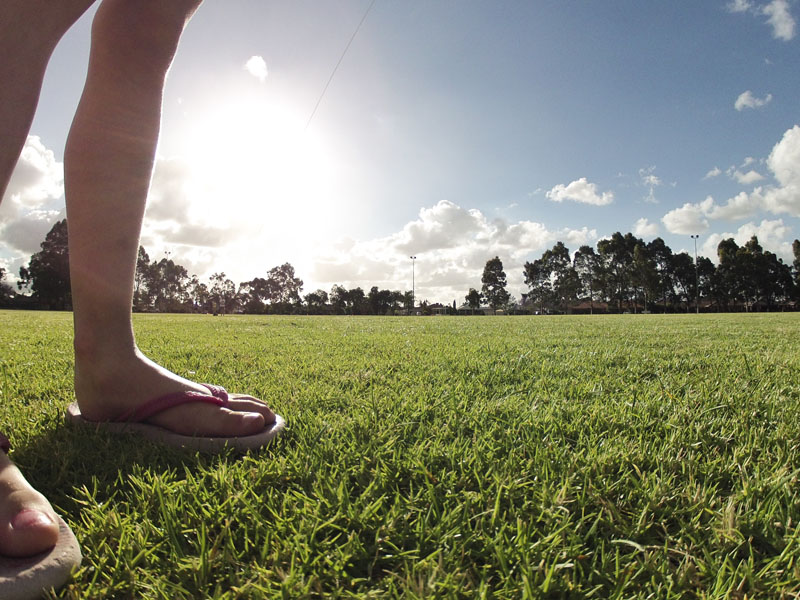
thongs
Bob Blackburn Reserve, Seville Grove, Western Australia
GoPro HD Hero2 (suspended from a kite)
I recently bought a new kite for kite aerial photography (KAP), a
9' Levitation Delta.
The Delta should allow me to KAP in lighter winds than the
FlowForm 16' that I have been using for a few years.
Delta kites also will fly at a much steeper line angle than a FlowForm, which should allow
higher viewpoints for KAP.
posted Thursday, 21 November 2013, 21:51 (+0800), by Martin
My younger son is a big Star Wars fan - and here is a composite I put together
last year, showing my younger son, performing a Star Wars inspired choke hold on himself.
Have a look at my
Tutorial for Creating Levitation Photos in Photoshop
to see how you can create similar levitating composite photos yourself.
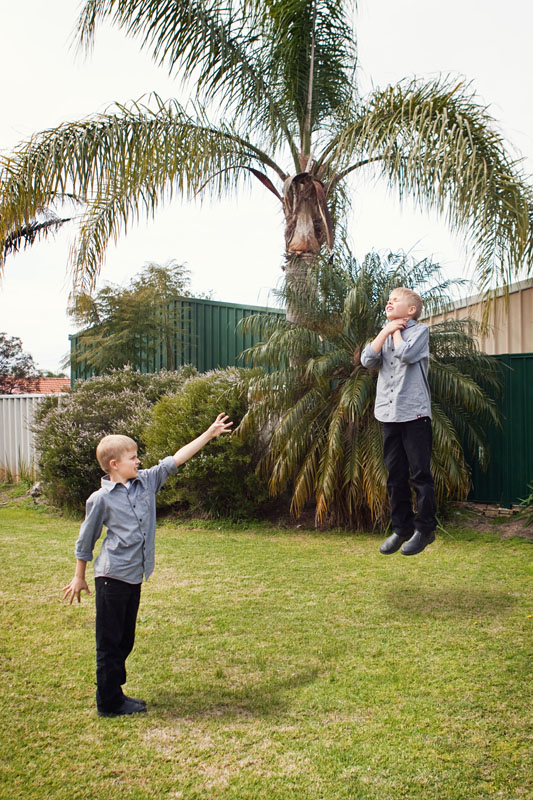
wishing he had Star Wars powers
back yard at home, Western Australia
Canon EOS 50D, 24-70mm f/2.8L @24mm, 1/400 sec, f/4, ISO100
posted Thursday, 14 November 2013, 20:02 (+0800), by Martin
Occasionally I like to go through some of my older photos, and look for things that I may have missed
when I originally took the photos.
Here is one from a school excusions I attended with my younger son, at
Cohuna Wildlife Park.
I believe this is a Osteospermum, from the daisy family Asteraceae.

purple daisy
Cohuna Wildlife Park, Byford, Western Australia
Canon EOS 50D, 24-70mm f/2.8L @67mm, 1/500 sec, f/5.6, ISO500
posted Friday, 08 November 2013, 20:12 (+0800), by Martin
Chromasia Training Discounts
David Nightingale from Chromasia Training
is offering a great deal on his
photography and post-production tutorials.
Until midnight Sunday 10th November you can sign up for a lifetime membership
for just £29 (approx USD$47), which is the normal price per year.
Check out the
tutorials
(including a free sample tutorial), and you can sign up
here.
Chromasia also is offering a big discount on his video training titled
"The Art of Black and White Photography", bringing the price down to just USD$9.
The normal price is USD$99, so that's a savings of about 90% on the usual price,
and is also available until midnight Sunday 10th November.
Use
this link
to get the discount.
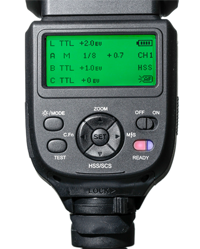
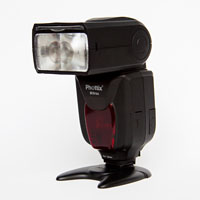
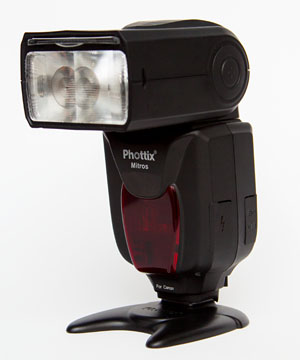
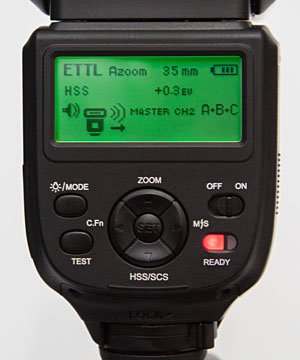
Phottix Mitros+ TTL Transceiver Flash
Phottix released their
Mitros TTL flash for Canon
earlier this year, followed by the
Nikon version,
to very good reviews.
They have now gone one step further, and integrated an
Odin transmitter,
Odin receiver, and a
Strato
receiver into the Mitros flash, and called it the
Mitros+ TTL Transceiver Flash.
Having a TTL flash with this functionality integrated into the flash unit means you no longer need
to use separate triggers for each flash, reduces the complexity of a lighting setup,
and reduces the amount of gear and number of batteries that you need to carry.
The Phottix
Mitros+ for Canon
is currently available, with a Nikon version expected in the future.
Phottix Flash Trigger Compatibility
Phottix published a table showing
compatibility
between the various models of flash triggers that they sell.
If you are considering
buying a Phottix flash trigger,
or have some and want to know what is compatible with them,
be sure to check out this
compatibility chart.
Photo Inspiration
- Fiddleoak's "littlefolk" series
is a great set of images by a 14 year old consisting of people composited as miniatures in the real world. Check out his
photos on flickr,
his blog, and a
tutorial showing how he created one of the photos.
He has recently started a new series titled traveler.
- Dave Flynn's Mini Worlds is also a great set of photos
showing tiny humans in the real world.
- Crafting scenes of iconic Americana
is a flickr blog post featuring some great photos by
Michael Paul Smith.
At first glance, Michael's photos of mid-twentieth century America look real, but they are actually created
using model cars on a table, with scale model buildings and real buildings in the background.
- Ben Heine's series of images titled
Pencil vs Camera
combine photography with hand-drawn pictures in a very unique and interesting way.
Browse through his photos
and see some of his work as featured on the
flickr blog.
posted Sunday, 27 October 2013, 14:20 (+0800), by Martin
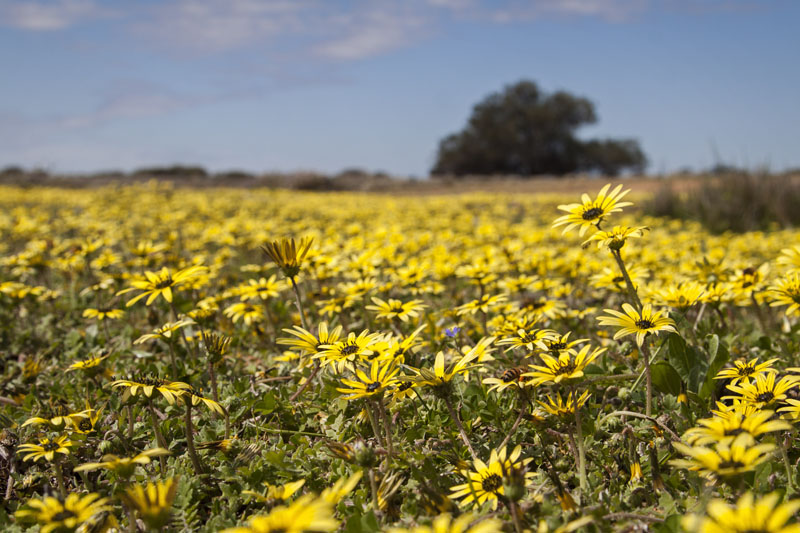
carpet of daisies
Warrdagga Rock, Ninghan Station, Western Australia
While on a recent school camp a few hundred kilometres north of Perth,
I was hoping for a lot of wildflowers in the area.
The weather conditions this year were not optimal for wildflowers, so there weren't all that many.
However, there were plenty of daisies growing near our camp.
In the top photo, I got down low, laying on the ground, to get a shot with some flowers in focus in the foreground
(complete with a few bees), and a carpet of yellow flowers leading into the distance.
For the second photo, I decided to include the open gate in the frame, giving the appearance
of an open gateway leading to the flowers.
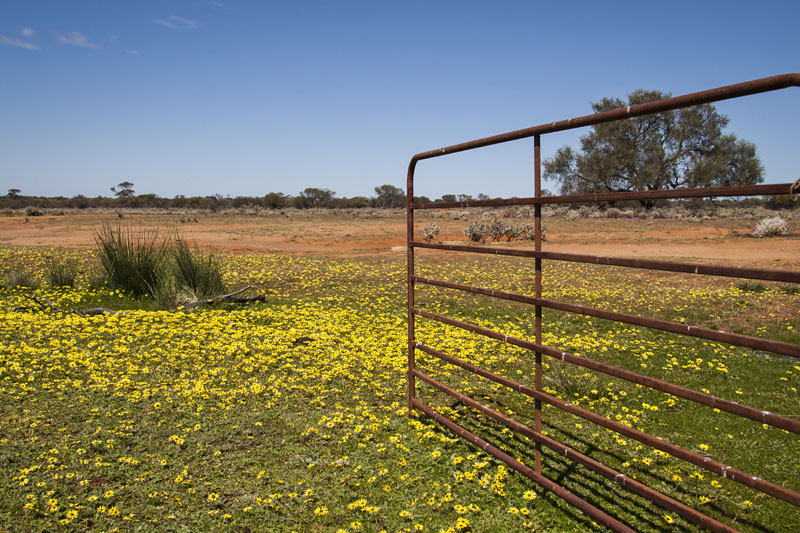
gateway
Warrdagga Rock, Ninghan Station, Western Australia
posted Tuesday, 08 October 2013, 21:04 (+0800), by Martin

dead tree landscape
Cradle Mountain-Lake St Clair National Park, Tasmania
Canon EOS 50D, 10-22mm @22mm, 1/50 sec, f/10, ISO200
While in north-west Tasmania during a family holiday earlier this year,
we drove through some areas near Cradle Mountain with stands of dead trees.
With some low fog hanging over the trees, we had to stop to take some photos,
as it looked very sombre and gloomy.
I converted this to black-and-white and brought out some detail using the
Silver Efex Pro 2 plug-in for Adobe Photoshop from Google's
Nik Collection.
posted Sunday, 06 October 2013, 15:07 (+0800), by Martin
While on a recent year 9 school camp out in the bush (about 400km north-north-east of Perth),l
I was asked to run a quick photography lesson.
The intention was to give the students some photography tips before they spent some
time shooting photos for a photography competition.
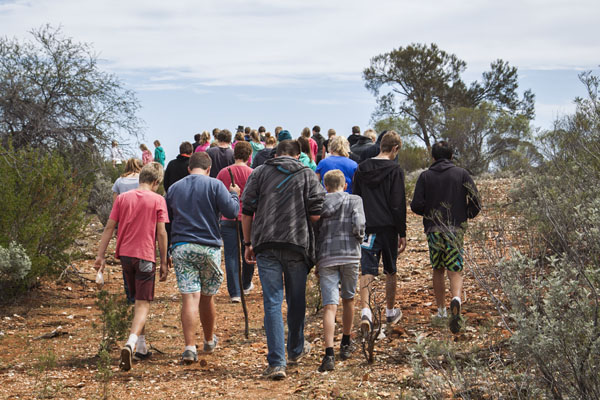
bushwalking
Mount Edon, Western Australia
I had prepared some brief notes before-hand, and thought it would be worthwhile posting them
here on my blog.
I started by talking through a number of photography rules.
Photography Rules
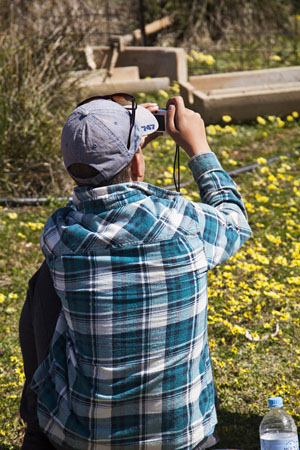
a student taking a photo
Warrdagga Rock, Ninghan Station, Western Australia
- There are exceptions to every rule.
I'm sure most of you have heard about the rule of thirds and numerous other photography rules.
Remember that these are only guidelines - they are not rigid rules that you must adhere to.
There are certainly situations where you can break these rules.
- It's not about the gear.
Having better / more expensive camera gear doesn't necessarily mean your photos will be better.
Know how to use your gear, and
understand the various settings, including all the
modes.
Know the limitations of your gear, such as the minimum focus distance,
maximum
ISO you can use before you get too much noise,
maximum aperture your lens supports, etc.
- It's all about the light.
Photography is all about capturing the way the light falls on something, so learn to appreciate shadows
and direction of lighting. The time of the day is also important, as it has a big impact on the lighting.
The golden hour is the first and last hour of sunlight in a day, and the blue hour is the time of twilight
in the morning and at night - both great times for photography.
- Don't share all your photos - share your good photos.
Only share your good photos. Don't share too many photos of the same thing, and cull out the bad photos
first. People aren't interested in seeing 50 photos of the same thing!
- Print more photos.
In this digital age, people don't print enough of their photos,
and only look at them on the screen.
Take the time to print some of your photos and hang them on your fridge or make a
photo board.
Make a photo book of your photos
from a holiday or trip.
- Take more photos.
The best way to improve your photography is to take more photos. Carry a camera with you,
and make a point of using it.
- Try different angles.
Too often people only shoot from eye height while standing. Vary your viewpoint by getting down low,
get up high and shoot down, get closer, etc.
- Be aware of the background.
Always think about the background when taking a photo. It is not ideal to have a sign post growing out of the back
of someone's head! If appropriate, use a large
aperture to decrease your
depth of field to blur the background.
- Shoot silhouettes.
When the sun is lower in the sky, try shooting
silhouettes by getting the sun behind the object or person that you are photographing.
- Take photos according to a theme.
As a photography exercise, it can be worthwhile to try taking a series of photos that all adhere to a specific
theme. For example, take photos of objects that are a specific colour, or look for a specific shape or pattern. Try
only long exposures, or try only short exposures.
- The best camera is the one that's with you.
That's a saying attributed to well-known photographer Chase Jarvis,
who emphasised
the fact that if you have a camera with you, you are more likely to take photos of things that matter.
(He created an iPhone app called "Best Camera", published a
book
of his iPhone photos, and created a
website to allow people to share their iPhone photos.)
In this modern age, many people have a capable camera built into the smart phone that in their pocket,
and many people need to use it more than what they do!
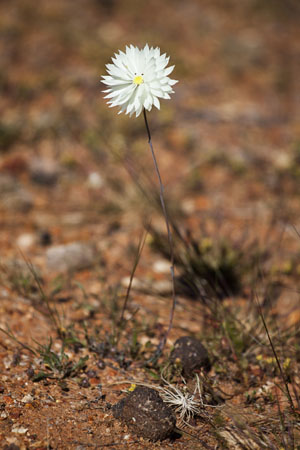
unknown
Warrdagga Rock, Ninghan Station, Western Australia
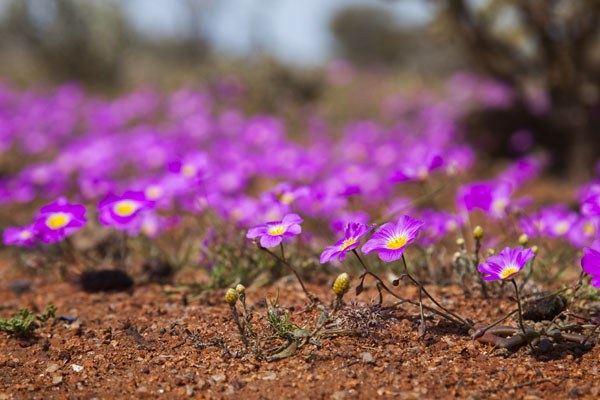
Tips for Shooting Wildflowers
I then followed up with some tips for photographing wildflowers.
- Think about the light source, light intensity, light direction, and shadows.
Bright sunlight will cause harsh shadows, especially if it is directly overhead.
An overcast day is great, as the clouds provide a soft diffuse light.
If there are no clouds around, create your own shade on the item being photographed.
Everlasting (Rhodanthe chlorocephala)
Warrdagga Rock, Ninghan Station, Western Australia
- Watch your background.
You do not want a bright background when photographing wildflowers. Ideally, you want a background that is
darker than the flower, as it will help highlight the flower in the photo.
Use a short depth of field to ensure only the
flower is in focus, and everything in the background is out of focus.
- Watch your focus.
It is important to get the right part of the flower in focus.
- Think about your viewpoint.
Don't only photography flowers from above, looking down. Try getting right down on the ground,
so you can shoot the flower from ground level.
- Know your gear.
Know how your camera focuses, understand how to select different focus points, and know the minimum
focus distance of your camera/lens.
- Watch the wind.
Wind will blow flowers back and forth, and can make it challenging to get sharp photos.
Use a fast shutter speed to freeze the motion, try blocking the wind, and take multiple photos.
- Leave no trace - take only photos, and leave only footprints.
Watch where you step, to ensure you don't unnecessarily damage vegetation.
Don't litter, but take your rubbish with you, and don't pick any wildflowers.
posted Monday, 23 September 2013, 22:32 (+0800), by Martin
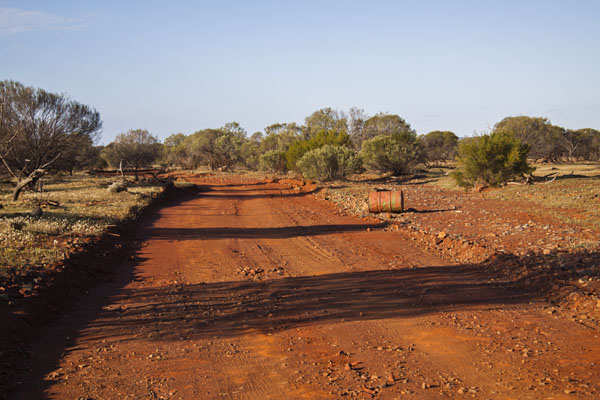
red gravel road
Ninghan Station, Western Australia
It seems like it was longer ago, but only a couple of weeks I was camping
with about 80 year 9 students in the middle of nowhere, about 400km
north-north-east of Perth.
This very red dirt and red gravel is characteristic of large parts of Western Australia,
and the red dust has a habit of getting into anything and everything!
This photo was taken shortly after we turned off the bitumen road and onto the gravel road.
A warning buzzer was sounding in one of the buses, and we were wondering if we were going
to be stuck here - quite a few kilometres away from where we were supposed to be camping.
A quick investigation revealed the cause of the buzzer - the release on the emergency exit
back door of the bus had shaken itself loose on the gravel road corrugations.
posted Thursday, 19 September 2013, 22:20 (+0800), by Martin
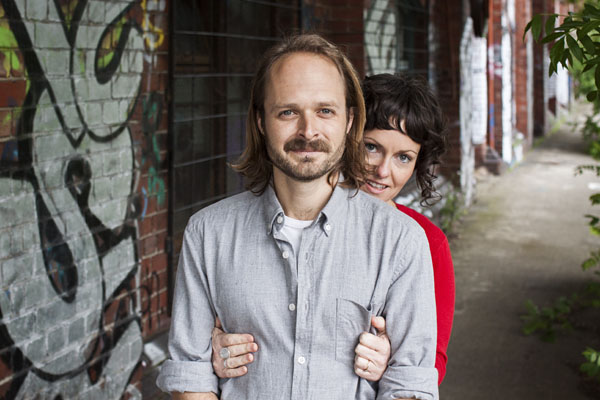
I recently attended a photography workshop in Melbourne. During the workshop, we had the lovely
couple Alex and Mel modeling for us during a photoshoot.
I'm sure that Alex and Mel now have an understanding what it is like to be pursued by paparazzi,
as they had 16 photographers shooting them from various angles!
posted Sunday, 18 August 2013, 13:57 (+0800), by Martin
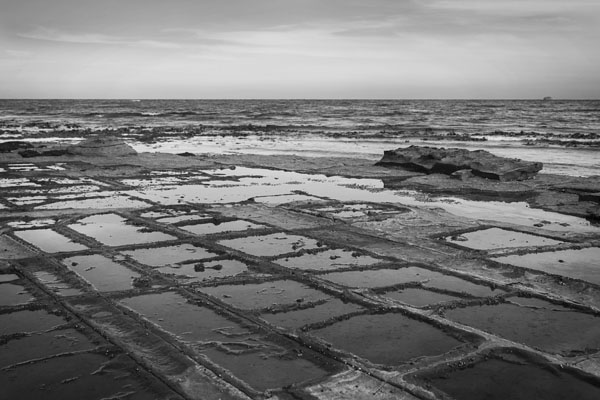
pan formations at the Tessellated Pavement
Eaglehawk Neck, Tasmania
Canon EOS 50D, 24-105mm f/4L IS @24mm, 1/250 sec, f/7.1, ISO100
I have had a few very busy months, but recently found some time to continue going through my photos from our holiday
in Tasmania in January this year.
The Tessellated Pavement, located just north of Eaglehawk Neck, is a naturally-occurring geological attraction
with some very straight and parallel lines in the rock formation.
This location appeals to me, because the rocks look so artificially formed, but yet occurred naturally.
The concave rocks are known as pan formations, and occur on the lower section of the pavement.
The rounded rocks are known as loaf formations, and can be seen on the higher sections of the pavement.
loaf formations at the Tessellated Pavement
Eaglehawk Neck, Tasmania
Canon EOS 50D, 24-105mm f/4L IS @24mm, 1/50 sec, f/7.1, ISO100
posted Sunday, 28 July 2013, 22:42 (+0800), by Martin
Phottix Mitros flash
Phottix Release Mitros Flash for Nikon
The Phottix Mitros TTL flash has been available
for Canon
for several months, and Phottix have now released the
Nikon version of the Mitros.
David "Strobist" Hobby has been testing the Nikon version, and has published a positive
review of the Mitros for Nikon.
In his review, David said:
Here's the five-word short version: "Nikon, you should be very afraid."
Why? Because this solid, Manual/TTL/CLS/HSS flash delivers all of the punch and practically all of the functionality of your
flagship Nikon SB-910 for about half the price. With twice the warranty.
With a 2 year warranty, the Mitros provides great value for money for anyone wanting a
TTL flash for either Canon or Nikon.
Photo Inspiration
Here are some interesting collections of photos to inspire you and humour you:
For some more inspirational photos, have a look through these recent galleries posted by
The D-Photo Inspiration Fix in recent weeks.
KAP at Soccer
Several of my children play soccer every Saturday, and I normally have my
KAP gear in the car.
Yesterday was the first time that there was sufficient wind to attempt some photos from my kite.
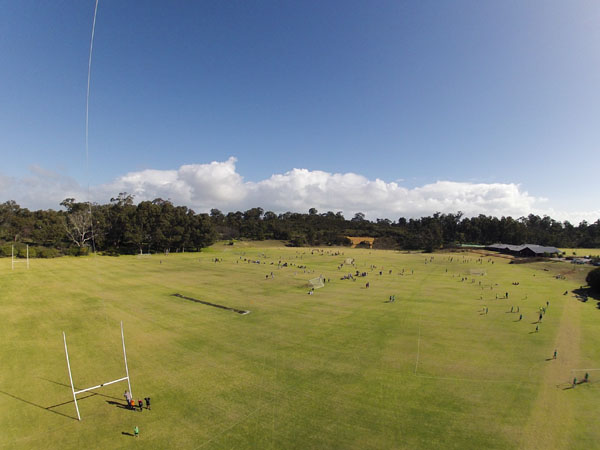
soccer fields
GoPro HD Hero2 (suspended from a kite)
The wind was a bit variable, so I did attempt to fly the kite over any of the games
that were in progress.
I am keen to try again at this venue, and hopefully some more consistent wind will allow me
to get some photos a little closer to the action on the soccer fields.
posted Sunday, 14 July 2013, 13:10 (+0800), by Martin

Michelle on the grass
Frenchmans Bay, Albany
Canon EOS 50D, 100mm f/2.8 macro @100mm, 1/640 sec, f/3.2, ISO400
This is my oldest daughter, taken in August last year during a brief holiday to Albany.
We spent some time at Frenchmans Bay with family members, and I photographed some of the
kids during the afternoon.
This was taken with one of my all-time favourite lenses, the
Canon 100mm f/2.8 macro lens.
While it is great for macro photography, I also find it works very well for portraits.
posted Tuesday, 02 July 2013, 19:50 (+0800), by Martin
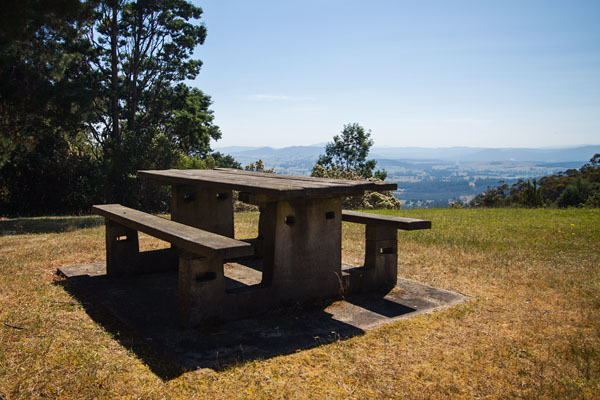
picnic bench with a view
Sideling Lookout, Springfield, Tasmania
Canon EOS 50D, 10-22mm @17mm, 1/250 sec, f/4.5, ISO100
It's been a busy year for me so far, and I am still working through the photos taken on
our holiday to
Tasmania
in January.
This picnic bench at the Sideling Lookout, near Scottsdale in north east Tasmania, has a fantastic
view over the surrounding area.
posted Saturday, 22 June 2013, 14:08 (+0800), by Martin

This post contains affiliate links and I will be compensated if you make a purchase after clicking on my links.
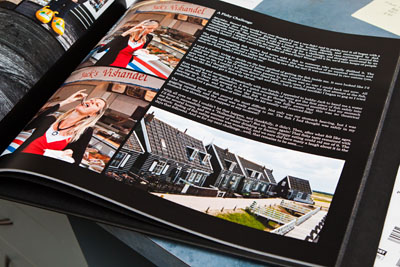
After a family holiday to Holland a couple of years ago,
we had a photo book printed by
Blurb.
I took a lot of photos on the three-week trip, and wanted to have a hard-copy photo book
for myself, and for my parents and siblings who holidayed with us.
Blurb are a well-renowned print-on-demand company, and they offer
numerous book printing options, with a variety of paper types, book bindings and other options.
Blurb provide multiple options for creating books, allowing you to use either their
BookSmart software,
web-based
Bookify,
a
plug-in for Adobe InDesign,
or you can do your own thing and create a PDF file for printing as a book.
This photo book was in Blurb's large landscape size (13x11 inches, or 33x28 cm),
and was created using Blurb's
BookSmart software.
When we had it printed by Blurb, we specified it with an imagewrap hard cover,
ProLine black end sheets, premium lustre paper.
These options increased the cost of the book, but I think it was worth the additional cost.
showing the spine, cover and binding of the book
We are very happy with the resulting book from our recent experience with Blurb.
However, there are a few things I wish I had known before undertaking this project,
as it would have saved me some time and effort.
Here are a few of the things I learnt from my experiences in preparing my first photo book
using Blurb's BookSmart software.
posted Saturday, 01 June 2013, 19:40 (+0800), by Martin
I love the red, orange and yellow colours of the autumn leaves.
Today, the first day of winter, I was pruning a tree in our back yard
with two of my children, and when I saw these back-lit leaves
on our Chinese Tallowtree, I had to
stop and grab my camera.
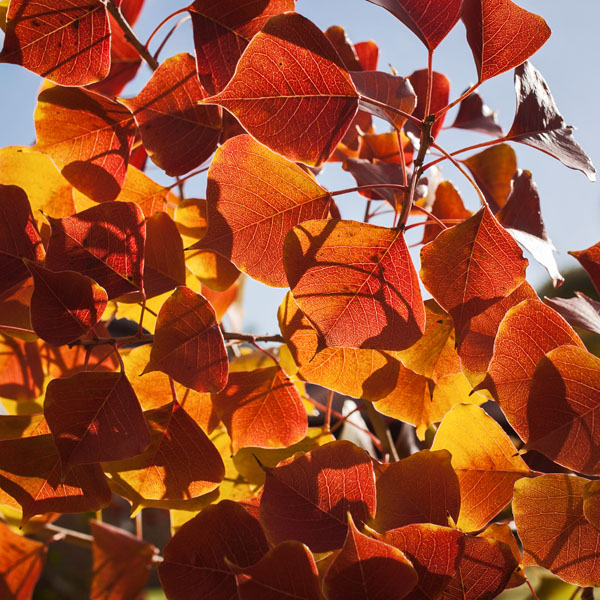
backlit autumn leaves
Chinese Tallowtree (Triadica Sebifera)
back yard at home, Western Australia
Canon EOS 50D, 35mm f/2 @35mm, 1/400 sec, f/8, ISO100
posted Tuesday, 21 May 2013, 19:40 (+0800), by Martin
This is the eleventh article in a
series on "understanding your camera"
that I am writing as I teach camera basics and camera operation to my children.

Metering the Scene
The metering mode determines how your camera will measure the brightness of the scene
being photographed to determine the
exposure.
Modern DSLR cameras support a number of different metering modes, and it is important
to understand how the different modes work, and when the different modes should be used.
This article describes how each of the metering modes works, and also provides some details
on selecting which metering mode to use in different situations.
Metering Modes
Below is a list of the metering modes supported by most modern DSLR cameras
and mirrorless cameras, along with the icons used to indicate these metering modes.
Not all cameras support all these modes, and some camera manufacturers use slightly different
terminology for the modes.
|
Evaluative Metering / Matrix Metering / Multi-segment Metering
|
|
|
How It Works:
Your camera will meter the entire frame to determine the exposure required.
To achieve this, the camera splits the frame into a number of sections, evaluates each section separately.
The exposure readings of the sections nearest to the active focus point are weighted more heavily
than other exposure readings from other sections, and the camera then analyses
the resulting exposures for each section to determine the over-all exposure for the scene.
When To Use It:
This is a general-purpose metering mode, suited for most conditions, and is the default mode
on most DSLR cameras.
When full-auto mode or any basic (portrait, landscape, macro, etc) modes
are selected, most (all?) DSLR cameras will revert to this metering mode.
|
Spot Metering
|

|
How It Works:
This mode will cause the camera to meter using a smaller portion of the frame,
typically 1.5-3.5%, depending on the camera model.
For most DSLR cameras, spot metering uses the centre of the frame.
With Canon, Sony and Pentax DSLR cameras, spot metering always uses a small portion of the frame at the centre
(the Canon 1D series of DSLR cameras are the only exception).
Nikon DSLR cameras behave a little differently, with spot metering using a small portion of the frame
centred on the currently selected focus point.
When To Use It:
Spot metering is useful for metering on a specific part of a subject or scene,
especially if the scene has a lot of contrast, with either bright or dark portions.
|
Partial Metering
|

|
How It Works:
The camera meters a small portion at the centre of the frame,
typically 5-10%, depending on the camera model.
When To Use It:
Similar to spot metering, this mode can be useful when you want to meter on a specific part of the scene,
but where the area being metered is larger.
|
Centre-Weighted Average Metering
|

|
How It Works:
This mode will use meter the entire frame, but will assign a greater weight to the metering from the centre
of the frame.
When To Use It:
This is a general-purpose metering mode, useful when the scene being photographed is lit quite evenly,
and the subject is in the centre of the frame.
This mode is largely redundant, as evaluative metering provides better results in most conditions.
|
posted Friday, 17 May 2013, 20:03 (+0800), by Martin
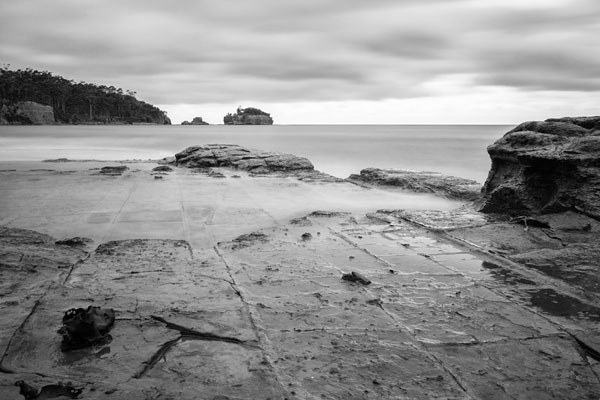
Tessellated Pavement in black and white
Eaglehawk Neck, Tasmania
Canon EOS 50D, 10-22mm @22mm (10-stop ND filter), 52 sec, f/16, ISO100
Ever since I
visited
the Tessellated Pavement in Tasmania about five years ago,
I've been keen to go back, and try some long
exposure
photography with an ND filter.
In January this year, I had an opportunity to revisit the Tessellated Pavement,
because we spent several weeks travelling around Tasmania with our children.
The Tessellated Pavement is located just north of Eaglehawk Neck, and is a naturally-occurring geological attraction
that looks somewhat un-natural due to the straight and parallel lines in the rock formation.
The two photos in this post were both shot with a
10-stop B&W ND filter,
allowing a much slower
shutter speed
to be used, causing the moving water and waves to appear as a smooth blur.
posted Thursday, 09 May 2013, 22:08 (+0800), by Martin
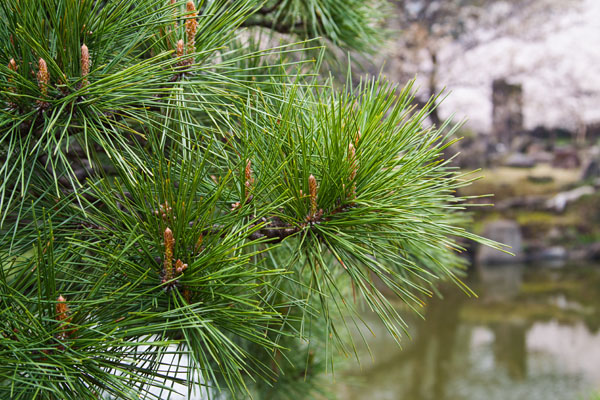
pine needles
Kyu-Shiba-rikyu Gardens, Tokyo, Japan
Canon EOS 50D, 24-105mm f/4L IS @40mm, 1/100 sec, f/5, ISO100
The Japanese people take their trees pretty seriously. After all, they have been practising the art of
bonsai for more than a thousand years.
I noticed similar levels of dedication with the pine trees in the gardens that I visited
while in Tokyo earlier this year.
posted Sunday, 05 May 2013, 13:22 (+0800), by Martin
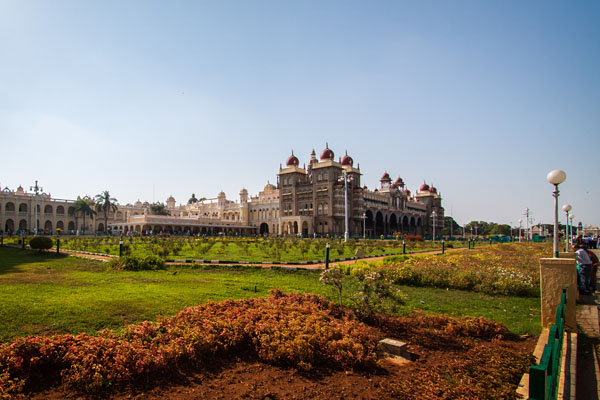
Mysore Palace
Mysore, Karnataka, India
Canon EOS 50D, 10-22mm @10mm, 1/125 sec, f/7.1, ISO100
Last month, while on a business trip to India, some colleagues too me to visit the city of Mysore,
about 140km from where I was staying in Bangalore.
The
Mysore Palace
(also known as Amba Vilas Palace) was one of the highlights of the visit to Mysore.
It is situated on large grounds, with various temples and other buildings located around the grounds.
Apparently Mysore Palace is one of the most famous tourist attractions in India after the
Taj Mahal.
The Palace itself is an amazing building to walk through, with lots of marble, gold, stained glass,
and plenty of huge murals on the walls.
Unfortunately, no cameras are allowed in the Palace itself, so I was unable to capture the amazing interior,
but I did take a number of photos of the exterior of the building.
The exterior of the building is covered with 97,000 light bulbs, and is illuminated on weekends,
holidays and festivals. Apparently it is an amazing sight to see the building at night with all the lights
on, but we headed back to Bangalore before dark.
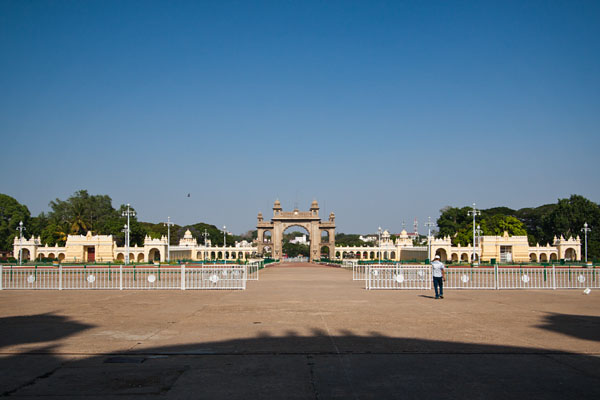
the main gate of Mysore Palace
Mysore, Karnataka, India
Canon EOS 50D, 10-22mm @22mm, 1/200 sec, f/7.1, ISO100
posted Friday, 26 April 2013, 21:00 (+0800), by Martin
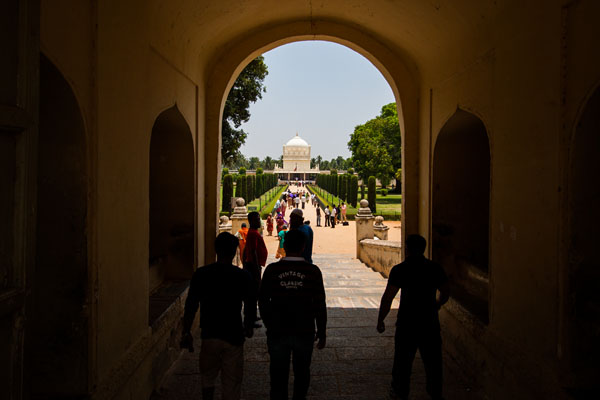
a view of the Gumbaz through the entrance
Gumbaz, Srirangapatna, Karnataka, India
Canon EOS 50D, 10-22mm @16mm, 1/200 sec, f/6.3, ISO200
I recently returned home from a couple of weeks in Bangalore, India.
It was my first visit to India, and I enjoyed the experience.
Future blog posts will be used to write more about my impressions of India.
On the Saturday that I was in India, some colleagues took me to visit the city of Mysore
to have a look at some of the local attractions. One of the places we visited near Mysore was
Gumbaz, a tomb and mosque that was built by Tipu Sultan as a tribute to his father Hyder Ali.
The Gumbaz is over 220 years old, and contains the cenotaphs (empty tomb / monument) of
Tipu Sultan, his parents, and various other relatives.
The polished granite pillars and ceiling were very impressive, as were the ivory-inlaid doors.
The photo above shows a view of the Gumbaz from the entrance gate,
and the photo below shows a row of arches in a seemingly deserted building behind the Gumbaz.

arches in an outer building
Gumbaz, Srirangapatna, Karnataka, India
Canon EOS 50D, 10-22mm @10mm, 1/25 sec, f/6.3, ISO100
posted Sunday, 21 April 2013, 14:36 (+0800), by Martin
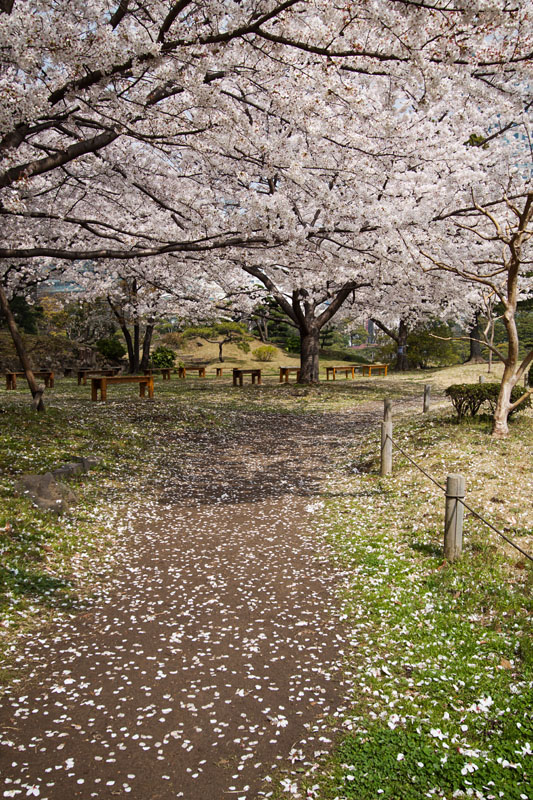
fallen petals
Kyu-Shiba-rikyu Gardens, Tokyo, Japan
Canon EOS 50D, 10-22mm @22mm, 1/100 sec, f/8, ISO100
Late last month I spent a week in Tokyo, Japan, on a business trip.
My visit to Tokyo happened to co-incide with the cherry blossoms (known as "sakura" locally),
something which typically only lasts a week or so.
I had an opportunity to visit some of the parks nearby my hotel, and took some photos of the
wonderful sight of many trees completely covered in white and pink cherry blossoms.
posted Sunday, 07 April 2013, 14:26 (+0800), by Martin
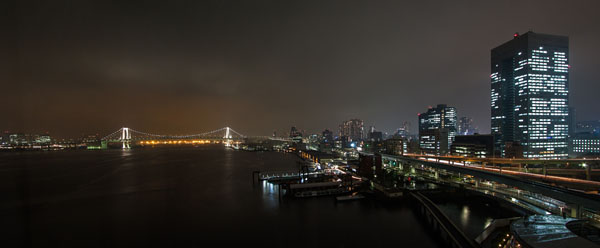
Rainbow Bridge and Tokyo Bay
Tokyo Bay, Tokyo, Japan
Canon EOS 50D, 10-22mm, 30 sec, f/8, ISO100
I recently visited Tokyo, Japan for a week, for some work-related commitments.
This is the veiw out of the window on my ninth floor hotel room
at Takeshiba, showing
Tokyo Bay,
with the
Rainbow Bridge
on the left hand side.
I left my tripod at home, so for this 30 second exposure, I balanced my camera
on top of a coffee table on top of the room service trolley.
This was not the first time I've used whatever was available in the hotel room to
support my camera for a long exposure photo - I have
previously
used a Coke can to support my camera when shooting out of a hotel window.
posted Saturday, 30 March 2013, 21:15 (+0800), by Martin
Phottix Releases the TTL Mitros Flash for Canon
Phottix recently
announced
a new TTL Flash called the Phottix Mitros.
Only a Canon version is available now, with a Nikon version expected soon, and a Sony version planned
for later this year.
While not yet listed in Phottix's
Phottix online store,
the expected price is around USD$350.
Update: The Mitros flash for Canon is
now available
in the Phottix online store, and is priced at USD$349.99.
Phottix Mitros flash
The Mitros is a high-quality flash that works well in both manual and TTL mode, and
is completely compatible with the fantastic
Odin TTL flash triggers
and the yet-to-be-released
Strato TTL triggers.
It is compatible with Canon's IR triggering capabilities, allowing you to easily use
one or more Mitros flashes with an existing set of Canon flashes.
A USB port ensures the firmware in the Mitros flash can easily be upgraded.
After testing a Mitros for a while, I found it has a few key features that make it more appealing to me
than a Canon 580EX II flash, including:
- ready confirmation beep
- battery indicator
- 3.5mm sync socket
- easier head tilt/rotation (no need to push a button)
Check out the full specifications of the Mitros on
Phottix's website.
Phottix Easter Savings
You can save 10% off all purchases in the
Phottix online store
until 2nd April when you use the discount code "EASTERTEN".
If you have been considering buying some new accessories for your photography, then you
should take advantage of this discount.
Chromasia Training Discounts
David Nightingale from Chromasia Training
a discount on his video training titled "The Art of Black and White Photography", bringing the price down
to USD$39 until Monday 1st April.
Use
this link
to get the discount or enter the coupon code "Easter_2013" to manually apply the discount.
You can also get a 50% discount on the first year subscription to the Chromasia
photography and post-production tutorials
if you sign up before Monday 1st April. With a 50% discount, that brings the price down from
£30 to just £15.
Use the coupon code "F81A814D6F" when you sign up to get the discount.
Nik Collection Discounted
Earlier this week, Google announced that they were reducing the price of the entire
Nik Collection
from USD$499 down to just USD$149.
This suite includes six of their great plug-ins, including
- HDR Efex Pro 2
- Silver Efex Pro 2
- Sharpener Pro 3
- Color Efex Pro 4
- Viveza 2
- Dfine 2
These plug-ins can be used with Photoshop, Lightroom or Aperture, and this bundle is great value at this price.
You can also try them for a 15 day trial before purchasing them.
The Nik Collection can be purchased from the
Nik Software website.
For a further discount, check the comments on
this story
for some coupon codes.
Photo Inspiration
I have previously linked to some of the galleries posted by
The D-Photo Inspiration Fix,
and they have continued to post some fantastic photos.
Here's a short selection of some of the recent galleries they have posted:
Note that some of the other sets linked by the D-Photo are NSFW.
posted Thursday, 07 March 2013, 18:28 (+0800), by Martin
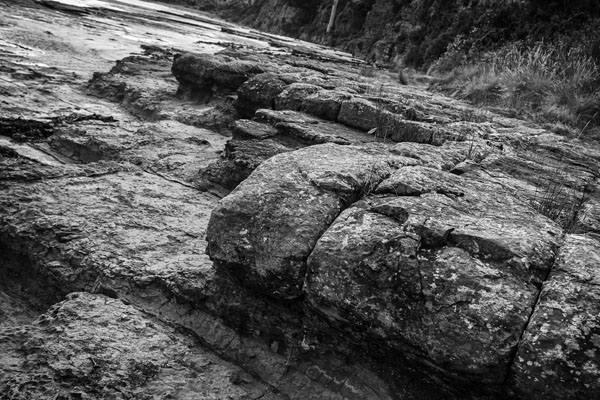
Elephant Rocks
William Bay National Park, Denmark, Western Australia
Canon EOS 50D, 10-22mm @10mm (10-stop ND filter), 20 sec, f/16, ISO100
During a roadtrip around the southwest of Western Australia late last year, we visited Denmark,
and had a look at
Elephant Rocks.
The name comes from the exposed rocks, which from some angles, look like elephants,
particularly when viewed from the path above the rocks, as shown in the top photo.
All three photos in this post were taken with the help of my
10-stop B&W ND filter.
The ND filter allows me to achieve much longer
shutter speeds
than normally possible during the day, by only allowing 0.1% of light through it.
posted Thursday, 28 February 2013, 19:41 (+0800), by Martin


main dial on a Canon 50D
In recent months, the main dial on one of my Canon 50D DSLR cameras
would slip when attempting to rotate it.
The slipping occurs more frequently in one direction than the other direction,
and also appears to be weather-related, occurring more frequently in hotter weather.
This was particularly annoying, as most of my photography sees my
camera mode
set to
aperture priority,
and without a fully functional main dial, it was difficult to quickly adjust the aperture.
It turns out this appears to be a relatively common issue
with some of the Canon DSLRs, including the 30D, 40D and 50D.
Getting the dial assembly replaced by Canon will apparently cost you about USD$150.
On closer inspection, it was clear that the rubber grip on the dial was slipping on the
inner plastic wheel.
Rather than sending the camera into Canon for repairs, I decided to try a DIY repair
by applying some glue between the rubber grip and the plastic wheel.
posted Friday, 22 February 2013, 11:26 (+0800), by Martin
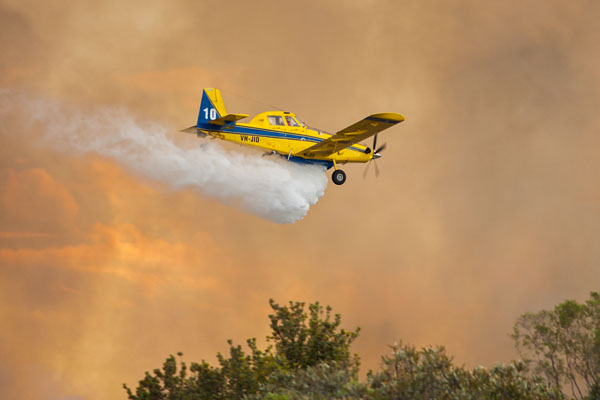
water bomber dumping water
Yesterday was another very hot summer day, with the temperature reaching 40 degrees Celcius.
Hot days seem to be a recipe for bushfires, and yesterday was no exception, with a couple of large fires
around Perth.
A bushfire in Forrestdale in the late afternoon sent plumes of smoke into the sky, and as we could see
some water bombers in action, I took two of my kids to have a closer look.
posted Sunday, 17 February 2013, 13:40 (+0800), by Martin
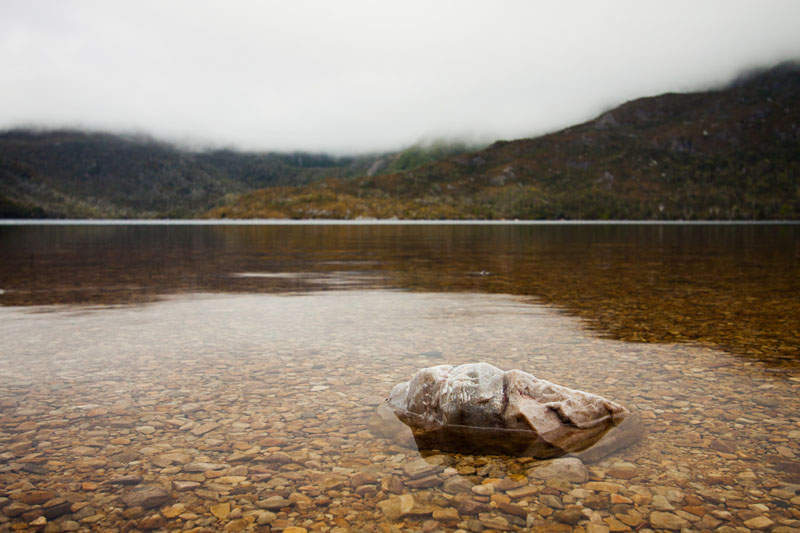
edge of Dove Lake
Cradle Mountain - Lake St Clair National Park, Tasmania
Canon EOS 50D, 10-22mm @22mm, 1/250 sec, f/7.1, ISO200
Here is another photo from our trip to Tasmania last month.
When we arrived at Dove Lake, everything was shrouded in thick fog, and we could barely see across the lake.
By the time we completed the walk around Dove Lake, the fog had cleared, and there was sunshine and a blue sky.
posted Sunday, 10 February 2013, 13:41 (+0800), by Martin
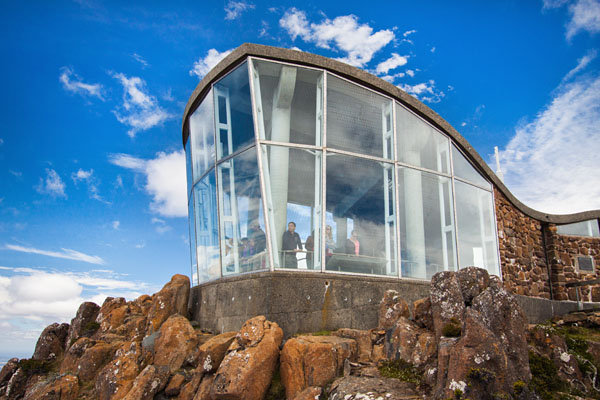
the Interpretation Centre
Mount Wellington, Hobart, Tasmania
Canon EOS 50D, 10-22mm @16mm, 1/125 sec, f/8, ISO160
Last month, we spent some time in Hobart while holidaying in Tasmania.
Hobart is Tasmania's capital city, and is located on the foothills of Mount Wellington.
Mount Wellington is nearly 1300 metres tall, and the road to the peak is a long and winding road.
Our kids were hoping for some snow on Mount Wellington, but unfortunately for them, there was none
(and yes, snow on the Mountain even in summer is fairly common).
On our
last visit
up the Mountain, about 5 1/2 years ago, we couldn't see anything due to a thick fog.
However, this time the weather was much better, and we had a reasonable view of Hobart city
far down below.
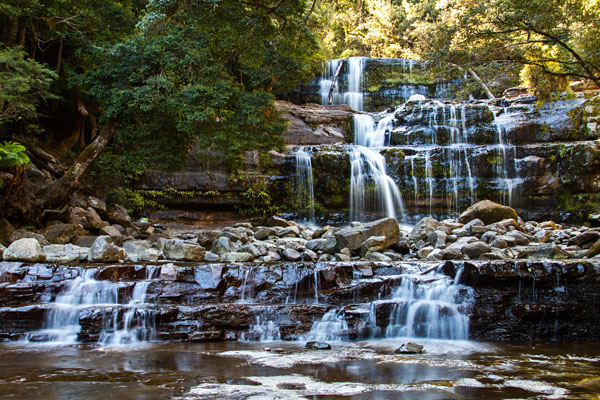
posted Friday, 01 February 2013, 20:08 (+0800), by Martin
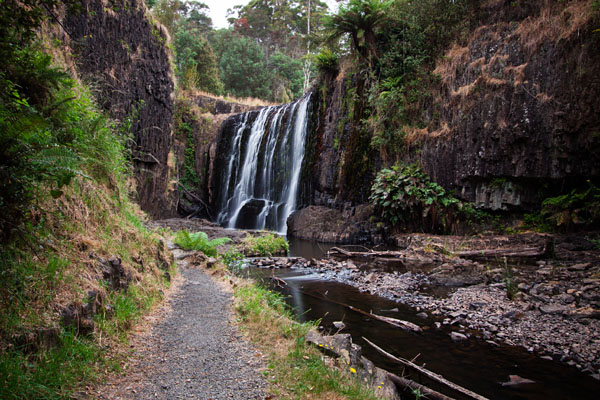
Guide Falls
West Ridgley, Tasmania
Canon EOS 50D, 10-22mm @16mm (10-stop ND filter), 63 sec, f/9, ISO100
Guide Falls is a very accessible waterfall about 20km south of Burnie, in the north west of Tasmania.
The base of the falls is just a short walk from a nearby car park and picnic area.
Apparently these falls have water all year round, but are more spectacular in winter and spring, due to a larger
volume of water flowing.
We visited these falls last month while holidaying in Tasmania,
and although it was a dry summer in Tasmania, there was still a reasonable amount of water flowing over the falls.
posted Sunday, 27 January 2013, 13:42 (+0800), by Martin
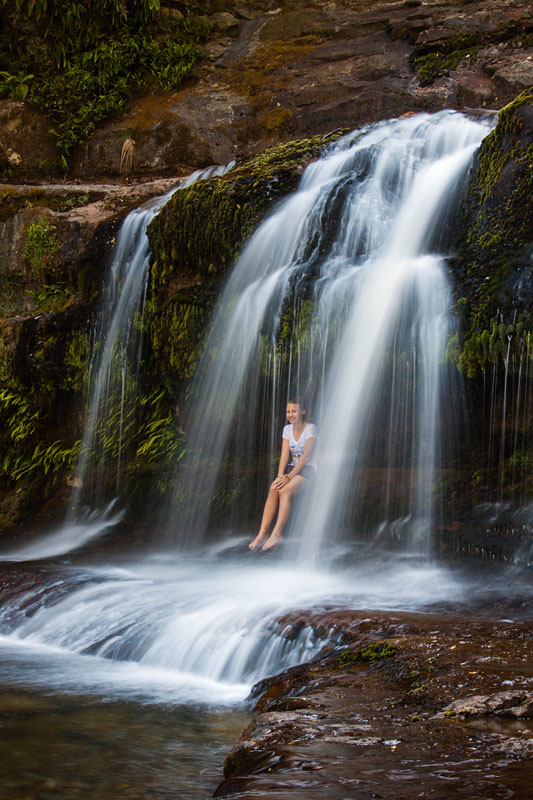
Michelle enjoying the falls
Liffey Falls, Liffey Falls State Reserve, Tasmania
Canon EOS 50D, 24-105mm f/4L IS @40mm, 8/10 sec, f/13, ISO100
We recently returned from a family holiday in Tasmania, where we had a great time exploring
the many wonderful sights with our children.
In early January, we were in Launceston on a hot day, and after first trying to get to the swimming pool
at the First Basin at the
Cataract Gorge
(we gave up trying to find a parking spot after seeing how many cars were parked on the side of the road in the area!),
we headed to Liffey Falls to cool off.
We had a great time splashing around in the cold water, and exploring among the rocks.
Liffey Falls
Liffey Falls State Reserve, Tasmania
Canon EOS 50D, 24-105mm f/4L IS @24mm, 8/10 sec, f/11, ISO100
posted Wednesday, 09 January 2013, 16:50 (+0800), by Martin

the Nobbies Centre
The Nobbies, Phillip Island, Victoria, Australia
Canon EOS 50D, 35mm f/2 @35mm, 1/80 sec, f/9, ISO400
On a recent business trip to regional Victoria late last year, I was staying in a hotel on Phillip Island,
which is located about 140km south-south-east of Melbourne, connected to the mainland by a bridge.
When travelling for work, I try to take my camera with me, and take photos of places I wouldn't otherwise
be visiting, and this trip was no exception.
One evening after work, I drove around Phillip Island, exploring the coastline and the local attractions.
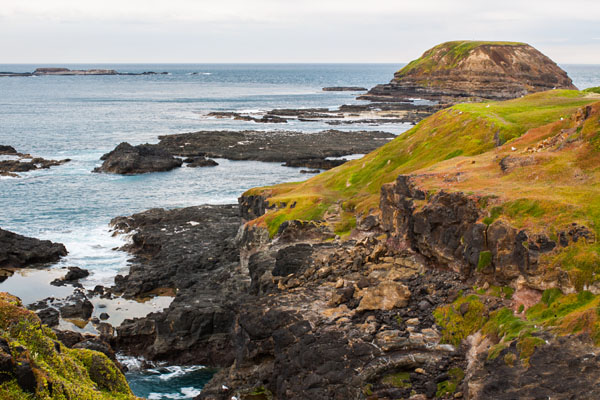
the Nobbies
The Nobbies, Phillip Island, Victoria, Australia
Canon EOS 50D, 35mm f/2 @35mm, 1/6 sec, f/13, ISO400
Located on the western tip of Phillip Island at Point Grant, the Nobbies is an interesting rock formation on the coast.
A tourist and information centre, known as the Nobbies Centre, is located here, along with boardwalks
allowing visitors to walk along the coast.
|
|