|
posted Thursday, 29 December 2011, 14:14 (+0800), by Martin
Looking Back at 2011
2011 has been another busy year for me.
It has been busy at work throughout the year, and I spent a number of weeks on work-related travel,
visiting Melbourne (three times),
Adelaide,
Calgary (Alberta, Canada),
Brisbane,
and a
remote mine-site
in the north of Western Australia near Kununurra.
I took a camera with me on most of the work-related trips, and in most cases, managed to find some time
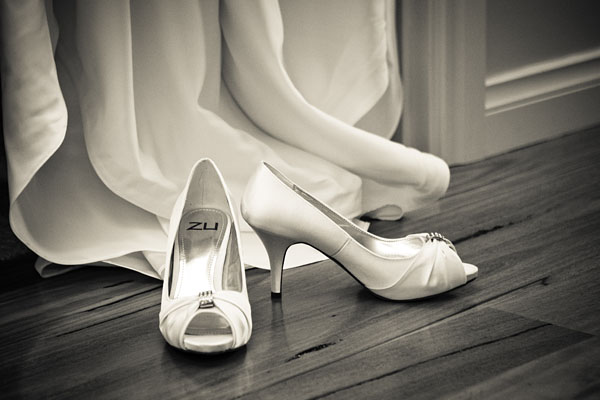
for photography.
ore stockpiles
remote mine-site, Kimberley, Western Australia
snow-covered mountains in the mirror
Spray Valley Provincial Park, Alberta, Canada
I also spent three weeks in the Netherlands on a family holiday - the first time I had been back
for about 13 years. I came back from the
Netherlands with nearly 3000 photos.
view of Elburg from Sint Nicolaaskerk
Elburg, Gelderland, The Netherlands
As I indicated
12 months ago,
I made a start in
kite aerial photography (KAP) this year,
using an old Canon PowerShot G5 point-n-shoot camera.
I also had an
Introduction to Kite Aerial Photography
guest post published on
DIY Photography.
KAP self-portrait
taken with remote-controlled camera suspended from kite
Southern River, Western Australia
I recently purchsed a
GoPro Hero2 camera, and used it
for a few KAP sessions earlier this week (photos from those sessions coming soon).
The GoPro Hero2 is smaller and lighter than the old Canon G5 I was using, has
a wider angle lens, and will provide 11 megapixel still photos and full HD video.

GoPro Hero2 camera in its weatherproof housing
Early in 2011, I also did my first new-born newborn baby
photoshoot - taking photos of Zoe Madison when she was two weeks old.
It was a lot of fun, and the parents and I were happy with the results.

Zoe Madison
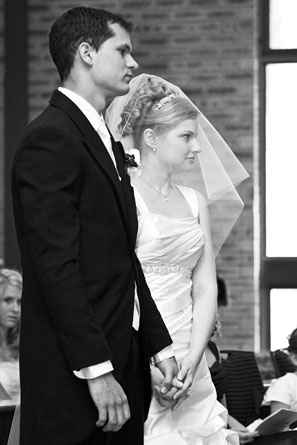
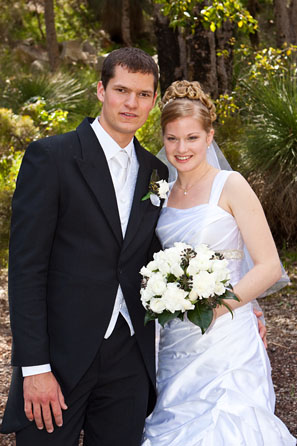
In 2011, I shot a few
weddings.
While I enjoy shooting weddings, I do not want to take on too many weddings, due to the
time and effort it takes.
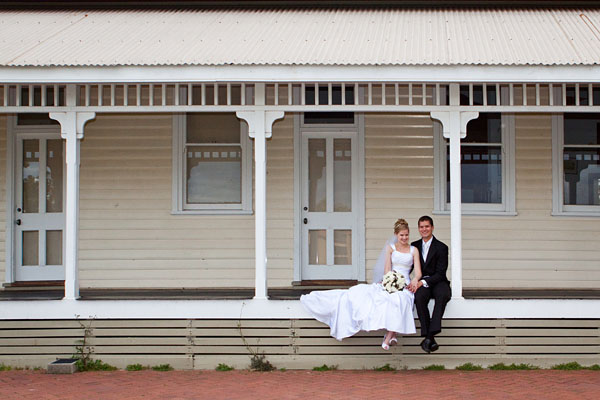
Marius & Alice
University of Western Australia
Throughout the year, I also went out on a few photowalks with friends, family, and colleagues,
to a variety of locations.
lonely
Warnbro, Western Australia
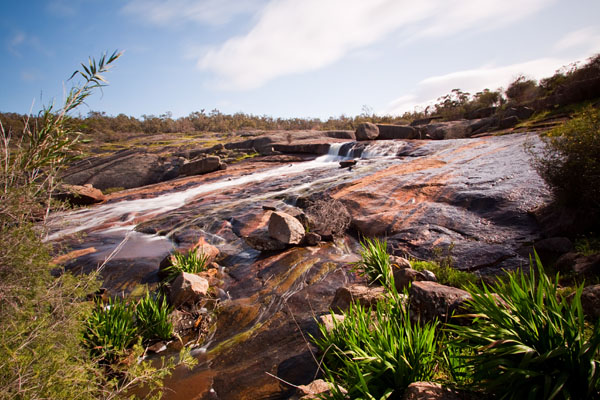
Hovea Falls
John Forrest National Park, Western Australia

dugite snake (pseudonaja affinis)
Harvey Dam, Western Australia
My cheapest gear acquisition in 2011 was a
DIY camera wrist strap,
made out of cheap paracord. After several months of use, I can say that I'm definitely
finding that it works well for me, and I am not missing the neck strap at all.
DIY camera wrist strap
One of my more exciting gear acquisitions was the
Phottix Odin,
a wireless TTL flash trigger.
The Odin provides full TTL functionality for multiple remote flashes - and does so wirelessly,
using 2.4GHz RF, providing more reliable triggering and much better range than Canon's
built-in infrared triggering.
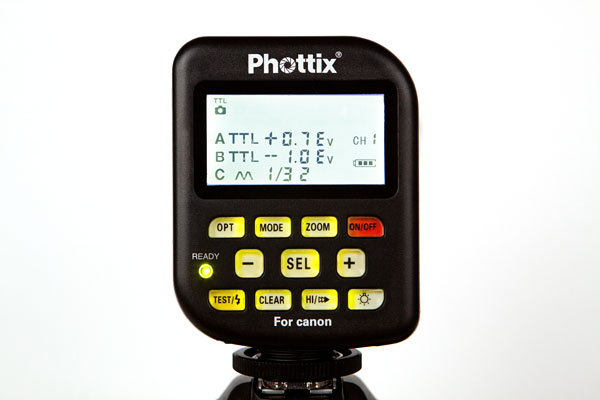
Phottix Odin transmitter control unit
I have used the Odin for a couple of weddings, as well as various family shoots
and product-type shoots, and have been very impressed with the functionality and features it provides.

Adrian & Roslin & bridal party
shooting into the sun, with two bare 580EX flashes triggered with a Phottix Odin, in TTL mode
Popular Posts of 2011
The number of
RSS subscribers
continued to increase during 2011.
According to Google Analytics, of the blog posts that were posted during 2011,
the most popular were:
As shown by the list of popular post above, gear-related posts continue to prove popular.
Due to insufficient time, I only posted three articles in the series I am writing as I
teach camera basics and camera operation
to my children (and all three show up in the most popular posts above).
Looking Forward at 2012
I intend to write more articles in the
Understanding Your Camera series
as I continue to teach camera basics and camera operation to my children.
Nicholas
Glen Brook Dam, John Forrest National Park, Western Australia
Bookings for a couple of weddings for 2012 have already been received,
and I may look at writing some posts about what happens while shooting a wedding.
More gear reviews are planned, as well as a number of book reviews and ebook reviews.
Thanks to all the people who have responded to posts with comments over the last years, and
I wish all my readers the best in your 2012.
If you are not a regular reader of this blog, you may want to consider
subscribing via
RSS
or via
email,
to ensure you don't miss out on any new content.
posted Thursday, 22 December 2011, 22:45 (+0800), by Martin
Some rough-cut wooden clogs in a clog workshop, in the historical Dutch village of
Marken.

wooden clogs
Marken, Noord-Holland, The Netherlands
Canon EOS 50D, 24-70mm f/2.8L @42mm, 1/50 sec, f/5.6, ISO250
posted Sunday, 11 December 2011, 13:35 (+0800), by Martin
Christmas Specials
Phottix are offering a 5% discount on all purchases from their
online store until 25 December 2011.
Use the discount code 5offxmas to receive your discount.
If you have been wanting a Phottix
Odin TTL flash trigger,
or maybe a Strato II multi trigger,
now is the time to submit an order!
B&H have
instant rebates
on numerous items, including lenses, camera bodies and more, until 7 January 2012.
Have a browse through their list, and see if there is anything you need while the rebates are available.

The Best Camera
Commercial photographer Chase Jarvis once said
" The Best Camera Is The One That's With You".
In other words, it doesn't matter if you've got a great camera sitting at home...because
if you don't have it with you, you can't use it!
Chase has been a big fan of using iPhone cameras and similar, as a phone is something
you normally always have with you in your pocket.
I don't carry my DSLR camera with me every day, as it's too large and heavy, and inconvenient to
take with me everywhere.
I've had a company-provided Nokia phone for many years, but the camera in my current Nokia 3120 Classic
is only capable of very crappy photos!
I recently bought a
Samsung Galaxy S II
Android smart phone, which has a camera that is capable of 8 megapixel still images
(with a 28mm equivalent focal length),
and full high-definition 1080p video at 30 frames per second.
(Check out the interesting advert for it here.)
While the camera on my new smart phone will never replace my DSLR, it will provide me with the opportunity to take
photos in situations where I previously did not have a camera with me.
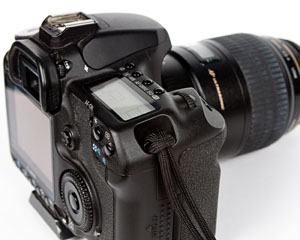
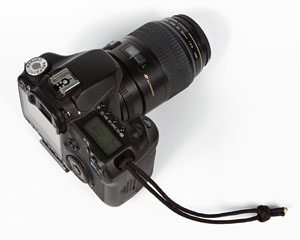
GoPro Hero 2
I recently bought a
GoPro Hero2 camera.
It's a tiny camera capable of 11 megapixel still photos (with a
field-of-view of 170 degrees!),
full HD video, and comes complete with weatherproof housing and various mounts.
Check out this video on YouTube for
some interesting ideas on how these cameras can be used.
I am intending to use the GoPro Hero2 camera for kite aerial photography.
Here's a photo to show just how small this camera is.

GoPro Hero2 camera in housing
photo taken with Samsung Galaxy S II phone
B&H do not yet have the
GoPro Hero2
in stock, but have the older
GoPro Hero Original
and accessories for both the Hero and Hero2 avaiable.
GoPro cameras can also be ordered directly from gopro.com.
I ordered mine from gopro.com, and it was delivered (to Australia) a week after being ordered.
Tilt Shift Showcase
Want to look through some cool
tilt-shift photos?
Want a place to show off your own tilt-shift photos?
The tiltShifted.com website
is an online showcase for tilt-shift photographers.
You can submit your tilt-shift photos for inclusion - a couple of
my tilt-shift photos are visible here
on tiltShifted.com.
Photos for Inspiration
Here are some great selections of photos to inspire you.
posted Thursday, 01 December 2011, 21:22 (+0800), by Martin
A sneak peek at a wedding I shot a few weeks ago.
Here's the bride pretending to drive away in the very cool Kombi that
they used as their wedding car.
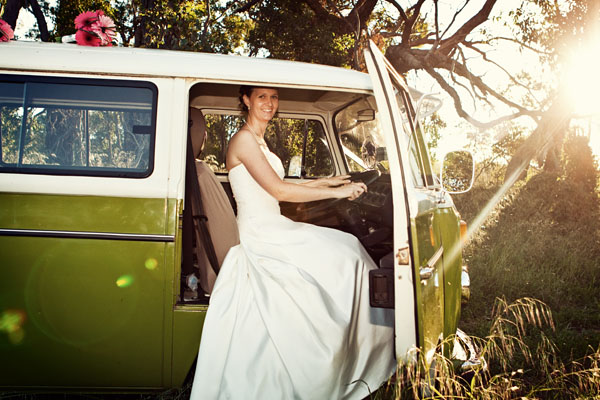
getaway car
Roleystone, Western Australia
posted Sunday, 27 November 2011, 14:27 (+0800), by Martin
While fly-fishing at Harvey Dam yesterday with some friends, we came across the 1.5m
dugite snake shown in the photos below.
Actually, it is probably more accurate to say it came across us.
While standing on the edge of the dam water with a rod in my hand, the snake's arrival
was announced via some screaming by a female friend.
dugite snake
Harvey Dam, Western Australia
The snake was clearly terrified, and tried to blend into the background by not moving at all.
I immediately grabbed my camera, and started shooting the snake.
With some gentle encouragement with a fishing rod, the snake departed up the hillside,
and disappeared in a hole in the ground.
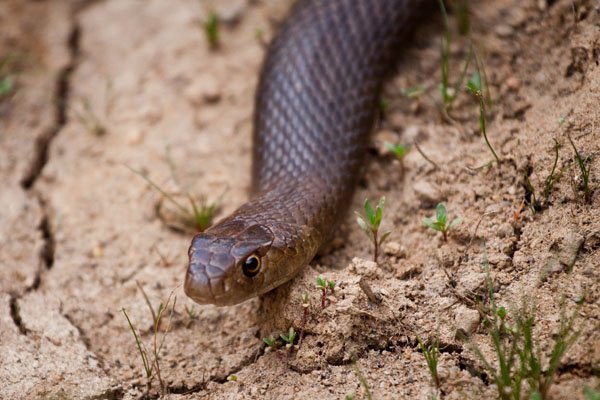
dugite snake
Harvey Dam, Western Australia
posted Saturday, 19 November 2011, 14:28 (+0800), by Martin
With summer almost here, and the weather starting to warm up (37 degrees forecast for next week Wednesday!),
I thought I'd dig out a photo from a much colder season.
This photo is from my trip to Canada in April this year, at the end of the northern winter.
While exploring near Barrier Lake (in Kananaskis Country), I saw some snow on a bench,
and decided to get closer with the camera.
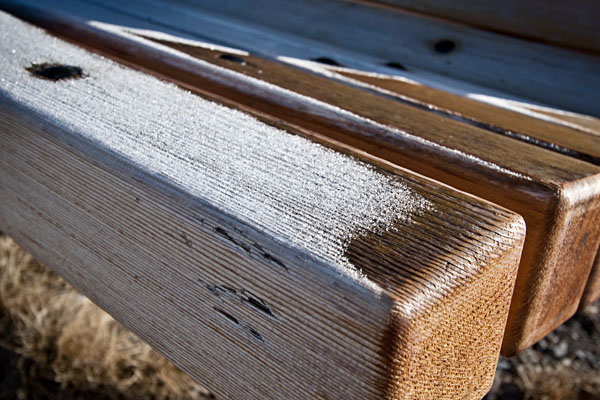
snow on a bench
Barrier Lake, Alberta, Canada
Canon EOS 50D, 10-22mm @22mm, 1/125 sec, f/7.1, ISO100
posted Wednesday, 09 November 2011, 22:26 (+0800), by Martin
Last month I shot the wedding of Marius and Alice.
The rain held off during the day, with only a shower or two when we were driving
between locations.
It was a fun day, and we visited some of my favourite wedding photo locations,
including UWA and the Crawley Edge boatshed.
Here's a few shots from the day.
posted Saturday, 05 November 2011, 22:48 (+0800), by Martin
A fishmonger weighs fish for a customer at the markets in Utrecht, the Netherlands.
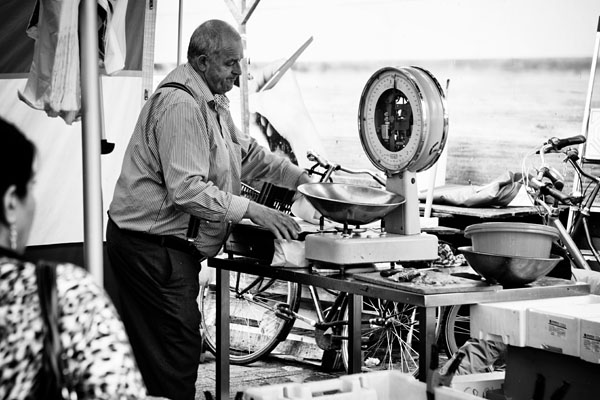
fishmonger
Utrecht, The Netherlands
posted Sunday, 30 October 2011, 14:53 (+0800), by Martin
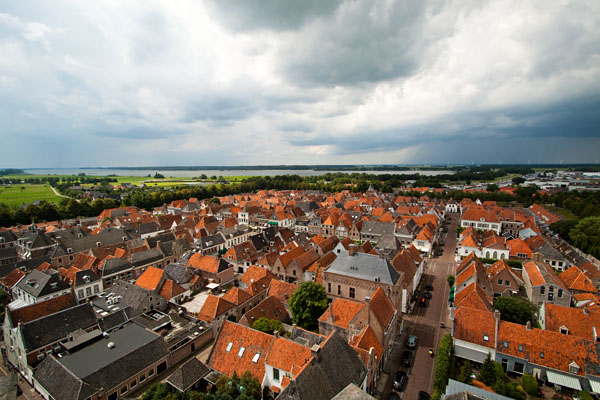
When walking through the old city of
Elburg,
in the Netherlands, earlier this year,
a wedding was about to start. I loved the look of the flowers on this black VW Beetle
that was parked outside the town hall, so I took a couple of shots with
my 10-22mm lens.
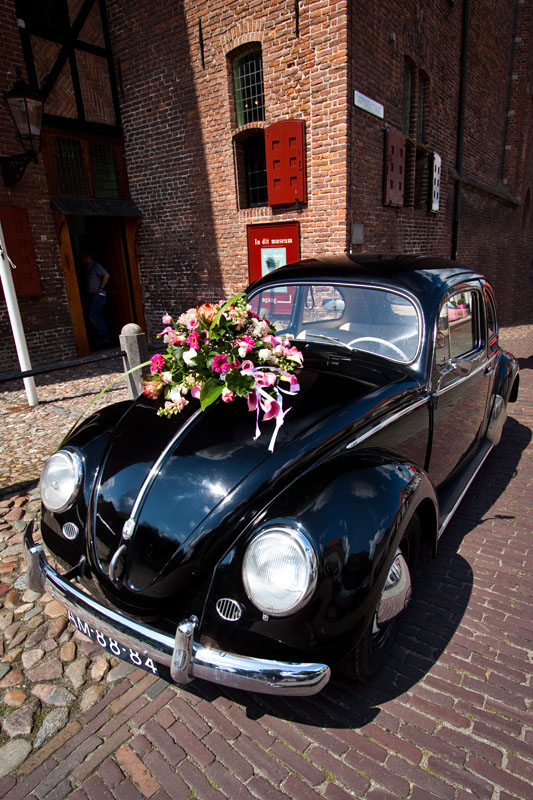
Wedding Beetle
Elburg, Gelderland, The Netherlands
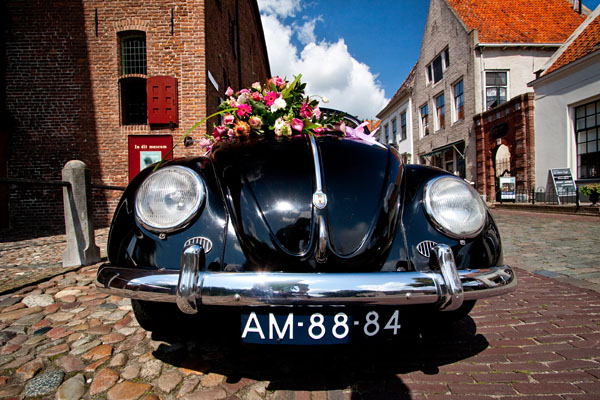
Wedding Beetle
Elburg, Gelderland, The Netherlands
posted Thursday, 27 October 2011, 17:35 (+0800), by Martin
A different kind of Dutch windmill to the
last one I posted.
This one was shot in central Holland somewhere, while
cruising through the canals in a boat.
Dutch windmill in the fields
The Netherlands
posted Tuesday, 11 October 2011, 22:10 (+0800), by Martin
Here is a photo from a wedding I shot earlier this month.
This was a spur-of-the-moment shot, taken out the window of my parked car
with a 70-200mm lens, as the wedding cars were driving through a carpark
towards me.
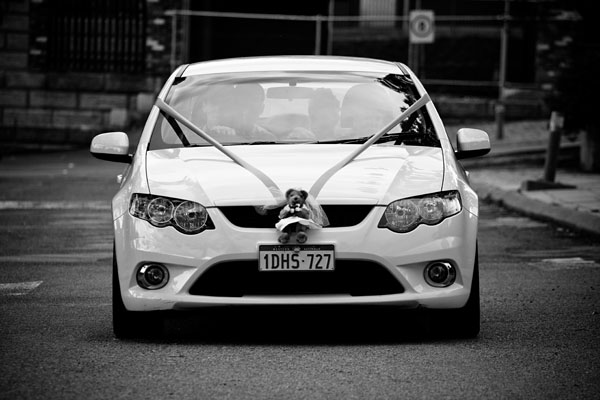
wedding car in black and white
Pioneer Village, Armadale, Western Australia
posted Saturday, 08 October 2011, 16:05 (+0800), by Martin
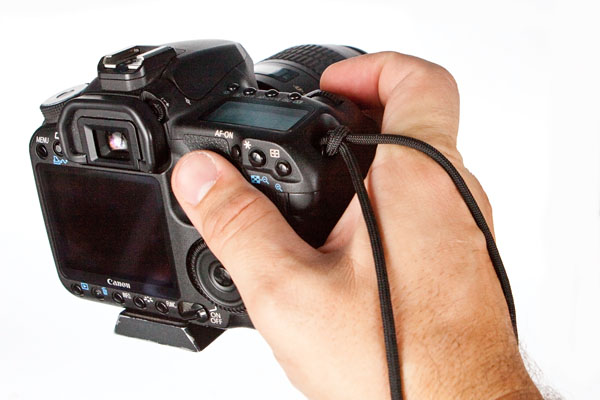
Wrist Strap
I have been using a DIY wrist strap on my camera for the last couple of months, and
I am finding that it works very well for me.
When on a photowalk or a photo shoot, I wasn't using the camera's neck strap,
and typically just would let it hang down, getting in the way.
This wrist strap allows me to completely remove the neck strap, provides
some security against dropping the camera, and adds some wrist support when holding the camera
up to my eye.
I have used it on a couple of photo shoots and a photowalk, and am not missing the neck strap at all.
The problem with many of the commercial hand/wrist straps is that the top normally attaches to the strap mount,
while the bottom attaches to the tripod mount underneath the camera.
Because I don't use a battery grip, such a strap would be too small for my large hands,
and it could potentially foul the tripod mount.
This DIY camera wrist strap only attaches to the top strap mount on the camera body,
and is adjustable to fit any size wrist and hand.
It allows me to leave my tripod quick-release plate screwed onto the base of the camera body,
and I can clip the camera onto my home-made rapid strap without having to remove the wrist strap
from the camera.
Credit
I first saw this DIY camera wrist strap
here
on Jan Christian's blog.
While Jan used red paracord for his strap (which works well with the red strip on some Canon L lenses),
I decided to use a more subtle black paracord for my wrist strap.
Making Your Own Wrist Strap
Jan specifies 550lb 7-core paracord,
which can easily be sourced on eBay or elsewhere on the internet.
The ends of an appropriate length of paracord (approx 60-70cm) are tied with a
lanyard knot.
The strap is then looped through the top right
strap mount on the camera body using a simple
lark's head knot.
As it will probably be a tight fit through the strap mount on the camera,
use one of the inner strands of paracord to help pull it through.

pull the strap through the strap mount
| |
lark's head knot on the camera
|
The length of the strap can then be adjusted to suit your wrist size
by moving the lanyard knot.
As Jan says,
you need to adjust it to find the
"sweet spot where there's a little tension on the strap but enough slack so
that you can still manipulate the buttons on the camera".
Once suitably adjusted, cut any excess off the ends, and melt them to prevent fraying.
If necessary, the strap can easily be removed from your camera at any time, without
having to undo the lanyard knot.
the finished product
| |

using the strap
|
If any locals who know me personally are interested in trying one of these wrist straps,
I have plenty of black paracord, as 30 metres was the shortest length I could find on
eBay at the time!
posted Thursday, 29 September 2011, 20:05 (+0800), by Martin
A curious piglet keeps a careful eye on me as I take his photo.
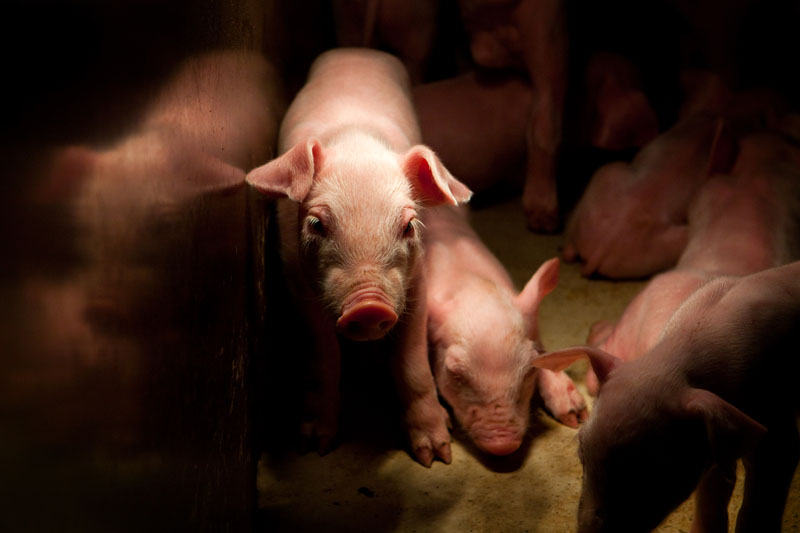
curious piglet
Wittelte, Drenthe, The Netherlands
posted Thursday, 15 September 2011, 10:01 (+0800), by Martin

Phottix Odin transmitter control unit
with backlight on
Intro
Phottix have delivered yet another interesting and useful camera accessory - this time
addressing the shortcomings of wireless TTL flash technology offered by Canon and Nikon.
The Phottix Odin is a wireless TTL flash trigger that uses RF communications,
thus providing more reliable triggering and longer range than the infra-red communications
used by Canon and Nikon's built-in wireless flash triggering functionality.
While there are many non-TTL wireless flash triggers available, they all require the flash power to be set
on each individual flash.
The Phottix Odin allows multiple remote flashes to be triggered either in TTL mode, or in manual mode,
but allows all parameters to be set from the Odin transmitter control unit, rather than
on each individual flash.
This TTL flash trigger was initially going to be called the Phottix Helios, but the name was
subsequently changed to the Phottix Odin.
Thanks to Phottix for providing a pre-release Phottix Odin for review purposes,
and thanks to Steve for responding to my many questions.
Note that the photos in this review show a pre-release version of the Phottix Odin for Canon.
Silk-screen labelling on the finalised version will be slightly different.
Refer to the product photos at the bottom of the official
Phottix Odin annoucement
to see the labelling on the release version of the Odin.
Features and Specifications
Features
The Phottix Odin TTL Flash Trigger has the following features:
- three flash groups
- four channels
- can use ETTL/manual mode or ratio mode
- each flash groups can be configured for ETTL (with FEC) or manual mode
- each flash group can have zoom set by ETTL or manually
- high-speed sync up to 1/8000 seconds
- second curtain sync
- remote flash wake-up
- compatibility with Phottix Strato 4-in-1
and Strato II Multi receivers
posted Wednesday, 14 September 2011, 06:42 (+0800), by Martin
DIY Photography
has published a guest post by myself, which takes an introductory look at kite aerial photography (KAP).
The DIY Photography website is a great resource for information on DIY light modifiers,
building a home studio, as well as various photography techniques and camera hacks.
The DIYP site is run by Udi Tirosh, a professional photographer.
He emailed me some time ago, asking if I was interested in writing a guest post about KAP,
so I jumped at the chance.
Head over to DIYP to read my
Introduction to Kite Aerial Photography
guest post.
KAP self-portrait
Southern River, Western Australia
Canon PowerShot G5 @7mm, 1/1600 sec, f/4
posted Sunday, 11 September 2011, 14:10 (+0800), by Martin
In the Netherlands, the humble bicycle gets a lot more use than in Australia,
with many people regularly using their bikes for commuting.
There's also a type of bike designed for carrying more cargo,
typically known as a
" bakfiets" in Holland
(probably best translated to English as "cargo bicycle" or
" freight bicycle").
Here are a few bakfietsen that I saw while walking around the city of Utrecht.
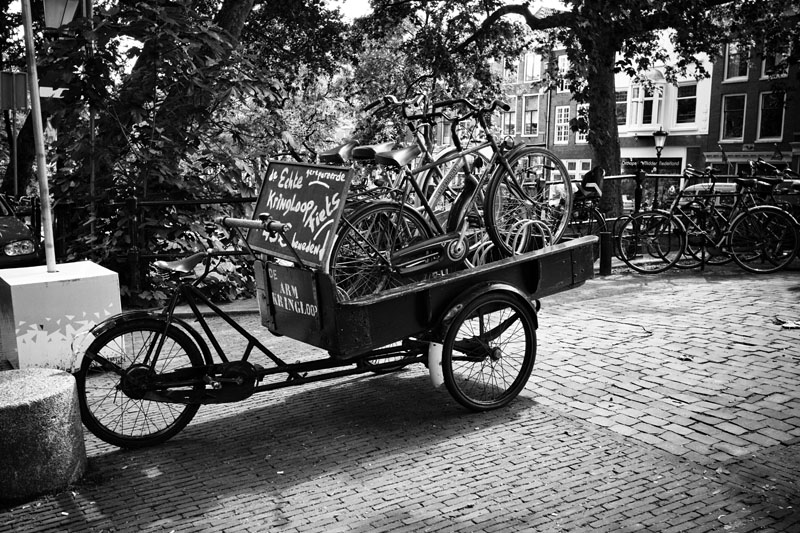
bakfiets outside a bike shop
Utrecht, The Netherlands
posted Tuesday, 06 September 2011, 18:50 (+0800), by Martin
While in the Netherlands in June/July, I noticed the variety of cobblestones
that many villages and cities had, with different types and shaped cobblestones
being used in different locations.
The cobblestones ranged from rectangular, square, round, random-shaped,
and more.
While bending down to take a photo of these cobblestones, just outside the
Dom tower in Utrecht, I noticed a love-heart-shaped indentation in
one of the stones.
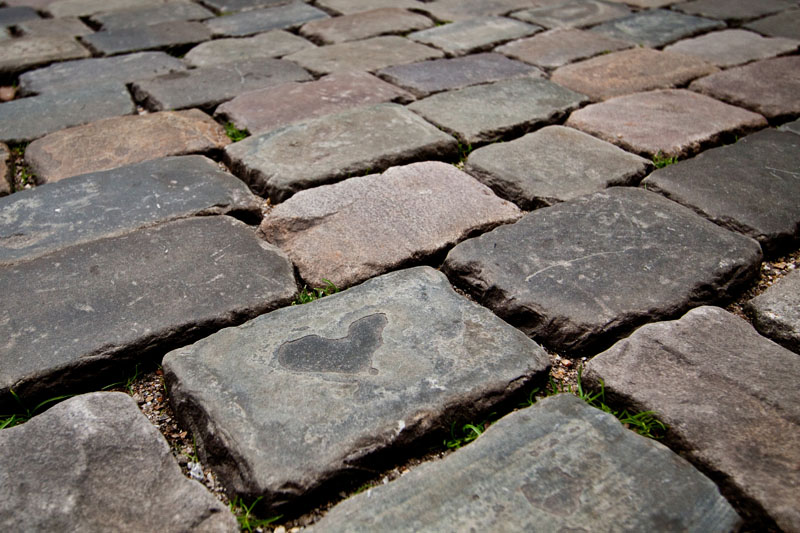
cobblestone love heart
Utrecht, The Netherlands
Incidentally, the photo above is the one I was about to take when I
damaged the CPL filter
on my Canon EF-S
10-22mm
lens, but the filter protected the lens itself from any damage.
posted Tuesday, 30 August 2011, 22:17 (+0800), by Martin
Taken while on holidays in the Netherlands recently,
I noticed this window on one of the barns on an uncle's farm,
and had to take a photo of it.
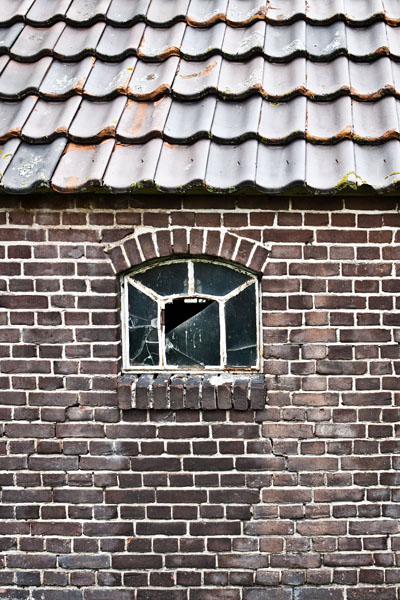
farm window
Wittelte, Drenthe, The Netherlands
posted Sunday, 14 August 2011, 13:40 (+0800), by Martin
While travelling around Holland in June/July, we quickly gained an appreciation for the
numerous canals criss-crossing the country, as well as the many drawbridges
that allow traffic over the canals.
The drawbridge shown below is in Ruischerbrug, in the province of Groningen,
and as we drove towards it, the drawbridge was raised (see second photo), to allow a long barge through.
We pulled over for a closer look and some photos, and the photo immediately below was taken
once the barge had passed through and the drawbridge was lowered again.
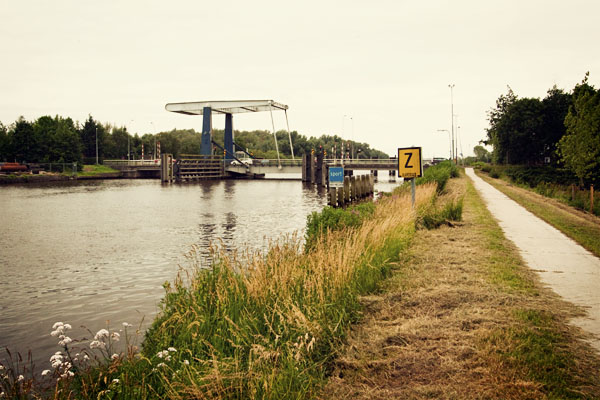
"Borgbrug" drawbridge over the Eemskanaal
Ruischerbrug, Groningen, The Netherlands
The name of this particular bridge is the "Borgbrug", which I suppose could be translated as "Borg Bridge" ;-)
posted Sunday, 07 August 2011, 14:38 (+0800), by Martin
Last month I returned from a 3-week family holiday in the Netherlands, and came home
with several thousand photos.
I'm slowly working my way through the photos, and will be posting some of them on my
blog in the coming months.
While I have been to the Netherlands several times before, this was the first time I
have been there in summer, and we had a great time, making the most of the very long
evenings (with daylight savings, it gets dark at about 10:30pm).
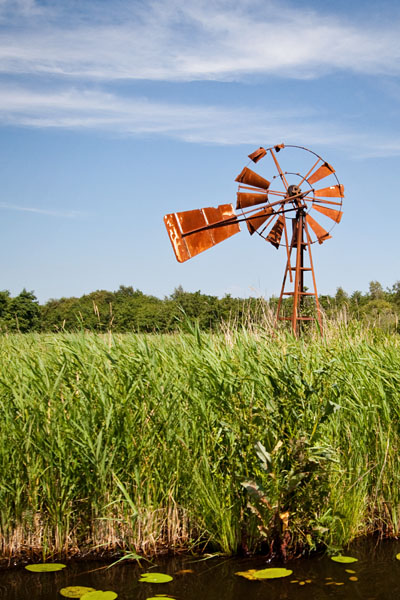
Here's a typical Dutch scene, a windmill, near Diever, in the province of Drenthe, in the north
of the Netherlands.
We were driving past, and stopped on the side of the road so I could capture this windmill.
In the first couple of photos I shot, the windmill was in the shade, but then the sun broke through
the clouds and lit up the windmill, resulting in the photo below.
Diever windmill
Diever, Drenthe, The Netherlands
posted Thursday, 04 August 2011, 21:53 (+0800), by Martin
Do Filters Protect Your Lens?
I've previously
written
about why I like to keep a filter on the front of each lens to protect it (normally a UV filter).
It is a subject that seems to divide photographers - some always have a UV filter on each lens,
while others don't like to put any extra glass between their lens and the subject matter.
While recently in Europe, I had another experience that confirms why I have a filter on each lens.
Cobblestone Impact!
While getting down on my knees to shoot some
interesting cobblestones
in the Netherlands last month,
I stumbled, and the end of my lens banged into the hard cobblestones.
I had the Canon EF-S
10-22mm
wide-angle lens on my camera at the time,
with a 77mm low-profile circular polarising filter (CPL) on the lens.
The end of the filter took the brunt of the impact, as shown in the photo below.
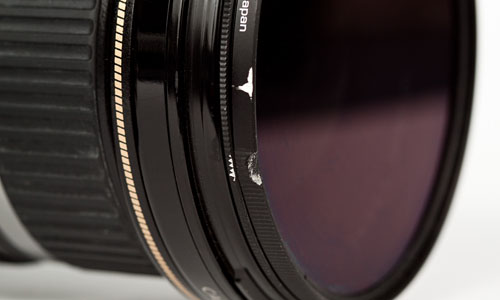
damaged CPL filter on a Canon EF-S 10-22mm lens
The lens itself wasn't damaged at all, other than a slight scuff mark on the outside of the filter thread.
Despite the damage to the CPL filter's outer element, the filter glass is still intact, and the filter
still rotates fine (initially a little stiff, but it has since loosened up).
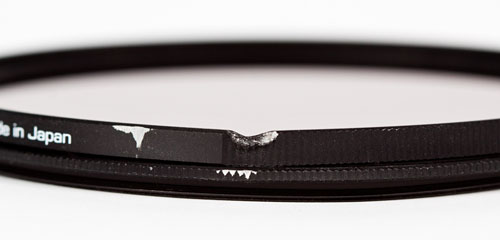
damaged CPL filter
With the damage to the CPL filter, I can no longer attach another filter to the front of this CPL filter.
However, I don't like to stack filters, so that's not an issue for me.
A Damaged Filter is Preferable to Damaged Lens
If I hadn't had any filter on the lens when it contacted the cobblestones, the filter thread on the lens itself
would very likely have been damaged.
With damaged filter thread on the lens, I wouldn't be able to screw on any filters, nor would I be able to
use my
Cokin Z-Pro filter holder
on the Canon 10-22mm lens.
I would much rather have a damaged filter, than a damaged lens!
A filter is a lot cheaper to replace than repairing or replacing a lens. In this particular incident,
although the filter was damaged, it's still completely useable.
posted Sunday, 31 July 2011, 20:30 (+0800), by Martin
Dear Photograph - a photo from the past in the present
The Dear Photograph website collects user-submitted photos
of a photo from the past in the present, and some great photos have been submitted.
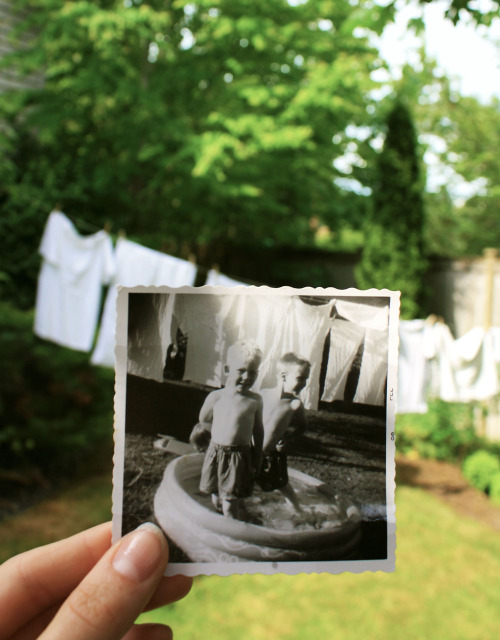
Head over to the Dear Photograph website, and browse through their collection.
Alternatively, dig out some of your old photos, and take your own photos to submit to the website.
More Then and Now photography
The Young Me / Now Me website
has user-submitted pairs of photos - where one photo is of the person or people from years ago,
and the second photo is of the same person or people in the same location.
Photographer Irina Werning's
Back to the Future project
takes the concept a step further, taking old photos of people, and then
re-creating the scene with the now-older person, using similar looking clothes, hairstyles, lighting and backgrounds.
(Note: some photos in the Irina's collection are NSFW.)
Cinemagraphs - a new use for animated gifs
Jamie Beck and Kevin Burg have found a new
use for animated gifs, using them to create some very interesting photos with subtle animation
that they call "Cinemagraphs".
Have an adventurous weekend, by Jamie Beck
For more examples of these cinemagraphs, head over to
Jamie's blog,
or see this
journal post
on redbubble.com with more info and links to tutorials on creating your own cinemagraphs.
Taking your Photography passion into other areas...
For all you keen photographers, you can now buy a piggy bank in the shape of a DSLR camera,
called the
DSLR Bank.
To help you dream about photography, you can also buy
lens pillows,
with a wide selection of different lenses available.
posted Saturday, 23 July 2011, 17:51 (+0800), by Martin
Early on last week Saturday morning, a few brave souls ventured out to Kings Park to catch the sunrise.
There was some low-lying fog over the city, river and the hills, which provided
some interesting views as the sun rose behind the city.
This shot was taken just after sunrise, with the sun just off the left of the frame,
and a lone boat in the river providing some interesting ripples in the water.
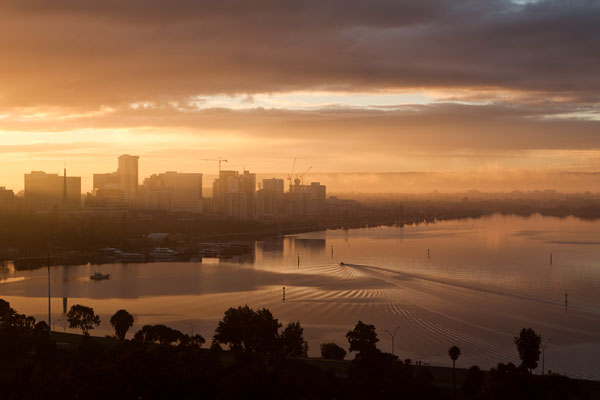
Swan River at sunrise
Kings Park, Western Australia, 2011-07-16
Canon EOS 50D, 24-70mm f/2.8L @50mm, 1/200 sec, f/5.6, ISO100
posted Sunday, 17 July 2011, 23:04 (+0800), by Martin
We have been breeding Gouldian finches for several years. A few weeks ago, I decided to try to get
some photos of a parent Gouldian finch feeding one of their young babies.
The young finches were a little shy, and here's one of them hiding behind a leaf.

baby Gouldian finch peering through a leaf
back yard at home, Western Australia
Canon EOS 50D, 70-200mm f/4L @188mm, 1/100 sec, f/4, ISO200
These baby finches had only been out of the nest for a week or so, and were still demanding to be fed by their
parents. Before too long, I was snapping photos of the father Gouldian finch feeding one of his brood (photo below).

male Gouldian finch feeding a young finch
back yard at home, Western Australia
Canon EOS 50D, 70-200mm f/4L @135mm, 1/100 sec, f/4, ISO200
posted Wednesday, 13 July 2011, 22:01 (+0800), by Martin
Introduction
After reading a
recent post
by Jason, where he analyses the focal lengths he uses,
I was inspired to do something similar.
I performed a similar analysis on all the photos I took in 2010, looking at
which lenses I used most, and the focal lengths used.
This was done in light of the fact that I have been thinking about maybe selling
one of my lenses and getting one covering a slightly different focal length.
Analysing EXIF
ExposurePlot is a useful
application for performing analysis on your photos.
Just point it at a directory of your photos, and it reads the EXIF data
in all the photos in that directory and subdirectories, and generates graphs of the data.
The command-line exiftool
provides similar functionality, but requires a little more effort to process the results.
For example, to extract the focal lengths of all photos and dump the results into a text file
(recursively going through all subdirectories looking for photos), the following syntax can be used:
exiftool -r -focallength * > focallengths.txt
If you are a Lightroom user, Lightroom can report various statistics by
lens, aperture, focal length, and more. Just click the filter combo at the
top right, and select "Metadata" to view the filter criteria.
Photos from 2010
During 2010, I took photos on numerous work-related interstate trips,
visiting Sydney (twice), Adelaide (three times), Brisbane, Gold Coast, Roxby Downs,
as well as a road trip through various locations in NSW, including Newcastle, Wollongong,
Nowra and Botany Bay.
I also shot one wedding, did one family shoot, and took plenty of photos on several
holidays with my own family.
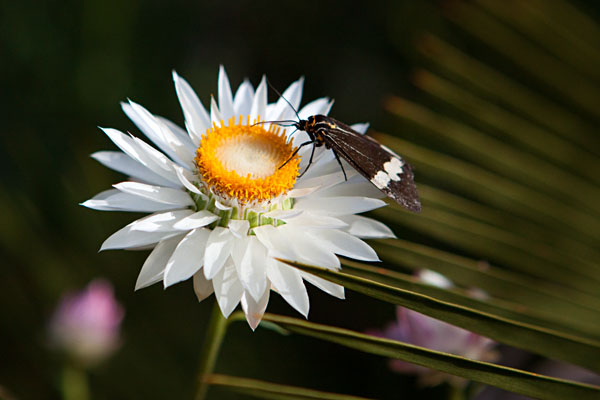
moth and everlasting flower
Lesmurdie Falls National Park, Lesmurdie, Western Australia
Canon EOS 50D, 24-70mm f/2.8L @70mm, 1/1000 sec, f/4.5, ISO400
posted Sunday, 19 June 2011, 14:05 (+0800), by Martin
Safety Bay is a popular location for kite surfers. To capture the movement and speed of this kite surfer,
I used a slow shutter speed, and panned the camera.
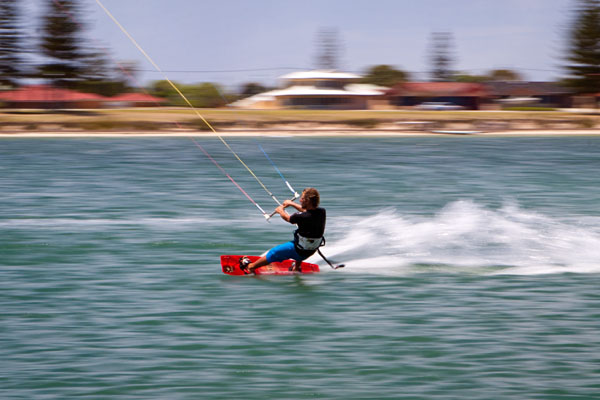
a kite surfer speeding along the water
Safety Bay, Western Australia
Canon EOS 50D, 24-70mm f/2.8L @70mm, 1/40 sec, f/22, ISO100
posted Sunday, 12 June 2011, 22:16 (+0800), by Martin
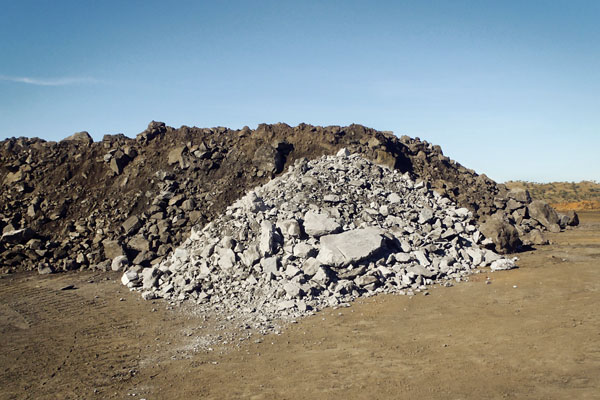
While on a remote mine site in the north of Western Australia recently, I was able to take
some photos while being shown around the site.
Here's some nickel ore, ready to be dumped into a crusher.
The lighter pile in the foreground is low-grade ore, while the darker pile behind it is
higher-grade ore.
mixed ore
Kimberley, Western Australia
Olympus uTough 8010 @5mm, 1/640 sec, f/3.9, ISO80
posted Thursday, 09 June 2011, 21:31 (+0800), by Martin
We have had a couple of extra boys in the house for the last week,
while friends of ours were overseas.
On the weekend, I snapped a few photos of the boys, and here's some results.
For lighting, I had a 580EX on the hotshoe, reflecting off the wall behind
me and off the ceiling.

Craig
Canon EOS 50D, 24-70mm f/2.8L @70mm, 1/80 sec, f/2.8, ISO200

Michael
Canon EOS 50D, 24-70mm f/2.8L @70mm, 1/80 sec, f/2.8, ISO200

Craig
Canon EOS 50D, 24-70mm f/2.8L @43mm, 1/80 sec, f/2.8, ISO200
posted Sunday, 05 June 2011, 13:52 (+0800), by Martin
Last weekend I got my KAP rig (kite aerial photography) airborne for the first time.
KAP is a form of aerial photography, where a camera is suspended from a kite
line to allow aerial photos to be taken, with the camera either being triggered
by an intervalometer, or controlled and triggered via radio control.
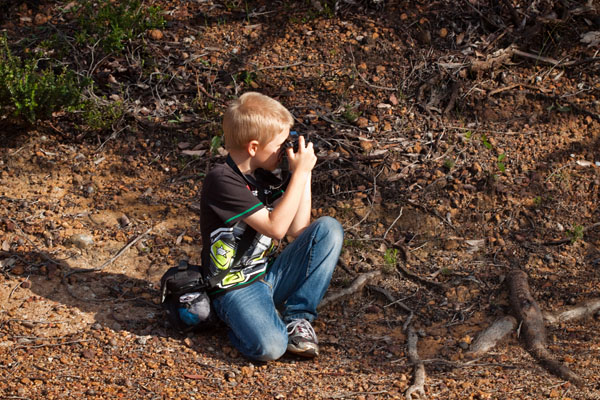
Here's a self-portrait taken during my first KAP attempt.
Also in the frame is my 12 year-old son
Ashley, another keen photographer.
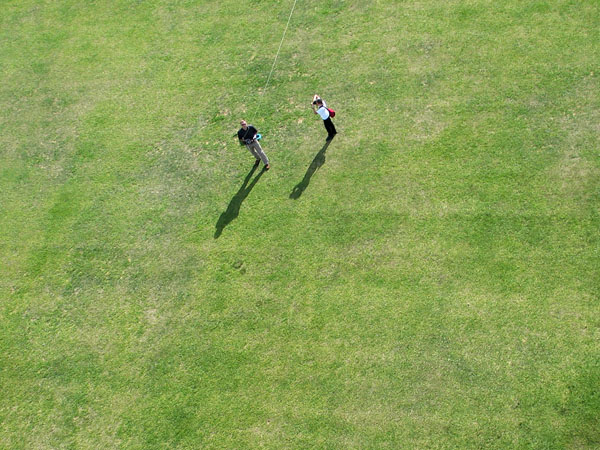
KAP self-portrait
Bob Blackburn Reserve, Seville Grove, Western Australia
Canon PowerShot G5 @7mm, 1/400 sec, f/4
I didn't have the kite and camera very high, or airborne for very long, as I was pushed for time, and the wind was quite gusty.
The photo below is stitched from 7 individual photos taken with the KAP camera.
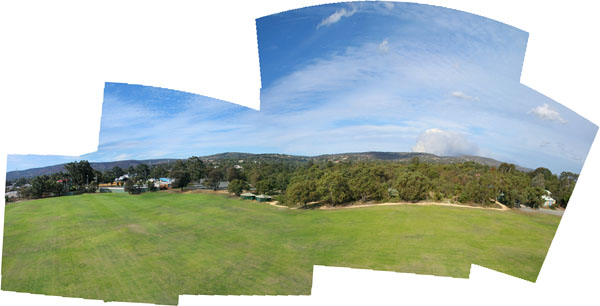
Bob Blackburn Reserve and Armadale Aquatic Centre
image stitched from 7 photos
Bob Blackburn Reserve, Seville Grove, Western Australia
Canon PowerShot G5, f/4
posted Wednesday, 01 June 2011, 20:10 (+0800), by Martin

Phottix Strato II Multi transmitter
Intro
Phottix released the Strato 4-in-1 trigger just over 12 months ago
(read my review here),
and have now released an updated and improved version called the
Strato II Multi
(also known as the Strato II Multi 5-in-1 wireless trigger).
The Strato II Multi includes all the functionality of the Strato 4-in-1, but also provides a number of improvements
and additional functionality.
Thanks to Phottix for providing a pre-release Phottix Strato II Multi for review purposes.
Note that the silk-screen labelling on the pre-release version shown in the photos in this review
shows "Strato Multi", but the name of the finalised version will be "Strato II Multi".
Features and Specifications
Features
The Phottix Strato II Multi is a multi-function device that can be used as:
- wireless flash trigger
- wired shutter release
- wireless shutter release
and it provides the following features:
- 4 channels
- 4 groups (transmitter can trigger one or more groups simultaneously)
- TTL pass-through on the transmitter
- remote flash wake-up
- backwards compatibility with the Strato 4-in-1 receiver
[
category: / gear/
| permalink
| 67 comments
]
[ tags: electronics, flash, gear, Phottix, remote, review, shutter release, Strato, strobist, trigger, wireless ]
posted Wednesday, 25 May 2011, 21:18 (+0800), by Martin
In the September school holidays last year, I took my two sons on a road-trip to
Cervantes for a few days. I am still catching up with post-processing photos
from last year, and have more photos from that trip to go through.
Here's a long exposure of the fantastic colours that showed up after sunset,
taken at one of the beaches in Cervantes.
The lone seagull posing on the jetty provides an interesting silhouette,
although he wasn't completely still for the 8 second duration of this photo.

seagull silhouette at sunset
Cervantes, Western Australia
Canon EOS 50D, 24-70mm f/2.8L @70mm, 8 sec, f/13, ISO100
posted Tuesday, 17 May 2011, 21:05 (+0800), by Martin
Summer is definitely over in Australia, and the weather is (finally) cooling down
after a long hot summer.
That means nature photographers can look forward to the colours of autumn, when
the leaves turn red, orange and yellow, and provide some fantastic photography
opportunities.
I love the colours of autumn, and always try to find some time to
capture the colours with my camera.
To remind everyone (in the southern hemisphere) what they can look forward to,
here's a photo of an autumn leaf from last year, taken with one
of my favourite lenses, the
35mm f/2.

autumn colour palette
Burswood, Western Australia
Canon EOS 50D, 35mm f/2 @35mm, 1/500 sec, f/2, ISO100
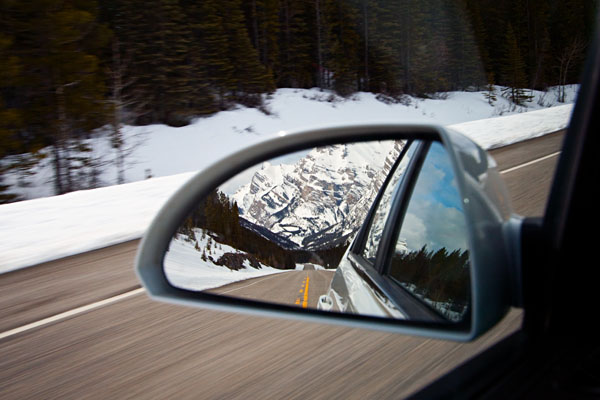
posted Sunday, 15 May 2011, 13:58 (+0800), by Martin
Although it seems like it was longer ago, it was only a week ago that I returned home from a week-long
training course in Canada.
I had one free weekend in Canada, and on the Saturday, I went for a drive
through Kananaskis.
Here's a photo of the side mirror of my rental car, showing the typical scenery in
the mountains.
snow-covered mountains in the mirror
Spray Valley Provincial Park, Alberta, Canada
Canon EOS 50D, 10-22mm @22mm, 1/80 sec, f/8, ISO100
posted Saturday, 14 May 2011, 22:05 (+0800), by Martin
New shoots on a grape vine wrap themselves around old tendrils from a previous season.
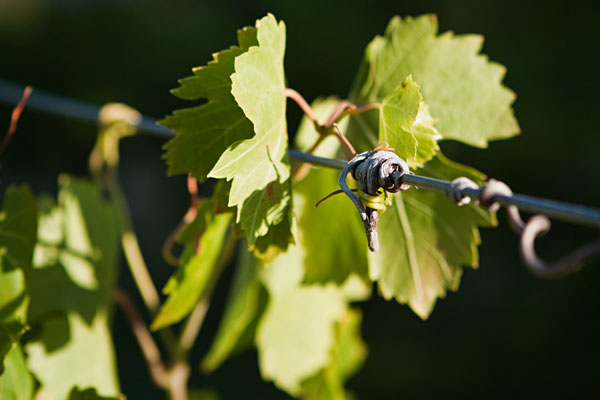
all wrapped up
Settlers Rest Farmstay, West Swan, Western Australia
Canon EOS 50D, 24-70mm f/2.8L @58mm, 1/800 sec, f/4, ISO200
posted Wednesday, 04 May 2011, 21:04 (+0800), by Martin
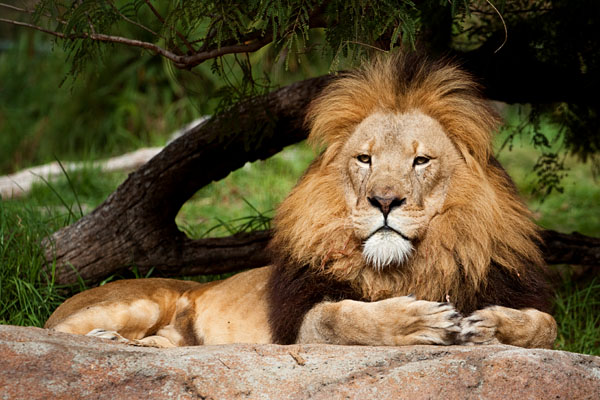
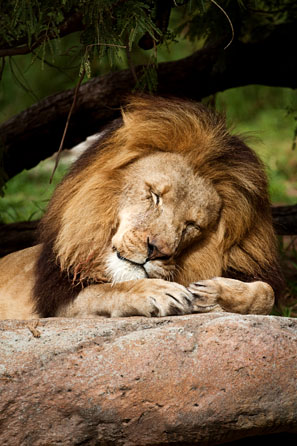
I still have a back-log of photos from the last year or so that I am slowly working through.
Here's some photos of a lion at the Perth Zoo, taken in June last year.
Often the lions at the zoo are not too keen to pose for photographers, but
are sleeping in the back of the enclosure.
However, on this occasion, this male lion was lying on a rock, keeping an eye
on the zoo visitors, and cleaning his paws and face.
posted Monday, 25 April 2011, 22:28 (+0800), by Martin
One of the performers we saw in action today at the
2011 Fremantle Street Arts Festival was
Leapin' Louie,
performing his comedy cowboy routines.
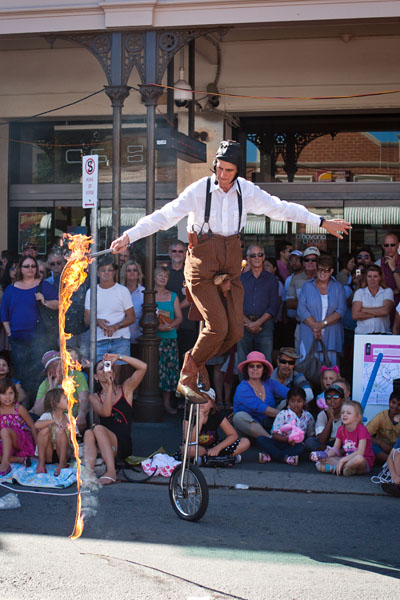
a tall unicycle and a burning whip....what could possibly go wrong?
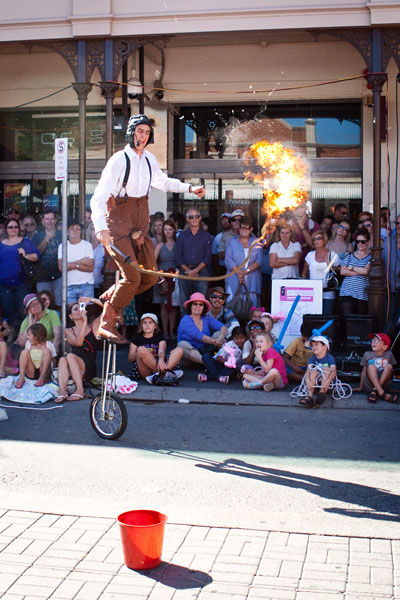
cracking a burning whip
posted Saturday, 23 April 2011, 22:22 (+0800), by Martin
Here's a photo taken in Sydney in late 2009, capturing the lights of Luna Park after sunset.
It was shot across the harbour from Blues Point.
I tried a few different exposures, and found about 10 seconds gave good results to capture
the lights on the spinning ferris wheel, while still smoothing out the water.
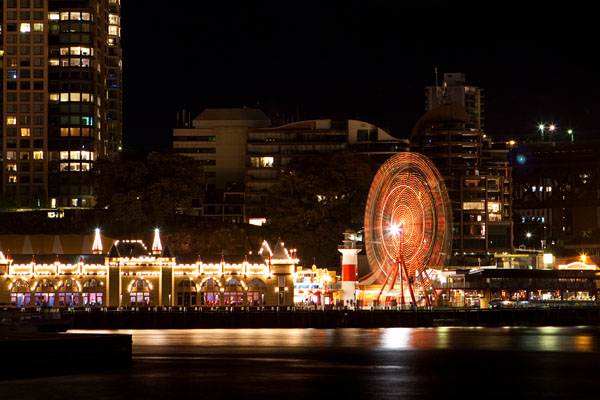
Luna Park at night
Blues Point, Sydney, New South Wales
Canon EOS 50D, 24-70mm f/2.8L @70mm, 10 sec, f/7.1, ISO100
posted Thursday, 14 April 2011, 21:04 (+0800), by Martin
This is the eighth article in a
series on "understanding your camera"
that I am writing as I teach camera basics and camera operation to my children.

Introduction
In the previous article in this series,
I discussed the
various modes
available on most cameras, from the fully automatic modes to the semi-automatic modes,
creative modes, and manual mode.
Don't Believe the "Manual Only" Brigade
There are plenty of people who believe you are not a photographer unless
you always use manual mode.
For someone who is relatively new to a DSLR camera, the idea of using manual
mode can be a bit daunting, especially when you are struggling to come to terms
with the concepts of
exposure,
aperture,
and you are still learning your way around the controls of your camera.
I don't have anything against the people who choose to use manual mode.
However, I do have a problem with the people who insist manual mode is the only way
to use a DSLR camera.
Let the Camera Do the Hard Work
Modern digital cameras contain a lot of electronics that can make
smarter and faster decisions about exposure than you can.
Rather than having to choose the
ISO,
aperture
and
shutter speed manually,
let the camera take control of one or more of those parameters, while you
set the parameter(s) that are important.
Let the camera do most of the work, and you can then adjust the
exposure up or down a little, if required, using
exposure compensation.
This will allow you to focus on actually taking the photo, the composition, and capturing the moment,
rather than fiddling with the camera's controls to get the right exposure in manual mode.
This is especially true for people who are still learning the controls on their DSLR camera,
where adjusting aperture, shutter speed and ISO isn't second nature, and you haven't yet figured out
how to do it blind-folded, with one arm behind your back.
posted Wednesday, 06 April 2011, 22:49 (+0800), by Martin
I recently did my first newborn baby photoshoot,
photographing Matt and Roz's new-born baby girl.
Zoe Madison was born on 11 February, and was just two weeks old when these
photos were taken.

sleeping beauty
supporting hands
posted Wednesday, 30 March 2011, 18:37 (+0800), by Martin
Revisiting photos taken a while ago, and post-processing (or re-post-processing them) can be
an interesting experience, as you can find photos that you didn't think were worth post-processing
at the time, as well as finding photos that you think are worth post-processing again,
using a different style.
While recently browsing through photos from a 2008 Tasmanian trip, I decided to post-process
some additional photos, and one of the results is shown below.
This photo shows loaf formations at the Tessellated Pavement, near Eaglehawk Neck, in Tasmania,
which I visited several years ago.
I found the Tessellated Pavement a fascinating place, and would definitely like to spend some more time there.
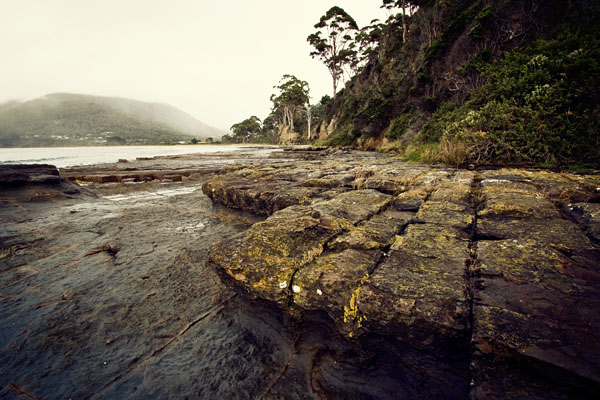
loaf formations at the Tessellated Pavement
Eaglehawk Neck, Tasmania
Canon EOS 350D, 10-22mm @12mm, 1/30 sec, f/9, ISO200
posted Sunday, 27 March 2011, 14:02 (+0800), by Martin
Working on a jigsaw puzzle on a recent holiday.

working on a jigsaw puzzle
Port Kennedy, Western Australia
Canon EOS 50D, 24-70mm f/2.8L @65mm, 1/80 sec, f/3.5, ISO250
posted Tuesday, 22 March 2011, 20:45 (+0800), by Martin
This is the seventh article in a
series on "understanding your camera"
that I am writing as I teach camera basics and camera operation to my children.


camera mode dials, all set to auto
(clockwise from top: Canon 50D DSLR,
Canon G5 point-and-shoot, Canon 350D DSLR)
Introduction
SLR cameras and many point-and-shoot cameras have a mode dial, allowing you to select one of a number
of different modes, depending on the conditions and how you want the camera to respond.
However, many people do not understand the different modes, and leave their camera in the fully automatic mode
all the time.
It is important to understand
exposure, and what the camera is doing
when you take a photo, and that is the reason why I'm looking at the different modes.
What's Wrong with Auto Mode?
In full auto mode, the camera is making almost all the decisions about the exposure
( aperture,
shutter speed
and ISO),
and has to guess what you want.
In many situations, you are much better off using some of the other modes available on your
camera, as it will allow you to make decisions about some of the variables,
while still (optionally) allowing the camera to make decisions about other variables.
In this post, I look at each of the modes available on most cameras, and
provide some information about how the camera reacts when configured to use that mode.
(Note that I am more familiar with Canon cameras, so some references are specific to Canon
cameras. However, the description of the modes is just as applicable to other
brands of cameras.)
posted Monday, 14 March 2011, 19:50 (+0800), by Martin
I love the juxtaposition of the bobcat parked outside a solicitor's office on an Adelaide street,
and couldn't resist taking a few shots while walking past.
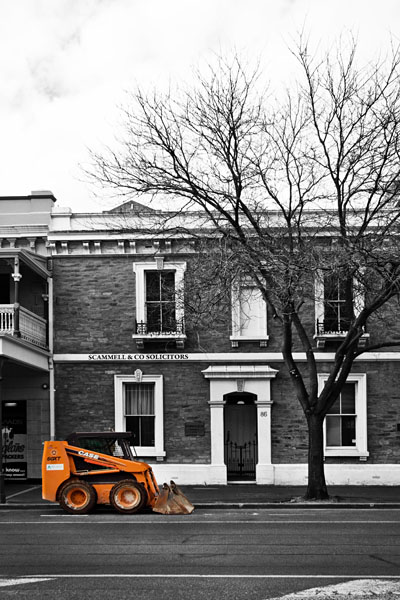
visiting the solicitor
Adelaide, South Australia
Canon EOS 50D, 10-22mm @22mm, 1/50 sec, f/7.1, ISO200
posted Friday, 11 March 2011, 19:54 (+0800), by Martin
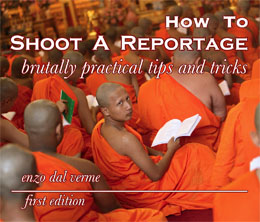
Enzo Dal Verme is a photographer based in Milan and Paris, and he shoots for various magazines,
including Vanity Fair, Marie Claire, Elle, Glamour, and others.
He says people kept on asking him for tips on how to shoot reportage,
and as a result, he decided to publish
"How To Shoot A Reportage",
where he shares what he has learned from his experiences around the world.
Enzo provided a free copy of the PDF version of this eBook for review purposes.
Reportage, according to thefreedictionary.com, is
"the reporting of news or information of general interest", so in relation to photography,
reportage is photojournalism. I think the author assumes anyone reading this eBook
knows what reportage is, as he doesn't define the term at all.
The PDF version of "How To Short a Reportage" is a 68-page eBook full of practical tips
and advice on shorting reportage.
Enzo discusses numerous topics, including finding inspiration, why people shoot reportage,
different types of reportage, preparation, and more, before going onto the practicalities of
shooting itself.
Numerous photos are included in the book, demonstrating many of the practical aspects
mentioned in the text.
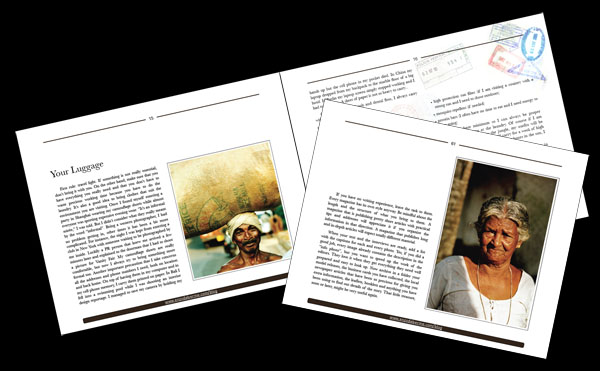
For anyone interested in photojournalism,
"How To Shoot A Reportage"
is a great reference, with plenty of useful and practical information in it.
This eBook can be purchased from
Enzo's website,
and is available in EPUB format for E4.99 (approx USD$6.95),
or PDF format (contains more images than the EPUB version) for E8.59 (approx USD$11.95),
with a print edition coming soon.
posted Thursday, 10 March 2011, 20:52 (+0800), by Martin
I still have a back-log of photos from 2009 and 2010 that I need to go through,
and I am slowly working through them as I find the time.
This 30-second exposure was taken in Adelaide in October last year,
when I had a fantastic view of the sunrise from my hotel window.
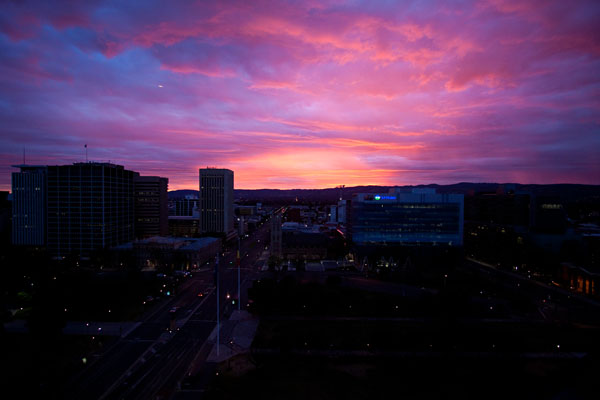
sunrise over Adelaide
Adelaide, South Australia
Canon EOS 50D, 10-22mm @10mm, 1/30 sec, f/3.5, ISO400
posted Tuesday, 08 March 2011, 20:45 (+0800), by Martin
Yesterday I was testing some lighting setups with two reflective umbrellas on light stands,
each with a Canon 580EX flash firing into it, triggering the flashes with
a Canon
ST-E2
wireless flash transmitter mounted on the camera's hotshoe.
I wasn't concerned about ambient light, so I was shooting with the camera in manual mode,
way under-exposed for the ambient light inside,
and relying on the flashes in ETTL mode to provide enough lighting.
The background is a plain wall in the living room.
I managed to talk my wife into being the first test subject, and with some minor tweaking
of the umbrella positions, I got the shot shown below.

Ruth
Seville Grove, Western Australia
Canon EOS 50D, 24-70mm f/2.8L @70mm, 1/100 sec, f/2.8, ISO200
I was pretty happy with the result, particularly given the very quick setup time of the light stands
and umbrellas.
Using ETTL mode for the flashes in a situation like this means there's virtually zero setup time of the flashes themselves,
other than potentially dialling in some flash exposure compensation to achieve the desired lighting.
posted Friday, 04 March 2011, 21:53 (+0800), by Martin
Late last year, inspired by some of the long-exposure photos by Tasmanian photographer
Alex Wise,
I bought a
B+W ND 3.0 filter.
It is a neutral density filter with an ND 3.0 rating, which means it reduces the
exposure
by 10
stops, letting just 0.1% of light through.
In other words, it's an expensive piece of dark glass!
I bought a 77mm sized filter, to fit my
Canon EF 24-70mm f/2.8L lens
and
Canon EF-S 10-22mm lens.
An ND filter reduces the amount of light allowed through the lens, thus allowing the use of much longer
shutter speeds
during the day.
Here is one of the first photos I took using the 10-stop ND filter. This is a beach scene at Point Peron, taken about half an hour
before sunset, in January.
The ND filter allowed a 30 second exposure with a fairly wide aperture of f/5.6.
A long exposure on such a scene serves to completely blur the waves, resulting in a flat ocean, and milky/smoky
water where the waves were breaking on the beach.
Due to the movement of the clouds during the exposure, they are also blurred, providing a streaked look in the sky.
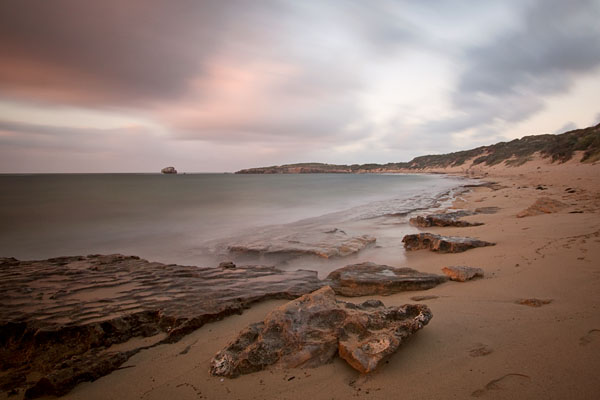
long exposure at Point Peron
Point Peron, Rockingham, Western Australia
Canon EOS 50D, 10-22mm @13mm (10-stop ND filter), 30 sec, f/5.6, ISO100
posted Thursday, 24 February 2011, 21:14 (+0800), by Martin
Another photo from Lake Walyungup last month, showing a lonely clump of grass against
the white gypsum lake bed.
I had to get the camera on the ground to achieve this low viewpoint, but I'm happy with the result.
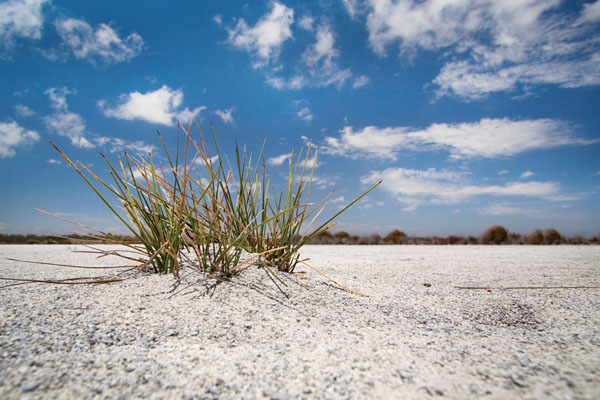
lonely
Lake Walyungup, Warnbro, Western Australia
Canon EOS 50D, 10-22mm @12mm, 1/250 sec, f/7.1, ISO100
posted Tuesday, 22 February 2011, 20:50 (+0800), by Martin
"Taking Your Portraiture to the Next Level II"
is a brand-new 58-page eBook sequel by Edward Verosky to the
"Taking Your Portraiture to the Next Level"
eBook which I
reviewed
recently.
In this sequel, Edward discusses covers a number of topics that he avoided in his
earlier portraiture eBook.
Topics include
- building a portfolio
- various ideas for shoots,
- finding subjects
- interacting with your subjects
- gear discussions
- brief section on post-processing
With lots of sample photos included in the book, the author provides plenty of useful information
for improving your portrait photography.
Note that if you haven't yet read the Edward's previous book,
"Taking Your Portraiture to the Next Level",
I would recommend you read it first, before reading
book II.
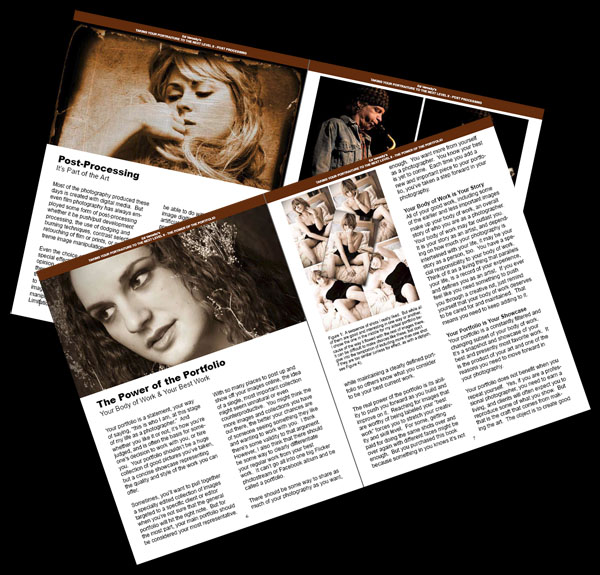
The "Taking Your Portraiture to the Next Level II"
eBook can be purchased online for USD$15, and is available for immediate download after submitting your payment online.
posted Thursday, 17 February 2011, 20:54 (+0800), by Martin
While on holidays near Rockingham last month, we visited Lake Walyungup
while looking for some geocaches in the area.
As it was summer, the lake is mostly dry, and it's an interesting location,
with the lake bed covered in gypsum (not salt, as many people think).
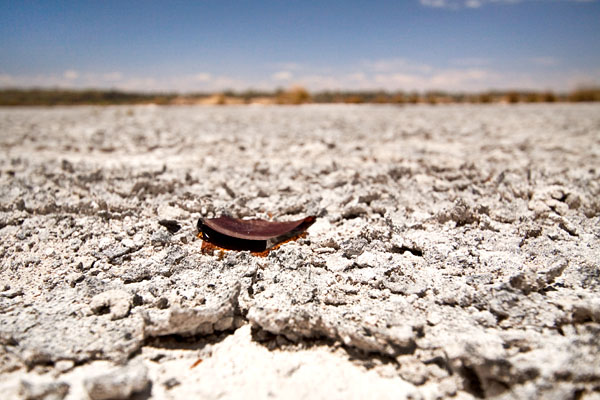
broken glass
Lake Walyungup, Warnbro, Western Australia
Canon EOS 50D, 10-22mm @22mm, 1/500 sec, f/7.1, ISO100
posted Sunday, 13 February 2011, 19:34 (+0800), by Martin
While bike riding around the Rockingham area earlier this year, we came across
a bobtail on the side of the cycle path.
I couldn't pass up an opportunity to photograph it, and took a number of photos
with a wide-angle lens, placing the camera on the ground very close to
the bobtail.
I think the bobtail saw its own reflection in the lens, and decided to put on an
aggressive show, resulting in the wide-open mouth pose shown below.
The bobtail is also known as a Western Shingleback, and its scientific name is
Tiliqua rugosa.
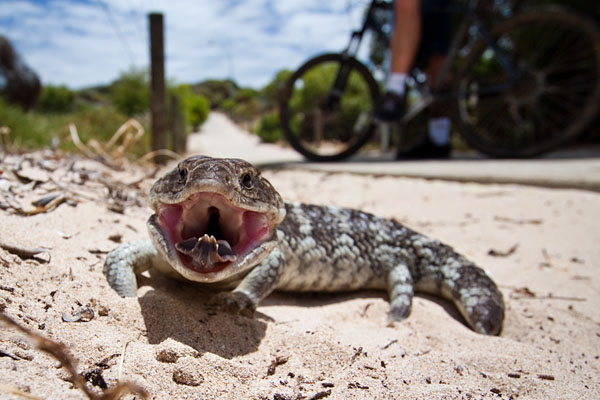
bobtail
(Tiliqua rugosa)
Warnbro, Western Australia
Canon EOS 50D, 10-22mm @13mm, 1/250 sec, f/5.6, ISO100
posted Saturday, 12 February 2011, 14:37 (+0800), by Martin
A bunch of grapes catches the late afternoon sun at a vineyard in the Swan Valley.
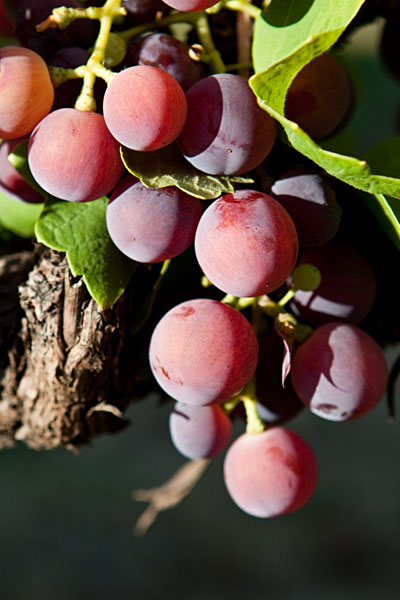
grapes
Settlers Rest Farmstay, West Swan, Western Australia
Canon EOS 50D, 24-70mm f/2.8L @70mm, 1/640 sec, f/4, ISO200
posted Wednesday, 09 February 2011, 19:00 (+0800), by Martin
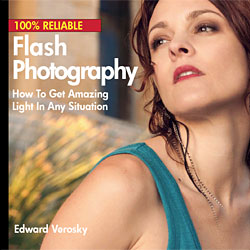
I recently came across some eBooks by
Edward Verosky,
a professional photographer who likes to teach people how to make pictures.
I bought a few of his eBooks, as DPS was offering
them at a discounted price, and have been impressed by the content.
I recently reviewed Edward's
"Taking Your Portraiture To The Next Level",
and am now taking a closer look at another of his eBooks, titled
"100% Reliable Flash Photography".
It is a 75-page eBook that provides detailed information on improving your flash photography,
both indoors and outdoors.
Edward first provides some introductory information on lighting,
covering the terminology and tools associated with flash photography, providing
definitions for all the commonly used terms, and describing the equipment, ranging from
snoots, flags and more.
An overview of light, reflected light, large vs small light sources
is next, as well as a brief overview of how cameras set exposure with aperture,
shutter speed and ISO, as well as exposure compensation and flash exposure compensation.
posted Friday, 04 February 2011, 19:05 (+0800), by Martin
I love silhouettes, especially against a sunset sky.
The sunset on this particular day certainly didn't disappoint, with some cloud cover
providing a range of interesting colours shortly after the sun disappeared
below the horizon.
sunset cross
Settlers Rest Farmstay, West Swan, Western Australia
Canon EOS 50D, 35mm f/2 @35mm, 1/125 sec, f/4, ISO200
posted Monday, 31 January 2011, 22:08 (+0800), by Martin
Grape vine leaves provide an interesting silhouette against the sunset colours in the sky.
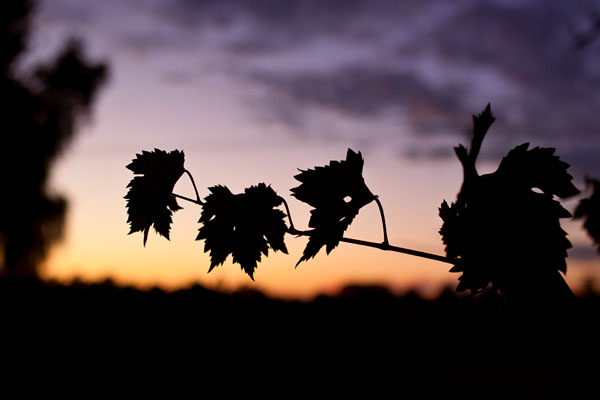
vine leaves at dusk
Settlers Rest Farmstay, West Swan, Western Australia
Canon EOS 50D, 35mm f/2 @35mm, 1/250 sec, f/2.8, ISO640
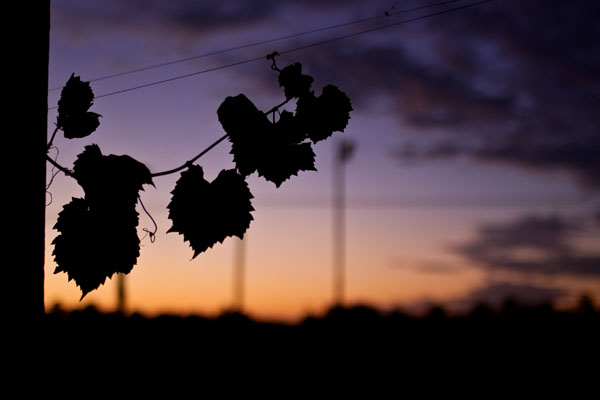
vine leaves at dusk
Settlers Rest Farmstay, West Swan, Western Australia
Canon EOS 50D, 35mm f/2 @35mm, 1/160 sec, f/2, ISO160
posted Friday, 28 January 2011, 21:56 (+0800), by Martin
I enjoy shooting during the golden hour
(the first or last hour of sunlight during the day), it provides lovely lighting.
This is another photo from our recent farmstay in late December, in the Swan Valley.
grass at sunset
Settlers Rest Farmstay, West Swan, Western Australia
Canon EOS 50D, 24-70mm f/2.8L @42mm, 1/640 sec, f/4.5, ISO100
posted Sunday, 23 January 2011, 20:57 (+0800), by Martin
Full-text RSS Feeds
Not sure if you noticed it, but several months ago I enabled full-text RSS feeds, so
anyone
subscribing
to blog updates via
email
or using an
RSS
reader will now see the full post, without having to click through to the blog itself.
(If you are not subscribed to this blog, then you may want to consider
subscribing
via RSS
or email
to ensure you get get notified of all new posts on this blog.)
Little Bramper
I recently came across a cool device with the interesting name of
Little Bramper.
It is a bulb-ramping intervalometer for Canon DSLR cameras that allows the shutter speed to be varied
during a time-lapse, to allow better results for time-lapses done during sunset and sunrise.
Here's a sample time-lapse created with a Little Bramper
(via Canon 5D tips):
posted Monday, 17 January 2011, 16:52 (+0800), by Martin
Sunlight behind a vine leaf accentuates the structure and veins of the leaf.
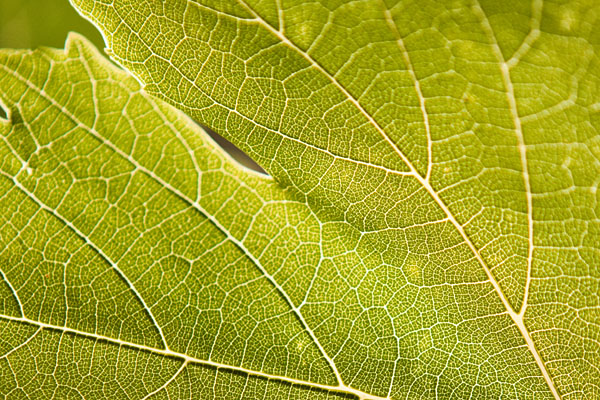
grape vine leaf detail
Settlers Rest Farmstay, West Swan, Western Australi
Canon EOS 50D, 24-70mm f/2.8L @70mm, 1/1600 sec, f/4, ISO200
posted Monday, 10 January 2011, 09:50 (+0800), by Martin
This is the sixth article in a
series on "understanding your camera"
that I am writing as I teach camera basics and camera operation to my children.
Overview
It has been a little while since the
previous post
in this series. I am hoping to
publish additional articles in this series a little more regularly this year.
Before looking at camera controls and camera operation, I want to first re-visit
the concept of f-numbers, f-stops and stops, as an understanding of these
is important for further posts in this series.
F-Numbers and F-Stops
The f-number is the ratio of
aperture
to the
focal length,
because the area of the aperture opening changes with focal length.
It can be calculated as the ratio of the focal length to the
diameter of the aperture opening, ie,
|
f-number =
|
focal length
| |
--------------------------------------
| |
diameter of aperture opening
|
This allows you to calculate the f-number (aperture number) for a given focal length and aperture diameter,
or alternatively, to calculate the aperture diameter for a given f-number and focal length.
For example, this equation allows us to calculate that a 50mm lens at an aperture of f/2
will have the lens aperture opened to a diameter of 25mm.
posted Saturday, 08 January 2011, 21:46 (+0800), by Martin
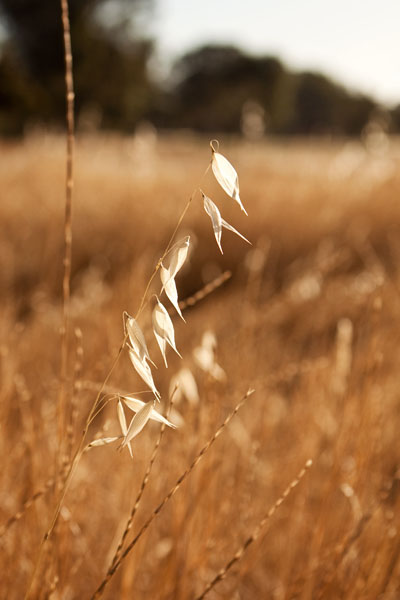
I'll be posting more photos in coming weeks from our recent farmstay in the Swan Valley.
In this photo, the evening sun provides some rear lighting on this dried grass,
bathing it in a golden light.
I love the colours and lighting during the "golden hour" just before sunset!

golden ears
Settlers Rest Farmstay, West Swan, Western Australia
Canon EOS 50D, 24-70mm f/2.8L @24mm, 1/400 sec, f/4.5, ISO100
posted Monday, 03 January 2011, 21:54 (+0800), by Martin
We spent last week at a farmstay in the Swan Valley. The kids loved interacting with the animals,
including collecting the chicken eggs each morning.
Samantha collecting the eggs at Settlers Rest farmstay
West Swan, Western Australia
Canon EOS 50D, 35mm f/2 @35mm, 1/200 sec, f/3.5, ISO500
posted Sunday, 02 January 2011, 14:05 (+0800), by Martin
Looking Back at 2010
Looking back at 2010 makes me realise just how busy a year it has been for me.
In addition to being busy with family committments and community-related committments,
I travelled fairly regularly for work, spending a total of 7 weeks away from home.
I visited Sydney (twice), Adelaide (three times), Brisbane,
Gold Coast, Roxby Downs, as well as a road trip to various locations
through NSW, including Newcastle, Wollongong, Nowra and Botany Bay.
I always try to take a camera with me when I travel for work, and managed to
find some opportunities for photography in those locations.
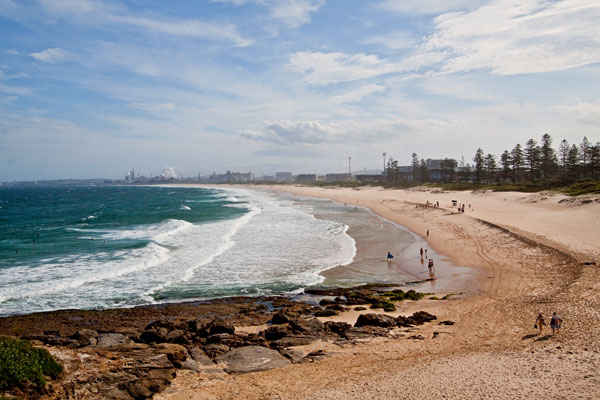
looking down on City Beach
Flagstaff Point, Wollongong, NSW
Canon EOS 50D, 10-22mm @19mm, 1/200 sec, f/11, ISO100
I participated in the
Worldwide Photo Walk for 2010,
attending one of
walks in Perth
with my two oldest children (aged 10 and 11).
I also went on several other
photowalks
with friends and colleagues throughout the year.
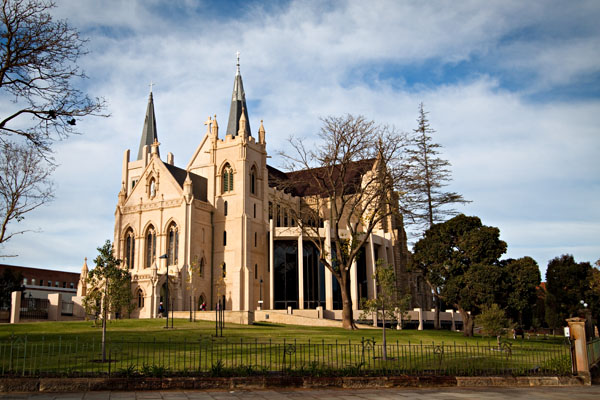
St Mary's Cathedral
Perth, Western Australia
Canon EOS 50D, 10-22mm @21mm, 1/125 sec, f/6.3, ISO100
One of my more interesting photography-related purchases in 2010 was a
Canon EF 35mm f/2 lens.
On a Canon 50D body, I
prefer
the 35mm focal length rather than 50mm
(a 35mm lens results in an effective focal length very close to 50mm,
rather than the 50mm lens' effective focal length of 80mm).
|
|