|
posted Monday, 31 December 2012, 19:42 (+0800), by Martin
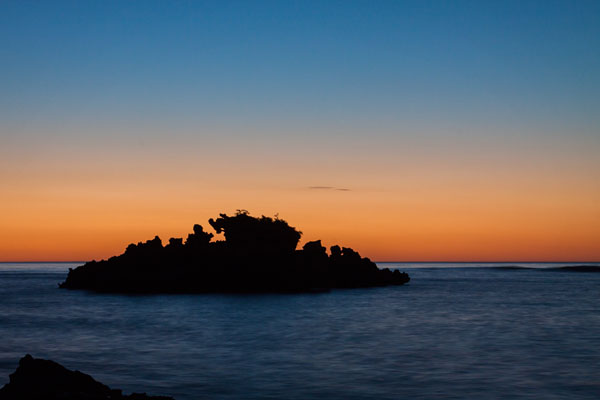
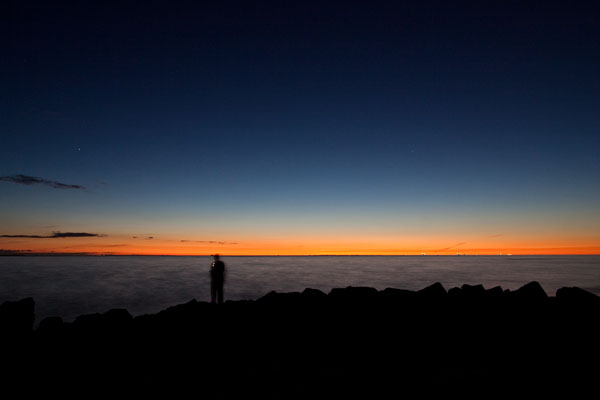
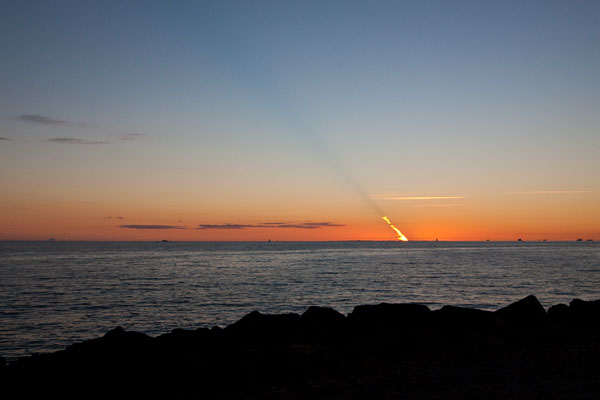
post-sunset sky
Point Peron, Rockingham, Western Australia
Canon EOS 50D, 24-105mm f/4L IS @60mm, 3.2 sec, f/18, ISO100
Last night, I went to Point Peron
with a friend and my oldest daughter, to photograph the sunset.
It was a hot evening, but we witnessed a great sunset, and some fantastic colours in the sky after the sun
was below the horizon.
The top photo was taken about half an hour after sunset - one of my favourite times for photography.
The photo below was taken a few minutes later, and my daughter used a torch to light-paint the hearts on the
left hand side.
posted Sunday, 30 December 2012, 13:30 (+0800), by Martin
As the 2012 year draws to an end, I thought I'd post my favourite
ten photos that I blogged during the year
(some were shot prior to 2012, but never posted until this year).
Here they are, in the order that I blogged them.
You can click each photo to view the blog post for that particular photo.

boats along the Prinsengracht
Amsterdam, Noord-Holland, The Netherlands
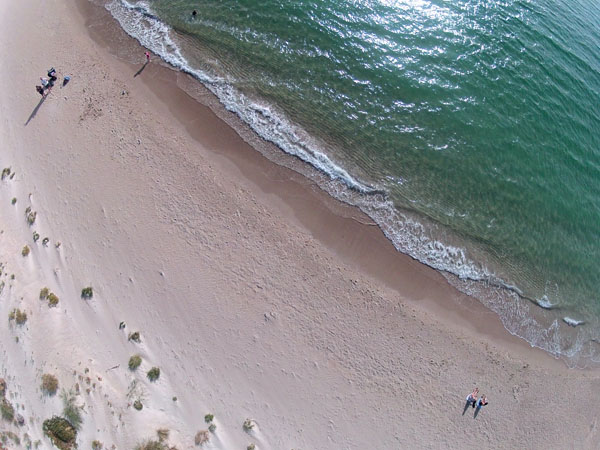
straight down
Kwinana Beach, Western Australia
GoPro HD Hero2 (suspended from a kite)
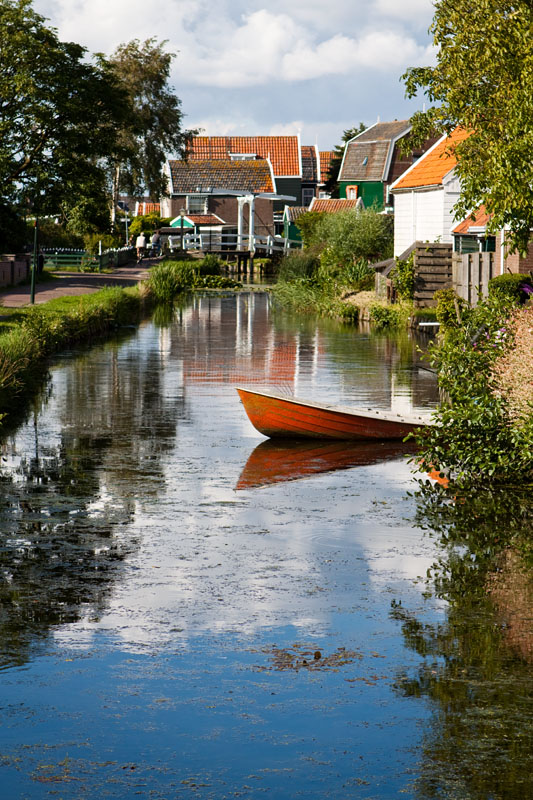
old boat in the canal
Marken, Noord-Holland, The Netherlands
posted Sunday, 23 December 2012, 15:02 (+0800), by Martin
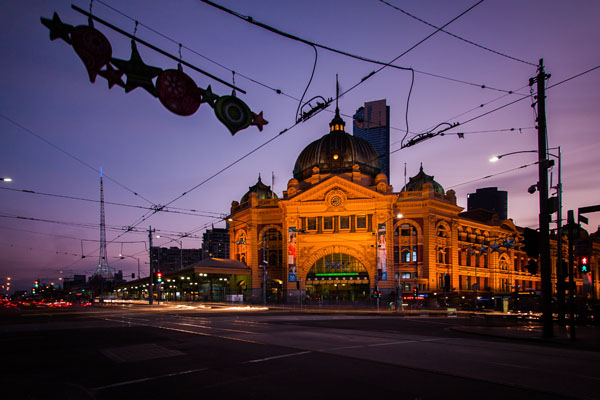
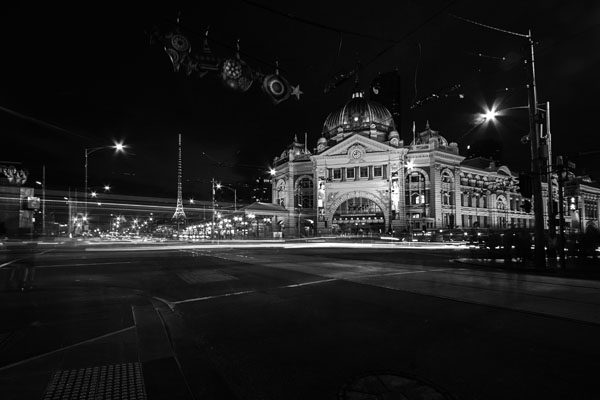
Flinders Street Station after sunset
Melbourne, Victoria, Australia
Canon EOS 50D, 10-22mm @14mm (10-stop ND filter), 179 sec, f/5.6, ISO100
Last month, I spent a few days in Melbourne on a brief business trip.
While in Melbourne, I met up with
Alex
and
Ben
for dinner.
I have admired Alex's photography for quite a few years, but for various reasons, haven't been able to
meet him in person in either Tasmania or Melbourne prior to this visit.
I have been on a few photowalks with Ben in the last few years, both in Perth and in Melbourne.
It was great to be able to catch up with them over dinner.
After dinner, Ben and myself headed to the
Flinders Street Station,
one of Melbourne's cultural icons, completed in 1909.
Apparently it was the first railway station in an Australian city.
It's a lovely building, and we spent some time taking long exposure photos of the building
from across the street.
Flinders Street Station after sunset
Melbourne, Victoria, Australia
Canon EOS 50D, 10-22mm @10mm, 10 sec, f/11, ISO100
posted Tuesday, 18 December 2012, 20:10 (+0800), by Martin

Zoe
home, Western Australia
Canon EOS 50D, 24-105mm f/4L IS @85mm, 1/125 sec, f/5, ISO200
strobist info: a 580EX into reflective brolly on each side of camera, triggered with Phottix Odin
Now nearly two years old, here's a recent photo of Zoe, the daughter of some good friends of ours.
I first shot Zoe when she was just a new-born,
but she is growing up fast!
posted Thursday, 13 December 2012, 20:10 (+0800), by Martin

sunset down the road
near home, Western Australia
Instagram | Samsung Galaxy S II
I have had my Samsung Galaxy S II Android phone for over 12 months now.
When I bought the phone, I
mentioned
that having a phone with a reasonable camera in my pocket would provide me with the
opportunity to take photos in situations where I previously did not have a camera with me.
In hindsight, I haven't used my phone for photography much at all.
I want to use my phone for day-to-day photography, and to make it easier for me to
take photos and share them, I have installed the
Instagram app for Android.
The sunset photo above is an example of something I wouldn't have been able to capture without my phone.
I was walking around the block in the evening with my wife, and didn't have my DSLR camera with me,
but I always have my phone in my pocket.
You can view my Instagram photos online by visiting my
Instagram profile page
or if you are an Instagram user, feel free to follow me.
I will also occasionally
repost
some of my Instagram photos here on my blog.
posted Thursday, 06 December 2012, 20:58 (+0800), by Martin
Tracking Memory Cards
When you are on a photoshoot, juggling multiple memory cards for your cameras, you need to be able to
quickly and easily identify which memory cards have already been used and are full, and which memory
cards are still empty and ready to be used.
You do not want to have to try each memory card in your camera, to see if it already has photos on it.
An Easy Solution
I have been using a quick and easy solution for the last few years
that allows me to instantly see if a memory card has been used, or if it is empty.
I cut up the sticky part of a post-it note, and stick one piece on the inside
of the compact flash memory card cases.
When putting a memory card into a case, facing the front of the card towards the
post-it note label indicates the card is full, and facing the back of the card towards
the post-it note label indicates the card is empty.
This method allows me to easily identify which memory cards are full, and which memory cards are empty,
just by looking at the case.
Have a look at the photos below to see how it works.

two empty memory cards in their cases
(front of memory cards facing AWAY from the label)

two full memory cards in their cases
(front of memory cards facing TOWARDS from the label)
posted Sunday, 02 December 2012, 14:54 (+0800), by Martin
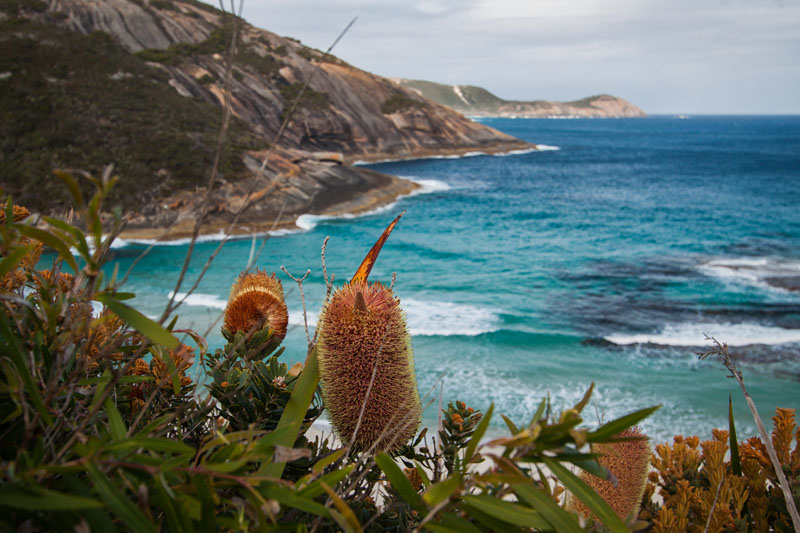
banksia at the Salmon Holes
Torndirrup National Park, Western Australia
Canon EOS 50D, 10-22mm @22mm, 1/80 sec, f/6.3, ISO100
The Salmon Holes is a fantastic looking beach in
Torndirrup National Park,
in the south-west of
Western Australia, in the region of
Albany,
and is renowned for being a great spot for salmon fishing.
This location also has a reputation for being dangerous, due to numerous people being swept off the rocks while fishing,
due to large waves and surges.
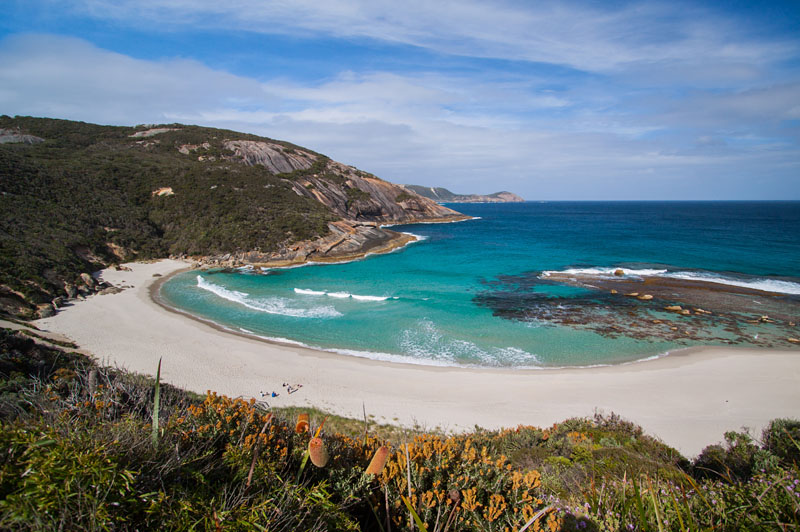
Salmon Holes
Torndirrup National Park, Western Australia
Canon EOS 50D, 10-22mm @10mm, 1/400 sec, f/4.5, ISO100
posted Friday, 23 November 2012, 21:15 (+0800), by Martin
Background On The "Print-A-Day" Project
A couple of months ago, I did a " print-a-day" project for
a period of four weeks.
I got the idea from a
blog post
on The Online Photographer.
As I mentioned in my previous post
about this project, I decided to do this project
" as an exercise in improving your post-processing skills specifically in relation to achieving good photo prints".
It has been a while since I completed the project, but due to holidays, business travel, and other commitments,
I haven't yet had a chance to write about my experience with the print-a-day project.
However, this has given me additional time to reflect on the project. I still have all the prints hanging up in my home office,
and look at them on a regular basis.
Looking back at the project, I believe it was definitely worthwhile, and I have learnt some interesting lessons as a result
of the project.
The Photos from the Project
Here are the 28 photos I post-processed and printed during the 4 weeks of the print-a-day project.
Some of these photos have already been
featured here on my blog.


Completing the Project
I used a spreadsheet to keep track of the photos I was using in this project,
and also used it to record how much time I spent post-processing each photo.
The post-processing time for the photos ranged from 10 to 60 minutes, with most
photos typically taking about 15 minutes.
Finding the time to process and print a photo each day was relatively easy, as for three out of the four weeks of the project,
I was on holidays from work, and was mostly at home during the day.
Outside of holidays, it would certainly be more difficult for me to find the time each day to
process and print a photo, with work commitments, work-related travel, family commitments,
and other extra-curricular activities.
Lessons Learnt
This project taught me a number of lessons.
I have attempted to note down these lessons as a reminder for myself, and so readers of this blog can
benefit from them too.
- I don't print enough photos.
While I typically take plenty of photos, and post-process plenty of photos, I don't print photos very regularly.
Printing out photos and hanging them on your wall gives you a better appreciation for your photos,
and allows you to enjoy them more.
I am intending to regularly print some photos, and hang them on my
magnetic photo board.
- Pick photos that appeal to you.
Post-processing is always a lot more enjoyable if you are working on photos that you like, rather than photos
that you are post-processing because you have to (such as processing a big batch of photos after a family or wedding shoot).
- After processing, and before printing a photo, step away from the computer for a while,
or close the photo and do something else for a while.
Putting a photo aside for a while allows you to take a fresh look at the photo, and you will often see something
that needs further adjustment or correction, which you haven't noticed while you were working on the photo.
Spending too much time looking at colours can cause you to become somewhat
desensitised to them.
- What may look good to you at the time printing may look like it needs some remedial attention the next morning.
This is closely related to the previous point.
- Critically review your photos, your post-processing efforts, and your prints,
and be honest with yourself.
- Screen calibration and colour settings in Photoshop are very important.
I had just moved from an old PC and Photoshop CS4 to a new PC with Photoshop CS6, and had some initial teething
issues with monitor calibration and colour profiles in CS6 with some of the photos printed as part of this project.
Conclusion
I found the print-a-day project to be very rewarding, and can definitely recommend it to any photographer
who wants to improve their post-processing and printing skills.
If you want to improve your skills in this area, this can be a worthwhile project.
posted Thursday, 15 November 2012, 21:07 (+0800), by Martin
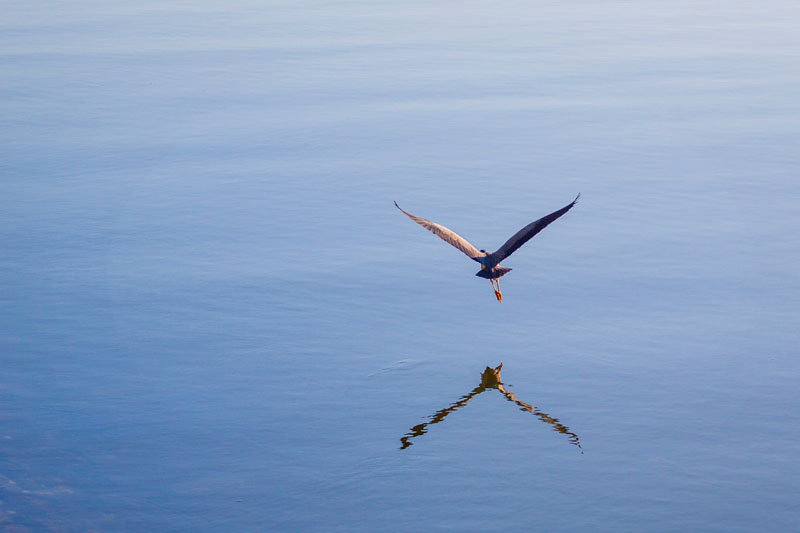
up and away
Homebush Bay, Sydney, New South Wales
Canon EOS 50D, 70-200mm f/4L @78mm, 1/1600 sec, f/4, ISO100
This is one of my favourite photos taken a few years ago, on an early-morning photography outing
with a colleage to Homebush Bay, near Sydney.
It has some similarities to the
very first photo
I posted on this blog, nearly five years ago, of a pair of
black-winged Stilts flying away from me, also over water.
posted Tuesday, 06 November 2012, 21:22 (+0800), by Martin
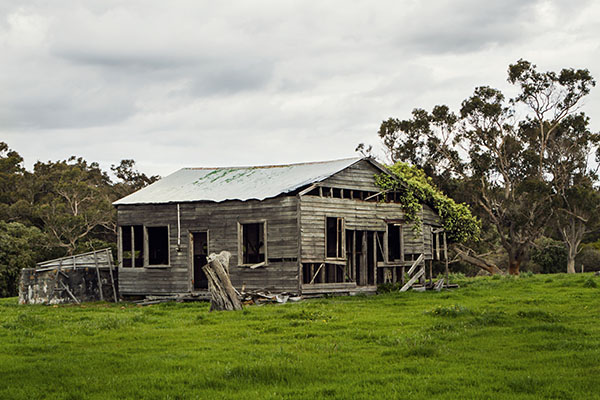
old shed
somewhere near Margaret River, Western Australia
Canon EOS 50D, 24-70mm f/2.8L @42mm, 1/60 sec, f/8, ISO200
On a recent road trip around the south-west of Western Australia with a couple of cousins
from Holland, we saw this great looking old shed somewhere near Margaret River, and had to stop for some photos.
I love the character of old buildings such as this, and the overcast sky provides a
dark and gloomy look and feel.
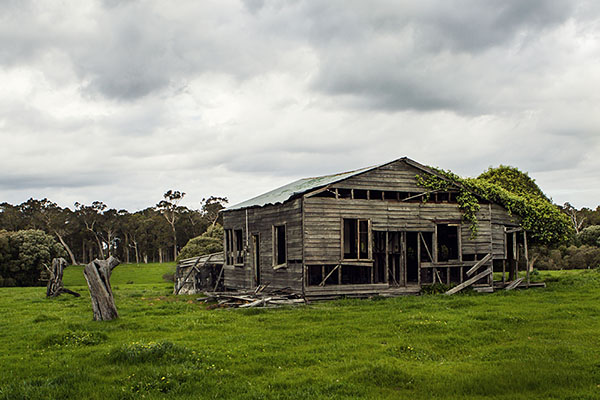
old shed II
somewhere near Margaret River, Western Australia
Canon EOS 50D, 24-70mm f/2.8L @24mm, 1/125 sec, f/8, ISO200
posted Sunday, 28 October 2012, 14:21 (+0800), by Martin
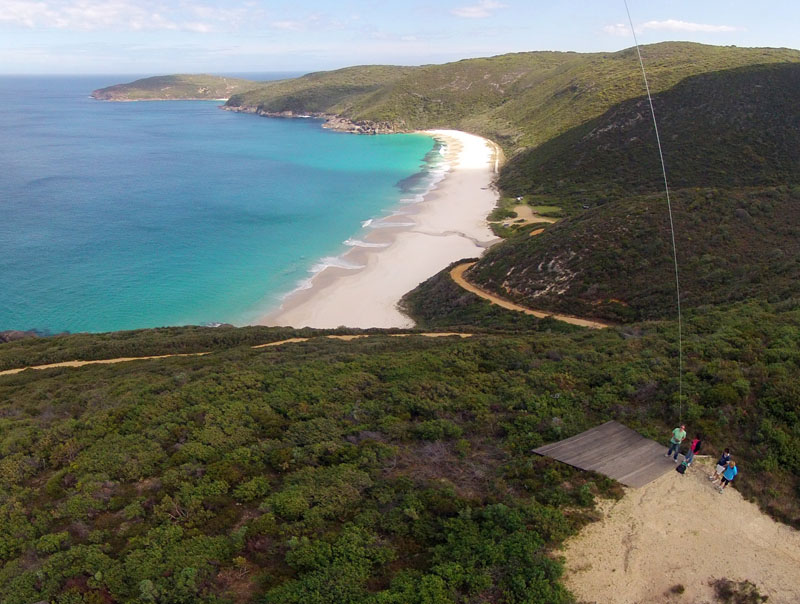
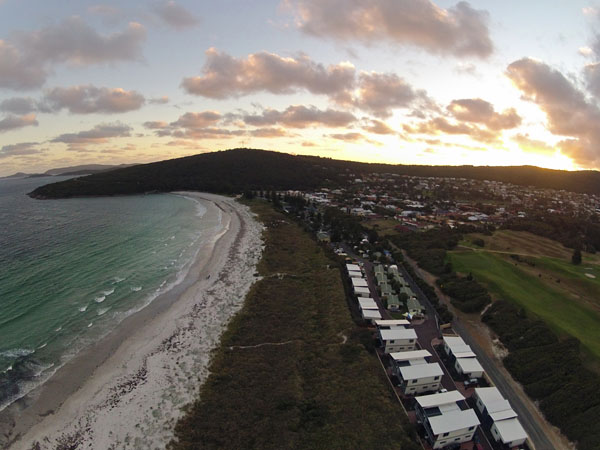
Shelley Beach from above
Shelley Beach Lookout, West Cape Howe National Park, Western Australia
GoPro HD Hero2 (suspended from a kite)
Earlier this month, my wife and I had the pleasure of taking two of my cousins from Holland
around the south west of Western Australia.
While staying in Albany for a few days, we drove out to Shelley Beach, located about 30km west of Albany.
The lookout high above Shelley Beach is apparently a favourite spot for hang gliders, as there is almost always
plenty of wind there.
The large wooden platform that I'm standing on is a launch ramp for the hang gliders.
The lookout is located high above the beach, and after launching my kite,
I managed to get some photos of us standing at the lookout, with Shelley Beach far below us.
Here is a selection of photos from this KAP session at the lookout.
posted Thursday, 25 October 2012, 19:46 (+0800), by Martin

Phottix Ares transmitter
Intro
The Ares is a new wireless flash trigger from Phottix. It was announced in late September 2012 at Photokina,
and is available for purchase from 25 October 2012.
The Ares is designed as a no-frills flash trigger that is easy to use, and provides reliable
triggering, at an affordable price.
The Phottix Ares is due for release in October 2012, and will replace several of the older Phottix flash
triggers, including the
Tetra,
Aster,
and the
original Strato.
Features and Specifications
Features
The Phottix Ares Flash Trigger has the following features:
- Triggers hot shoe flashes and studio lights
- Rotating transmitter can be used in up or down position
- Reliable digitally-encoded signals
- Cold shoe and 1/4" threaded insert on receiver
- Includes PC sync cable and batteries
Specifications
|
Frequency
|
2.4 GHz
| |
Range
|
200 metres +
| |
Channels
|
8 channels and Fire-All function
| |
Batteries
|
2 x AA in transmitter and in receiver
5V DC socket for external power supply on receivers
| |
Max sync speed
|
1/250 seconds (1)
| |
Antenna
|
built-in internal PCB antenna
| |
Transmitting Power
|
> 6dBm
| |
Receiver Ports:
|
3.5mm sync port, hot shoe output
| |
Operating Temperature
|
0°C to 40°C
| |
Working Humidity
|
35% to 95% RH
|
Notes:
|
1.
|
on compatible cameras and flashes
|
posted Sunday, 14 October 2012, 13:52 (+0800), by Martin
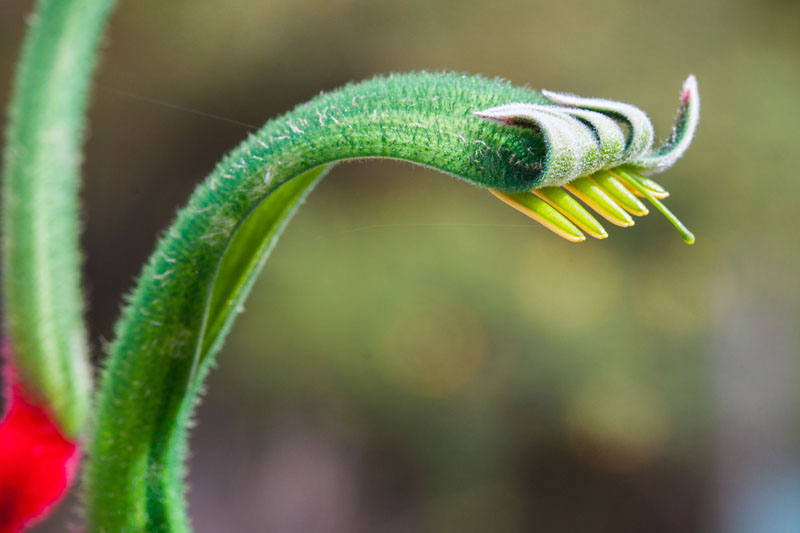
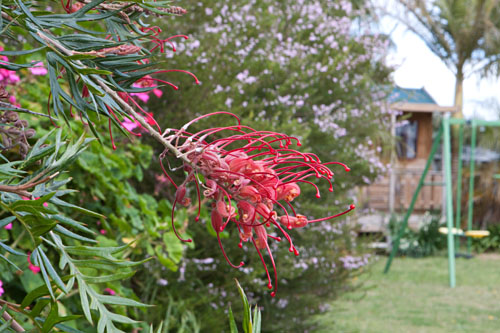
kangaroo paw detail
Beeliar, Western Australia
Canon EOS 50D, 100mm f/2.8 macro @100mm, 1/60 sec, f/9, ISO250
Taken while exploring
The Spectacles Wetlands in the Beeliar Regional Park,
I used the fantastic
Canon 100mm f/2.8 USM macro lens
to capture the details of this native kangaroo paw.
The 100mm macro lens is one of my favourite lenses, as it allows me to capture the details of nature,
such as this kangaroo paw.
The 100mm macro lens also works wonderfully as a portrait lens.
posted Thursday, 11 October 2012, 19:38 (+0800), by Martin
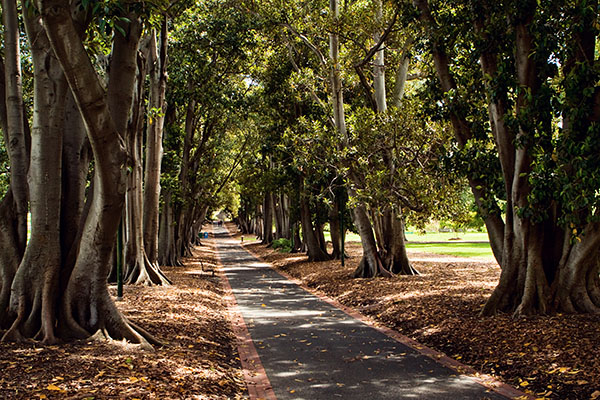
Treasury Gardens walkway
Melbourne, Victoria
Canon EOS 50D, 24-70mm f/2.8L @24mm, 1/50 sec, f/8, ISO200
I like walking.
When I am somewhere other than home, either on holidays, or for work, I always try to make a point of walking
somewhere every day.
Walking gives me some time to relax and unwind, and has its own physical benefits. Most of us, including myself,
can do with some more physical activity, and walking is a low impact form of exercise that I enjoy more than
other strenuous forms of exercise.
When I am at home, I try to go for a walk with my wife every evening. Not only does it provide the benefits mentioned above,
but it also gives us some time to catch up on each other's day, and to chat without the kids being in earshot.
As our kids get older, they are going to bed later, and we have found that gives us less time together in the evenings.
Our evening walks make up for that.
Another benefit of walking in other locations is that it allows me to see many places and things that I would otherwise miss.
Places and things that can be worth photographing.
Early last year I spent a couple of weeks in Melbourne for work. (I couldn't even remember why I was in Melbourne
until I looked it up - it was to conduct a training course for colleagues.)
When I have a weekend elsewhere, I try to spend some time walking and exploring with my camera.
The photo above is one location that I found when walking from my hotel to the CBD - the
Treasury Gardens,
located on the south-east side of the CBD.
I would have missed this location if I had taken a train, tram, bus or taxi into the CBD.
The next time you are visiting another city, take the time to walk around, and enjoy the local sights.
posted Saturday, 06 October 2012, 16:20 (+0800), by Martin
This is one of the photos from the recent
A Print A Day
project I did over a four-week period last month.
I am intending to post all the photos from the project in the near future.
This galah was photographed at the
Albany Bird Park and Marron Farm
in December last year, when we spent a couple of weeks on holidays in Albany.

galah
Albany Bird Park and Marron Farm
Canon EOS 50D, 24-70mm f/2.8L @70mm, 1/80 sec, f/5, ISO400
posted Thursday, 20 September 2012, 21:30 (+0800), by Martin
With Photokina happening at the moment, there have been a lot of announcements from
camera and accessory vendors.
Here are a few announcements that caught my eye.
Phottix Odin TTL Flash Trigger now available for Sony
Phottix released their fantastic
Odin TTL Flash Trigger late last year, initially only for Canon.
(Read my review of the Odin here.)
A
Nikon version
of the Odin was made available earlier this year, and now Phottix have
announced
the
Sony version
of the Odin.
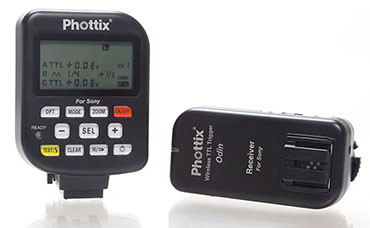
Phottix Odin for Sony
The Phottix Odin provides reliable triggering for multiple off-camera flashes, with three groups that
can be configured in either TTL mode or manual mode, allowing all settings, including flash power levels,
flash exposure compensation and flash zoom, to be configured from the Odin's transmitter.
The Odin also supports high-speed sync and second curtain sync, and is backward compatible
with the
original Strato,
Strato II
and Atlas II triggers.
Phottix have indicated that the Odin for Sony will start shipping next week, and is now
available for purchase
in Phottix's online store.
Phottix Strato TTL Flash Triggers Announced
At Photokina, Phottix have
announced
their newest flash trigger, the Phottix Strato TTL.
The Strato TTL is a brand-new trigger in the Strato series, and provides a cheaper solution
to photographers wanting reliable and easy-to-use wireless TTL flash triggering.
As with all of Phottix's more recent triggers, the Strato TTL trigger uses 2.4GHz.
It supports a maximum shutter speed of 1/8000 seconds in high-speed sync mode, and
also supports second curtain sync.
The Strato TTL is compatible with the
original Strato,
Strato II
and Atlas II triggers.
Versions of the Strato TTL trigger for Canon, Nikon and Sony will be released in Q4 2012 and Q1 2013.
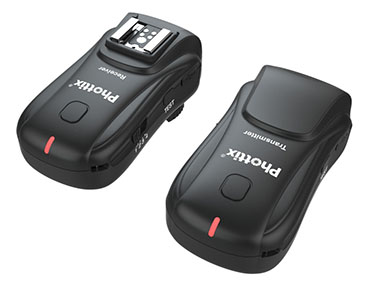
Phottix Strato TTL transmitter and receiver
rear of the Phottix Strato TTL transmitter and receiver
While the details in Phottix's press release are pretty thin, it looks like the Strato TTL
is a cheaper and smaller version alternative to the
Phottix Odin,
but without support for multiple groups of flashes.
No information is available about compatibility with the Phottix Odin, but it would be nice if
the Odin and Strato TTL were compatible.
Pricing information for the Strato TTL isn't yet available, but it should provide photographers
wanting TTL flash triggers a cheaper alternative.
Phottix Mitros TTL Flash Announced
Phottix have also
announced
a TTL flash, called the Mitros.
The Mitros will be available for Canon, Nikon and Sony, and has been under development for more than two years.
Functionality includes ETTL, manual and multi modes, high-speed sync, rear curtain sync,
auto and manual flash head zooming, and built-in IR master/slave triggering.
The Mitros takes 4 AA batteries, and has a socket for connecting an external battery pack.
With a guide number of 58, the Mitros flash output is likely to be comparable in power to a Canon 580EX.
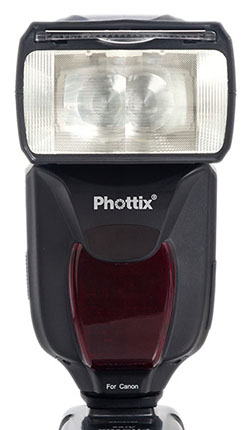
front of the Phottix Mitros TTL flash
| |
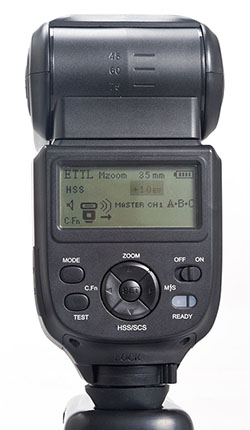
rear of the Phottix Mitros TTL flash
|
Something not seen on many other flash units, the Mitros has a USB port,
to allow the firmware to be upgraded.
This will allow Phottix to add compatibility for new camera models in the future.
The Mitros will be available for Canon, Nikon and Sony in Q4 2012 and Q1 2013.
Update: The Mitros flash for Canon is
now available
in the Phottix online store, and is priced at USD$349.99.
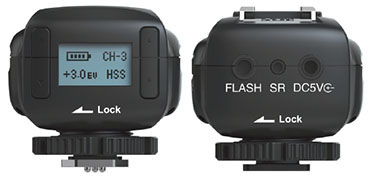
Phottix Ares Flash Triggers Announced
The Ares is a new wireless flash trigger from Phottix, and was
announced
on 20 September 2012.
The Ares is designed as a no-frills non-TTL flash trigger that is easy to use, and provides reliable
triggering, at an affordable price.
One of the key features of the Ares is the rotating transmitter mount.
It allows photographers to use the transmitter in an upright position, for easy access to the
controls, or folded down to make it more compact.
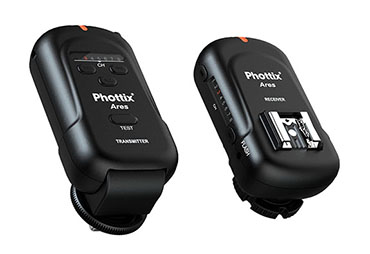
Phottix Ares flash trigger
Use of 2.4GHz for communication ensures the Ares has a range of over 200m,
and a total of 8 channels are provided. The transmitter allows either a single channel
to be triggered, or all channels at once.
The Phottix Ares is due for release in October 2012, and will replace several of the older Phottix flash
triggers, including the
Tetra,
Aster,
and the
original Strato.
The Phottix Odin can
trigger
the original Strato, but no information about compatibility between the Odin and the Ares trigger was
available at the time of writing.
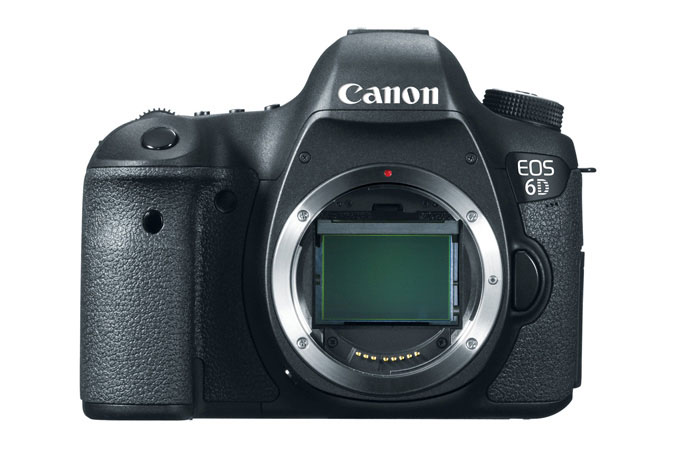
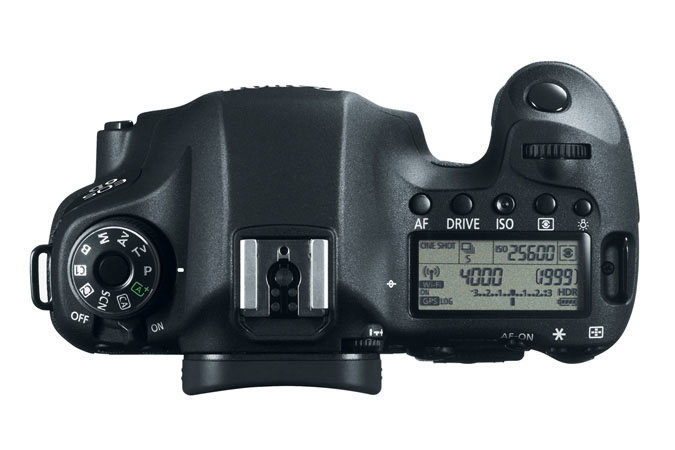
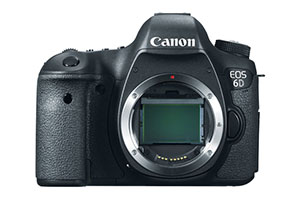
Canon 6D Camera Announced
Also at Photokina, Canon has
announced
the new Canon EOS 6D DSLR camera body.
The 6D is a smaller-bodied full-frame camera, with a new 20.2 megapixel sensor, and is set to be released in December 2012,
with an estimated price of approx USD$2100.
Canon say the 6D is the lightest full-frame DSLR, and it has built-in wifi and GPS functionality.
front of the Phottix Mitros TTL flash
| |

rear of the Phottix Mitros TTL flash
|
The Canon 6D fits into Canon's DSLR lineup between the 7D and the 5D mark III, providing a cheaper option
for people wanting a full-frame DSLR, without the higher cost (and additional features) of the 5D mark III.
The maximum flash sync speed of the Canon 6D is 1/180 seconds, compared to the 5D's 1/200 seconds, and the 50D/60D/7D's 1/250 seconds.
The slower flash sync speed could be a big issue for any strobist photographers wanting to use flashes outdoors.
posted Monday, 17 September 2012, 11:50 (+0800), by Martin
Phottix Atlas II Released

Phottix Atlas II transceiver
Phottix recently
announced the Atlas II
wireless flash trigger.
The
Atlas II
is a transceiver, where each unit can be configured to operate in either transmitter mode or receiver mode,
and can be used to trigger cameras, flashes and studio strobes.
The Atlas II has a range of upto 350m, with one tester reporting successful triggering
at distances of upto 600m (90% success rate at that distance).
The
Atlas II
is compatible with Phottix Strato and
Odin series
TTL triggers,
where an
Odin
TCU can trigger Atlas II transceivers,
Strato
and
Strato II Multi
transmitters can trigger Atlas II transceivers,
and an Atlas II can trigger
Strato
receivers.
Note that an Atlas II can not trigger Strato II Multi receivers or Odin receivers.
It is important to note that the
Atlas II
is not compatible with the original Atlas.
This is because the Atlas II uses 2.4GHz for communication, while the original Atlas
used 433MHz. This allowed the original Atlas to be compatible with some of the PocketWizard
products, but had a limited range.
The use of 2.4GHz in the Atlas II provides a much better range than the original Atlas,
ensures it can be sold world-wide, and introduces compatibility with other Phottix triggers.
Photo Inspiration
Some photo galleries to inspire you:
Photography Project Inspiration
Here is a short selection of creative photography projects to try:
posted Thursday, 06 September 2012, 20:55 (+0800), by Martin
Improving my Printing Skills: A Print A Day Project
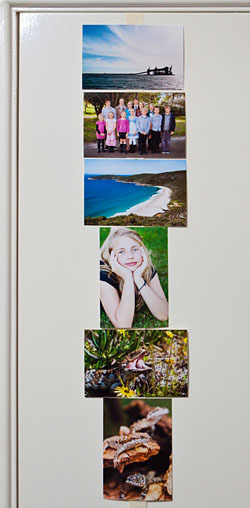
prints hanging on my door
Earlier this year I read an interesting post on The Online Photographer blog about doing a
photo print each day
as an exercise in improving your post-processing skills specifically in relation to achieving good photo prints.
It is something that appealed to me, but I put it off at the time, as I had been travelling for work, and have been
very busy.
However, as I have a few weeks holidays at the moment, I thought I would give it a try during my break from work.
Printer, Paper and Ink
I am using a Canon Pixma iP4300 inkjet printer that is a few years old, with genuine Canon ink
on 6x4" Canon glossy photo paper.
Previous experience has shown the colour rendition of my printer is very close to that of my calibrated monitors,
so the complexities of printer calibration is something I don't have to concern myself with.
Photo Selection
Rather than printing photos I have previously spent time post-processing, I am selecting a variety of photos from my archives
that I have never post-processed, interspersing landscapes, macro and portraits.
Only photos that particularly appeal to me are being chosen.
Some photos were taken a while ago, and I haven't got around to post-processing them.
Others photos are more recent - with today's print being a photo that I took earlier today.
Progress
I started last week Saturday, so today is day six, and I have six prints hanging on the cupboard door in my
home office, as shown in the photo above.
In a couple of weeks I'll post a followup on this print a day project, with some comments on what worked for me,
what didn't work, and what I learnt from the project.
Today's Print - Three Lizards
Today's print is one of the photos I took earlier today.
As I'm currently on holidays from work, I was able to attend an excursion with the year three class
that my 8 year old son is in.
We spent the morning at
Cohuna Wildlife Park,
and the afternoon at the
Armadale Reptile and Wildlife Centre.
Both locations provided a very hands-on experience for the kids, with a wide variety of animals.
It was a great day, and I managed to get some great photos of the animals, the kids, and the kids
interacting with the animals.
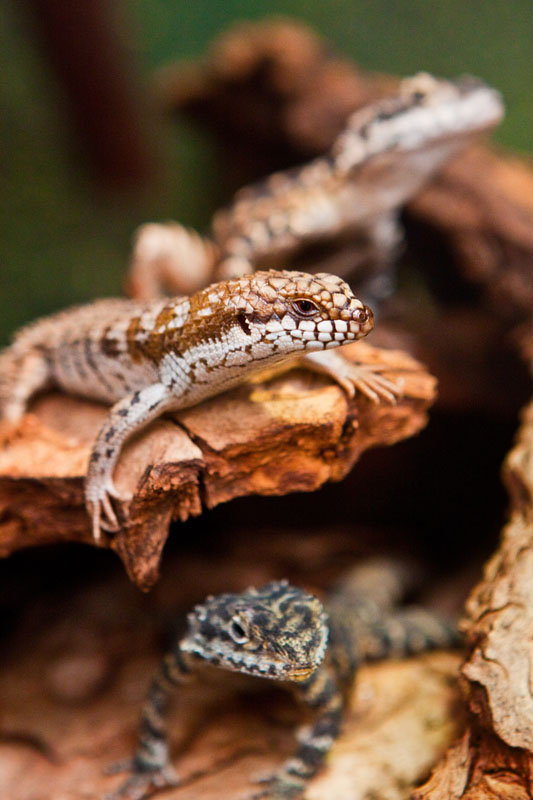
Three Lizards
top: unknown; middle: Pygmy Spiny Tailed Skink; bottom: Western Bearded Dragon
Armadale Reptile and Wildlife Centre, Armadale, Western Australia
Canon EOS 50D, 24-70mm f/2.8L @70mm, 1/25 sec, f/4.5, ISO1000
posted Tuesday, 04 September 2012, 20:36 (+0800), by Martin
Firmware Update - 1/3 Stop Adjustments in Manual Mode
Late last month Phottix
announced
an updated version of firmware for the fantastic
Phottix Odin for Canon wireless TTL flash trigger.
The most notable inclusion in firmware version 1.20 is support for 1/3
stop
adjustments in manual mode.
While the lack of 1/3 stop adjustments in manual mode hasn't been a big issue for me
(I typically use the Odin in TTL mode, and you can get 1/3 stops with the flashes in manual mode by using the camera's flash exposure compensation),
many people have been clamouring for 1/3 stops.
The Nikon version of the Phottix Odin has had support for 1/3 stop adjustments in manual mode from its initial
released version, and now the Canon version also supports this feature.
Display of 1/3 Stops on the Odin TCU
Due to limitations of the display on the Odin TCU for Canon, the Phottix team have taken a creative approach
to display the 1/3 stop adjustments.
With previous versions of firmware, when adjusting the power output of a flash group on the TCU, the TCU's display
would flash the power level, as shown in photo 1 below.
With firmware version 1.20 installed, the "+" and "-" buttons now adjust the power output of a flash group in manual mode
in 1/3 stop increments. The flashing display now alternates between the base power level (ie, 1/128) and
the 1/3 stop adjustment, as shown in photos 2 and 3 below.
photo 1: setting group 1 output in manual mode,
power level set to 1/128
(same display as previous firmware)
|
photo 2: setting group 1 output in manual mode,
power level set to 1/128 + 0.3
|
posted Friday, 31 August 2012, 20:20 (+0800), by Martin
As a result of business trips to Sydney every year or two, I have been able to photograph
the Sydney Harbour Bridge a number of times, and have posted several
photos
of it on my blog in recent years.
As I mentioned in a recent post,
I try to look for unusual angles and views of the Harbour Bridge.
The photo below was taken from the south end of the Harbour Bridge, looking up towards the main structure of the bridge.
It is affectionately called the "coathanger", due to its arched design.
This bridge is also the world's widest long-span bridge, and is the world's tallest steel arch bridge.
It is also the fifth longest spanning-arch bridge in the world - quite amazing when you consider that it was built many years ago,
with construction starting in 1923, and the bridge officially opened in 1932.

the coathanger
Sydney, New South Wales, Australia
Canon EOS 50D, 10-22mm @10mm, 1/250 sec, f/5.6, ISO200
On the Saturday when I took these photos, I observed several wedding parties in the vicinity, underneath the bridge,
around the Opera House, and in the Botanical Gardens nearby.
A bride can be seen near the railing on the other side of the road, underneath the bridge, in the photo above.
The photo below shows the massive hinges against the southern abutment, supporting the load from the arch.
Interestingly, the bridge pylons, built on top of the abutments, are not structural at all.
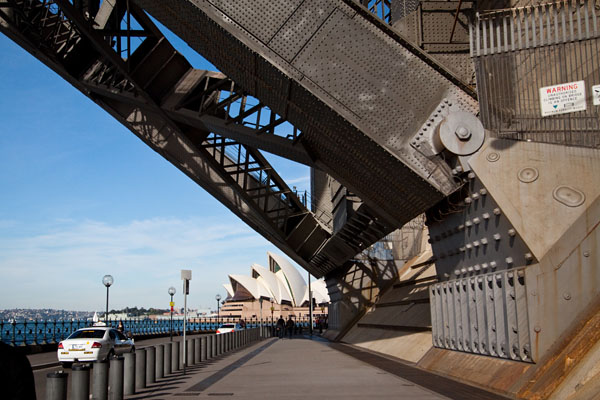
huge hinges under the bridge
Sydney, New South Wales, Australia
Canon EOS 50D, 10-22mm @22mm, 1/500 sec, f/5.6, ISO200
posted Wednesday, 22 August 2012, 22:25 (+0800), by Martin
I've previously
posted a photo
from a KAP session at Prevelly, near Margaret River in the south west of Western Australia.
Here are a few more photos from that
KAP session, all taken with a
GoPro Hero2
suspended from the line of my FlowForm 16 kite.
canoeist at the Margaret River
Prevelly, Western Australia
GoPro HD Hero2 (suspended from a kite)
posted Thursday, 16 August 2012, 20:34 (+0800), by Martin
The Sydney Harbour Bridge is a very recognisable and iconic structure that many visitors
to Sydney will photograph.
When I was in Sydney a few months ago, I tried to look for some more unusual angles and views
of the iconic "coathanger" bridge.
This photo of the southern end of the Harbour Bridge, with the Sydney Harbour Bridge
in the foreground, shows several groups of people doing the
Bridge Climb.

bridge walkers
Sydney Harbour Bridge
Sydney, New South Wales, Australia
Canon EOS 50D, 70-200mm f/4L @200mm, 1/2500 sec, f/4, ISO100
posted Sunday, 29 July 2012, 14:37 (+0800), by Martin
The remains of a windblown dandelion clock, photographed in my back yard,
using the fantastic Canon EF
100mm f/2.8 macro lens.
The black background was achieved by stopping down the lens
aperture
to f/14, so ambient light wasn't contributing at all to the
exposure.
A Canon 580EX flash was attached to the camera's hotshoe, with a home-made
flash reflector
providing a diffuse source of light.
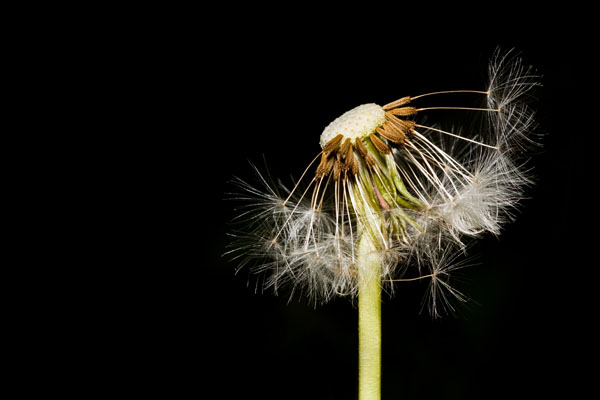
windblown
back yard, Western Australia
Canon EOS 50D, 100mm f/2.8 macro @100mm, 1/160 sec, f/14, ISO200
posted Tuesday, 24 July 2012, 21:14 (+0800), by Martin
On Saturday afternoon, I spent some time in the back yard with my
macro lens
and home-made
flash reflector,
and captured these photos of industrious bees in the flowers.

busy bee
back yard, Western Australia
Canon EOS 50D, 100mm f/2.8 macro @100mm, 1/160 sec, f/16, ISO200
posted Saturday, 14 July 2012, 10:32 (+0800), by Martin
Here are some more photos from my trip to Sydney in May.
While walking back from
Wentworth Falls,
we stopped at an interesting waterfall known as "Weeping Rock".
It is quite obvious where the name comes from - with the waterfall cascading over the top
of a flat rock, giving it a weeping appearance.

Weeping Rock
Blue Mountains, New South Wales, Australia
Canon EOS 50D, 10-22mm @19mm, 2.5 sec, f/18, ISO100
The photo above was taken from the walking track leading to Weeping Rock.
For the phot below, I got a lot closer to capture the details of the water cascading
over the edge of the rock, with the steps and hand railing in the background.
posted Saturday, 07 July 2012, 19:15 (+0800), by Martin
This is one of my favourite photos from a photowalk in South Fremantle last weekend.
This is a self-portrait as I'm standing on the rocks at the waters' edge.
Despite what it looks like, I am not a smoker, and I'm not lighting up a cigarette.
Instead, I am lighting up some steel wool to do some
steel wool spinning.
lighting up
South Fremantle, Western Australia
Canon EOS 50D, 10-22mm @13mm, 20 sec, f/9, ISO100
This self-portait was an accidental one.
As I was lighting the steel wool with a lighter,
I must have accidentally triggered my camera via the
Phottix Plato
remote shutter release transmitter that I was also hoding in my hand.
On the horizon at the right hand side are the remnants of the cloud that some people thought was a
meteor
hitting the ocean.
posted Monday, 02 July 2012, 21:17 (+0800), by Martin
On Saturday evening, I was in South Fremantle with a group of fellow photographers,
with the intention of doing some
steel wool spinning
once it got dark enough.
We saw an interesting cloud formation, which some claim was caused by a meteor
landing in the ocean.
Before sunset, some of us noticed what looked like a
contrail just above the horizon.
A contrail is long thin artificial cloud caused by condensation or vapour from aircraft engines.
In Perth, we rarely see contrails in the sky, as aeroplanes do not normally fly at a high enough
altitude over Perth to cause contrails (most aeroplanes flying over Perth are low, either
landing or taking off, as Perth is a pretty remote city).
What we saw on Saturday night initially looked just like a normal contrail, starting below the
horizon, and finishing abruptly a short distance above the horizon.
Once the sun disappeared below the horizon, just to the right of the contrail,
the light of the setting sun lit up this cloud, as shown in the photo below.
a meteor? I don't think so
South Fremantle, Western Australia
Canon EOS 50D, 10-22mm @22mm, 1/80 sec, f/9, ISO400
We weren't the only ones to see this interesting cloud formation. On the following Monday (today),
I
noticed
numerous
news
articles
on the internet, claiming the streak was caused by a meteor hitting the ocean.
Many of the news articles appear to focus on the fact that it was
a "fiery trail".
However, before the sun set below the horizon, it looked just like a normal white contrail, albeit with a somewhat abrupt ending.
Unfortunately I didn't take any photos of the cloud before the sunset.
This fiery streak was not caused by a meteor. It was just a contrail from a passing aeroplane.
Due to the location of this cloud, the setting sun caused the cloud to turn bright red and yellow,
as shown in the photo below.
posted Saturday, 30 June 2012, 22:05 (+0800), by Martin
This evening I got together with some fellow photography enthusiasts,
and had some fun with steel wool spinning on the beach right next to the abandoned
power station in South Fremantle.
We started spinning with the old power station in the background.
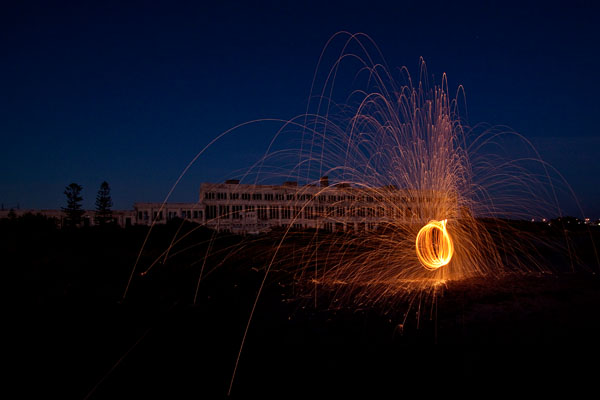
South Fremantle, Western Australia
Canon EOS 50D, 10-22mm @13mm, 20 sec, f/9, ISO100
We then turned in the opposite direction, to make the most of the sunset colours in the sky.
posted Saturday, 16 June 2012, 19:10 (+0800), by Martin
While walking back up the mountain from a visit to the bottom of
Wentworth Falls
last month, we stopped at Queen's Cascades.
Here, the Jamison Creek provides a fairly wide cascade over the rocks, as it falls into a pool,
with a small sandy beach on the right hand side.
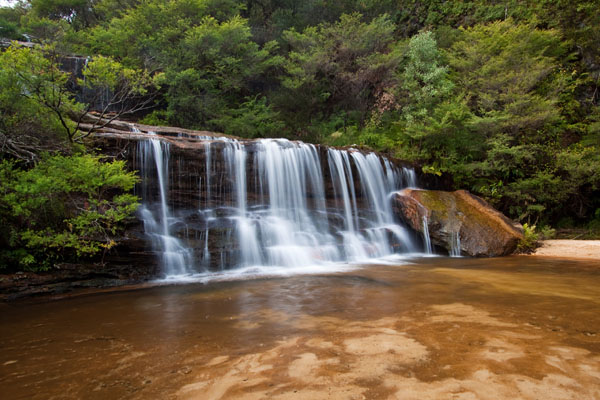
Queen's Cascades
Blue Mountains, New South Wales, Australia
Canon EOS 50D, 10-22mm @15mm, 8/10 sec, f/16, ISO100
posted Saturday, 09 June 2012, 15:05 (+0800), by Martin
Canon Release EF 40mm f/2.8 STM Pancake Lens
Canon have
announced
a new prime lens - the
Canon EF 40mm f/2.8 STM pancake lens.
I believe it's Canon's first pancake lens, and it'll work on full-frame and crop DSLR bodies.
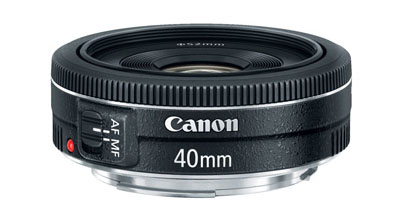
Canon EF 40mm f/2.8 STM lens
With 7 aperture blades, the bokeh should be a nicer than that of the
5-bladed Canon EF 50mm f/1.8 II lens and the
5-bladed Canon EF 35mm f/2.0 lens.
At about USD$199, it seems to be well priced, and is now available for pre-order from
B&H.
GoPro Release the Wifi BacPac
GoPro's much anticipated Wifi BacPac is now available, with various people reporting that they
have received theirs.
The Wifi BacPac is available by itself, requiring the use of an app on your iPhone or Android phone or tablet to
connect and control it.
The Wifi BacPac is also available with a wifi remote control that is capable of controlling up to 50
remote GoPro cameras equipped with the Wifi BacPac.
The BacPac provides remote wireless connectivity and control over a GoPro Hero camera.
Note that you need to update the firmware in your GoPro cameras before they will work with the BacPac. I have heard
a few people complain that the firmware upgrade procedure is painful, so be sure to read all the
information available on GoPro's
website
before attempting to upgrade your firmware.
B&H
don't have any in stock yet, but are taking pre-orders.
According to GoPro's website, the
Wifi BacPac cannot be shipped to Australia yet, as final certification has not yet been achieved.
More SanDisk Memory Card Specials
There seems to be an on-going memory card price war, as various vendors regularly provide
good discounts.
B&H are once again running some specials on selected
SanDisk memory cards.
Photo Inspiration - Diptychs and Triptychs
The D-Photo Inspiration Fix
regularly post a set of photos from different photographers, with some great photos
being posted.
Some of my recent favourite sets they have posted recently include:
Note that some of the other sets linked by the D-Photo are NSFW.
I thought I'd also share some great collections of triptychs and diptychs that I've come across
on flickr in recent months.

This is a collection
of triptychs of strangers, titled, not surprisingly,
" Triptychs of Strangers".
The three frames of the triptych covering the stranger's head, hands and their feet.

An interesting collection of diptychs titled
" Persona",
with the first frame showing the person, and the second frame showing what they are carrying in their bag and pockets.
posted Wednesday, 06 June 2012, 19:20 (+0800), by Martin
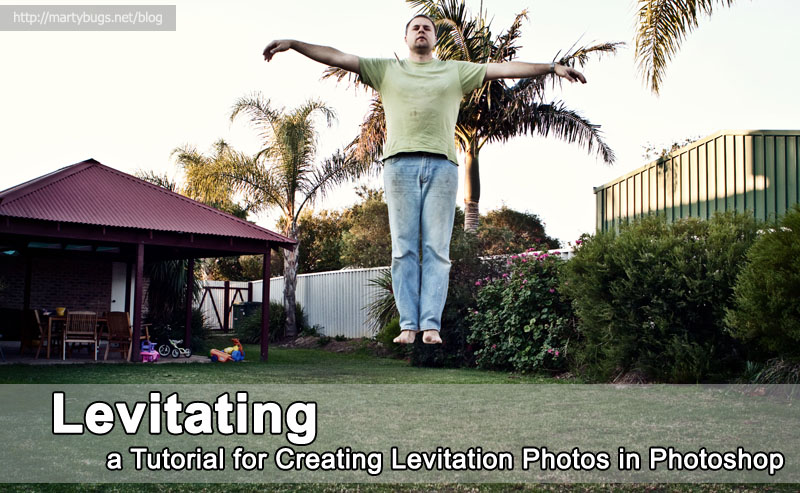
Some time ago I
posted some photos
showing myself and kids levitating in the back yard.
Due to the interest generated by those photos, I decided to create this tutorial
to describe how you can achieve similar results using Photoshop.
Note that this tutorial assumes the use of Photoshop CS4.
Some steps may be slightly different in other versions of Photoshop.
Similar results can also be achieved using most other image editing packages.
posted Saturday, 02 June 2012, 17:50 (+0800), by Martin
Last month, I spent two weeks working in Sydney.
On the weekend, one of my colleagues, also a keen photographer,
took me out to Katoomba, in the Blue Mountains, to take some photos
of Wentworth Falls.
Wentworth Falls
is located in the
Blue Mountains National Park,
a few kilometres east of the township of
Katoomba.
The total height of the falls is 187 metres, and the falls consist of several drops.
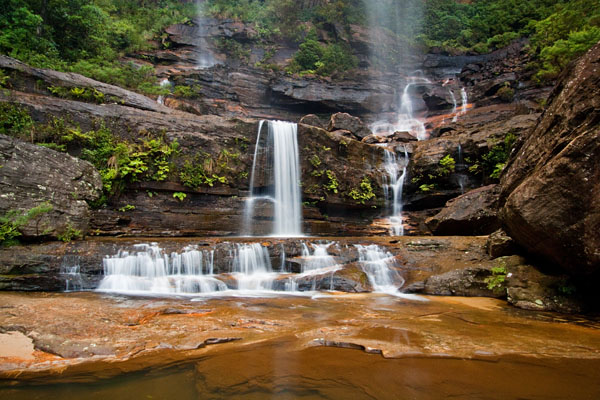
bottom of the Middle Falls, Wentworth Falls
Blue Mountains, New South Wales, Australia
Canon EOS 50D, 10-22mm @13mm, 6/10 sec, f/9, ISO200
The walking trail down to the middle falls consists of 173 steps cut into the stone, down a 90 metre cliff face.
Apparently it is the longest outdoor staircase in Australia!
The stone steps are creatively named the
"Grand Stairway", and walking back up the many steps is definitely
harder than walking down.
Below are a couple of photos (taken with my phone) showing the Grand Stairway.
posted Sunday, 27 May 2012, 14:15 (+0800), by Martin
While on our way to Injidup Beach last month, we stopped at Wyadup, where I managed to get some
aerial photos of Injidup Beach with my kite.
After the
KAP
session at Wyadup, we headed to Injidup Beach, and this is one of the photos I captured, just before the sun
sank below the horizon.
A 20 second exposure
(possible due to the use of a
10-stop ND filter)
captures the movement of the clouds in the sky, and completely smoothes out the movement of the water.
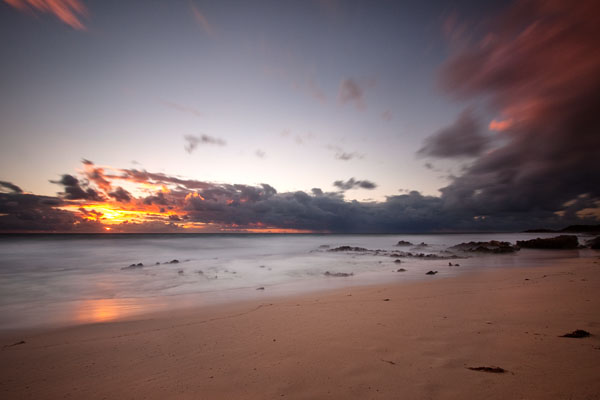
sunset at Injidup Beach
Injidup Beach, Yallingup, Western Australia
Canon EOS 50D, 10-22mm @10mm (10-stop ND filter), 20 sec, f/8, ISO100
posted Tuesday, 15 May 2012, 20:20 (+0800), by Martin
This is the tenth article in a
series on "understanding your camera"
that I am writing as I teach camera basics and camera operation to my children.
Confusion about Focal Length
A reader of one of my earlier posts in this series, titled
Focal Length, Field of View and Angle of View Defined,
left a
comment
indicating he was somewhat confused by what I had written about focal length.
The commenter, Luis, wrote
I am confused. Some books define focal point as the point where rays parallel to the optical axis converge
(the point that burns when you focus the sun on a piece of paper), and focal length as the distance from the center of the lens to that point.
Also, the rules given in books to construct the image by tracing the rays locate the image away from the focal point.
That is, if you place the film or the sensor at the focal point (as defined above), you don't get any image.
I will be grateful if you clarify what is actually your definition of focal length.
Rather than respond to Luis' questions in another comment, I thought I would explore and respond to his questions in this
blog post.
posted Sunday, 13 May 2012, 14:20 (+0800), by Martin
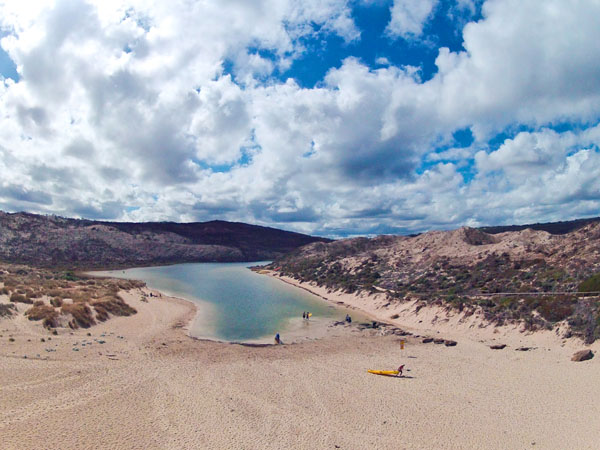
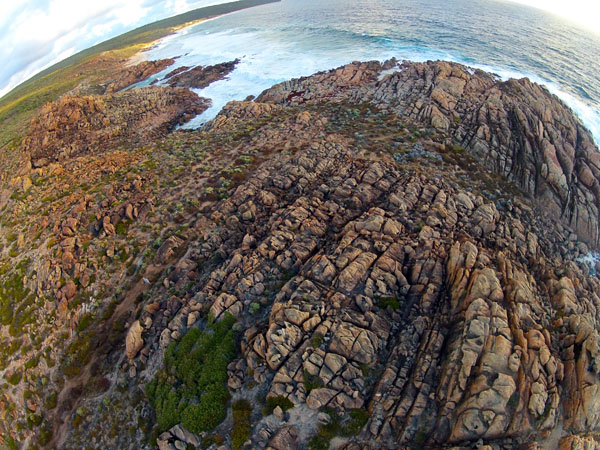
When I was younger, my parents would take us to Prevelly
(in the south west of Western Australia, right near Margaret River)
for a few weeks every summer holidays.
I have lots of great memories of our times there,
and like to visit the area whenever I'm in the vicinity.
The area has changed a lot over the years, with many more houses, hotels and resorts in the area.
While on holidays in Yallingup recently, we visited Margaret River and Prevelly.
The photo below was stitched using several photos taken by my GoPro HD Hero2 camera,
lifted airborne by my kite.
The end of the Margaret River is visible on the left hand side, while the right hand side
shows the Indian Ocean.
All the plants on the dunes had been decimated by a major bushfire that swept
through the area in November last year, so it looked quite different to what I remembered.
Be sure to click the image below to see a larger version of it.
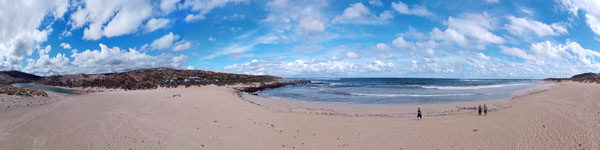
mouth of the Margaret River and the Indian Ocean
Prevelly, Western Australia
GoPro HD Hero2 (suspended from a kite)
posted Saturday, 05 May 2012, 17:48 (+0800), by Martin
A shutter speed of just under one second captures the waves receeding on the beach,
shortly after sunset at Injidup Beach, just south of Yallingup.
In the distance (on the horizon on the right hand side of the frame), an approaching storm
is visible.
The coastline around the south west of Western Australia has so many interesting
features, and so many different places to explore. The one week holiday we had
last month in Yallingup was definitely not long enough to explore the area,
and I can't wait until I get some time to do more exploring around the south west
with my camera and tripod.
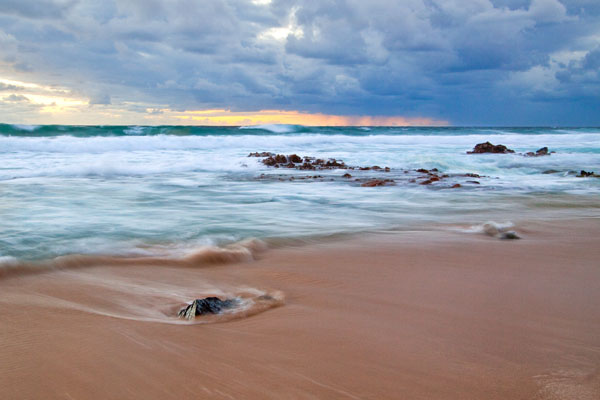
receeding waves
Injidup Beach, Yallingup, Western Australia
Canon EOS 50D, 10-22mm @22mm, 8/10 sec, f/11, ISO100
posted Wednesday, 25 April 2012, 16:11 (+0800), by Martin
A one second exposure captures the movement of the waves on this windy and stormy day earlier this month.
The long exposure was possible due to the
10-stop ND filter
I had screwed to the front of my
Canon EF-S 10-22mm lens.
The 10-stop ND filter is really just an expensive piece of dark glass that only allows a small amount of light to get through,
thus allowing longer exposure photos, even in broad daylight.
On this particular afternoon, the wind was really blowing
(much too strong for my kite aerial photography rig),
and the waves were crashing over the rocks.
The longer exposure allowed me to capture some of the movement of the water and waves.
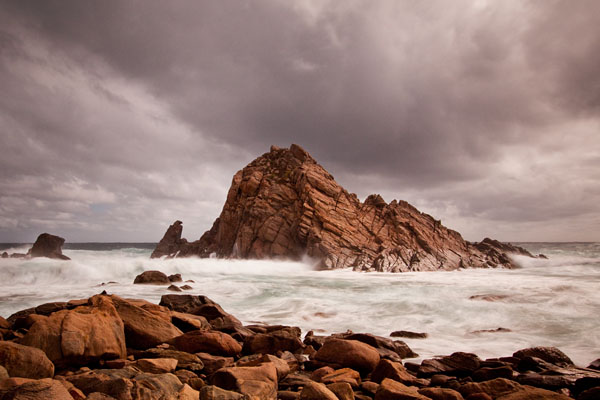
storm clouds over Sugarloaf Rock
Cape Naturaliste, Western Australia
Canon EOS 50D, 10-22mm @14mm (10-stop ND filter), 1 sec, f/8, ISO100
posted Saturday, 21 April 2012, 22:28 (+0800), by Martin
While on holidays in Yallingup recently (in the south west of Western Australia),
I took the opportunity to get my GoPro Hero2 camera airborne with my kite.
These photos are from a KAP session at Wyadup, located between Canal Rocks and Injidup Beach,
just south of Yallingup.
These photos were taken in the late afternoon, while on our way to Injidup Beach to shoot the sunset.
Here is an aerial photo looking south from Wyadup, showing the fantastic Injidup Beach.

aerial view of Injidup Beach
Wyadup, Yallingup, Western Australia
GoPro HD Hero2 (suspended from a kite)
Looking almost straight down from the kite shows the rock formations at Wyadup.
However, this angle doesn't give you any appreciation for the height of these rocks.
rock formations at Wyadup
Wyadup, Yallingup, Western Australia
GoPro HD Hero2 (suspended from a kite)
posted Saturday, 07 April 2012, 21:39 (+0800), by Martin
A sneak peek at a wedding I shot last month.
We spent some time up on the hills in Jarrahdale, and in this photo, the bridal couple are
taking it easy, leaning on a gate while enjoying the view.
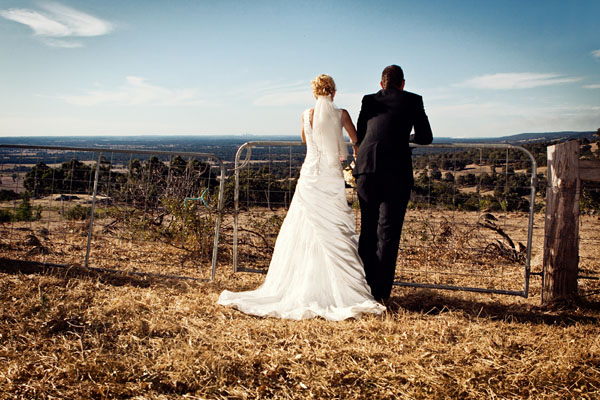
enjoying the view
Jarrahdale, Western Australia
posted Monday, 02 April 2012, 22:34 (+0800), by Martin
Lens Issues
I recently started having focus issues with my most-frequently used lens, the Canon EF
24-70mm f/2.8L.
It would often rear-focus a lot, despite using only the centre focus point and single-shot focus mode.
This rear-focusing behaviour didn't occur all the time, and it seemed to occur more frequently at wider focal lengths.
There was also some in/out movement in the lens barrel that I previously hadn't noticed,
and I suspected that this movement was related to the focus issues.

Canon EF 24-70mm f/2.8L lens
Example Photo Demonstrating Focus Issues
Here's an example photo, showing the bad rear focussing behaviour.
The photo was taken using the centre focus point only, and single-shot focus,
focusing on the face of my oldest son.
photo straight out of the camera
While the rear-focusing isn't particularly obvious in the scaled-down photo above,
the 100% crop below shows it much more clearly.
posted Sunday, 25 March 2012, 12:22 (+0800), by Martin
When I recently posted photos of my
Yellow-breasted Waxbill finches,
I mentioned that some photos of some of our other finches would be coming.
Here are some photos of the pair of Yellow-head Star finches we have in our aviary.
I find these more difficult to distinguish between the male and female than with any of
the other finch varieties we have.
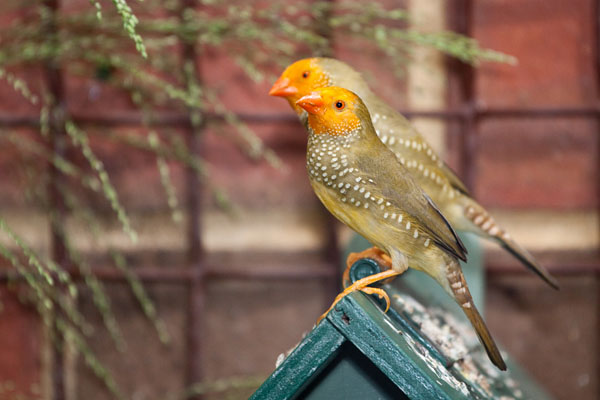
pair of yellow-head star finches
home, Western Australia
Canon EOS 50D, 70-200mm f/4L @200mm, 1/500 sec, f/4, ISO400
posted Sunday, 18 March 2012, 14:40 (+0800), by Martin
An old boat lies partially submerged in a canal in Marken,
in the north of Holland.
old boat in the canal
Marken, Noord-Holland, The Netherlands
While on holidays in Holland last year, we had spent the day exploring Marken
and Volendam,
two historic tourist towns in the north of Holland.
In the evening, on the way out of Marken, we decided to stop at a convenient
cafe for some dinner.
The cafe was called
Cafetaria De Verkeerde Wereld
(literally translated, it means "Cafeteria The Wrong World"), and we had a great dinner there.
While waiting for our meals to be served, I noticed this old boat in a canal
just across the road, and took the opportunity to take some photos of it.
posted Friday, 09 March 2012, 21:30 (+0800), by Martin
I recently went on a photowalk in Perth on a Friday evening.
After wandering around the streets and alleys for a while, we then
headed to Forrest Place, to take some photos of the
Friday night City of Perth Twilight Hawkers Markets.
In the crowds, we found a guy with a Stormtrooper backpack.
Some of my fellow photowalkers photographed him while he was seated,
and I snapped this photo as he walked past a some fellow photowalkers chimping at the back of
Mark's camera.
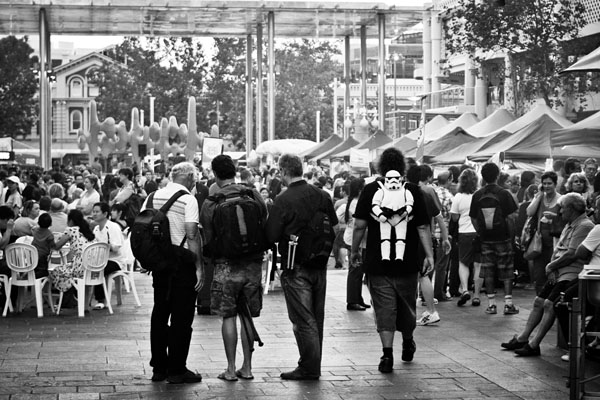
passing stormtrooper
City of Perth Twilight Hawkers Markets
Forrest Place, Perth, Western Australia
Canon EOS 50D, 35mm f/2 @35mm, 1/250 sec, f/2.5, ISO320
posted Saturday, 03 March 2012, 20:50 (+0800), by Martin
We have a fairly large bird aviary on the side of our house, which means we
get to enjoy the birds from our living room and main bedroom, with just the
window glass between us and the birds.
We first started with Zebra finches, because they are cheap and easy to breed.
After plenty of success with breeding Zebra finches, we switched to Gouldian finches,
and have since also acquired some more exotic finches.
I have previously posted photos of some of our
Gouldian finches
(and more here),
as well as photos of our baby quails,
but have never posted photos of our other birds.
This morning I spent some time photographing the other finches in our aviary.
The Yellow-breasted Waxbill finches are probably my favourite. They are more petite than
our other finches, and are also more active, constantly on the move.
Here is a selection of photos of our pair of Yellow-breasted Waxbill finches (also known as Zebra Waxbill finches),
with photos of the Painted Firetail finches and Yellow-head Star finches to come in a future post.

female yellow-breasted waxbill finch
home, Western Australia
Canon EOS 50D, 70-200mm f/4L @200mm, 1/80 sec, f/4, ISO200
posted Friday, 02 March 2012, 16:50 (+0800), by Martin
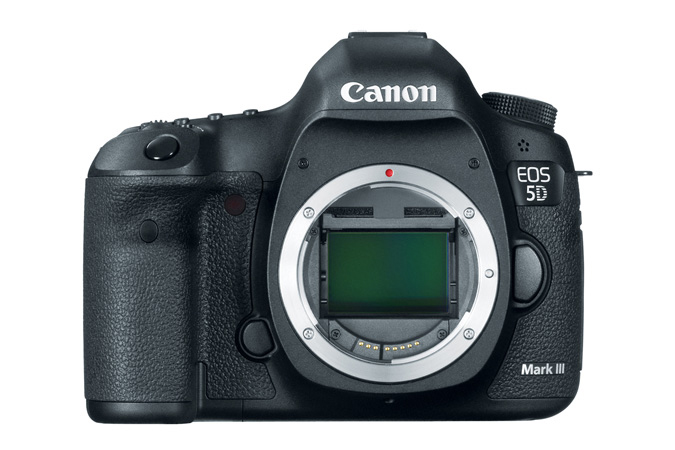
New Products Announced
Earlier today, Canon announced some new products:
- Canon 5D Mark III DSLR camera body (press release here)
- Canon Speedlite 600EX-RT (product page here)
- Canon Speedlite Transmitter ST-E3-RT (product page here)
- Canon Wireless File Transmitter WFT-E7 (product page here)
- Canon GPS Receiver GP-E2 (product page here)
- Canon Battery Grip BG-E11

Canon 5D Mark III with 24-105mm lens
Pricing is expected to be as follows
- Canon 5D Mark III DSLR camera body - USD$3499 body only (USD$4299 with the EF 24-105mm lens)
- Canon Speedlite 600EX-RT - USD$630
- Canon Speedlite Transmitter ST-E3-RT - USD$470
- Canon Wireless File Transmitter WFT-E7 - USD$850
- Canon GPS Receiver GP-E2 - USD$390
- Canon Battery Grip BG-E11 - USD$490
The 5D Mark III, 600EX-RT and ST-E3-RT are expected to be available at the end of March 2012,
and the WFT-E7, GP-E2 and BG-E11 are expected to be available at the end of April 2012.
The
5D Mark III camera body,
5D Mark III with 24-105mm lens
and the
600EX-RT flash
are currently available for pre-order at B&H.
Canon 5D Mark III
This announcement finally puts an end to the speculation about specifications of the Canon 5D Mark III in recent months,
with the announced specifications being:
- New 22.3 megapixel full-frame CMOS sensor
- New DIGIC 5+ processor
- New 61-point High Density Reticular AF system
- 6 Frames Per Second
- Multiple Exposures - an EOS first
- Inbuilt HDR (High Dynamic Range) mode - an EOS first
- ISO 100-25600 (with expansion of L:50,H:51200/102400) enabling sharper images in a broader range of lighting conditions, especially in low light
- Intelligent viewfinder with 100% coverage
- Shutter Life of 150,000 cycles
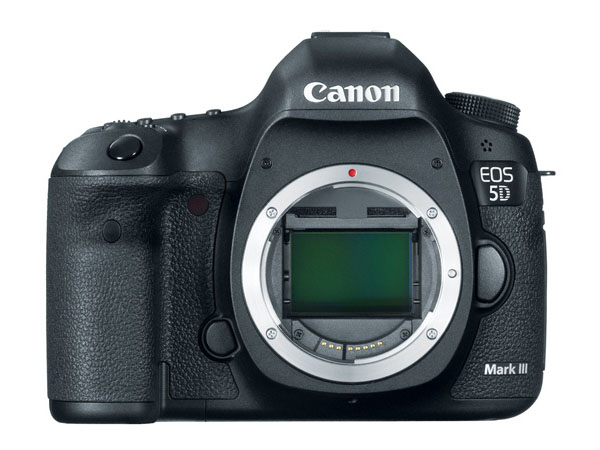
Canon 5D Mark III camera body
The Mark III features a minor increase in pixel count (22.3 megapixels compared to the Mark II's 21.1 megapixels),
a new DiG!c 5+ processor, lots more focus points, and a larger ISO range.
Multiple exposures are likely to prove useful for some artistic photos, but is unlikely to be widely used.
Built-in HDR functionality is interesting, as there are some situations where it could be useful. However,
due to the many completely overdone HDR photos seen on the internet, many people disdain HDR.
[
category: / gear/
| permalink
| 2 comments
]
[ tags: 5D, 600EX, body, camera, Canon, EOS, flash, Speedlite, ST-E3, trigger, wireless ]
posted Sunday, 19 February 2012, 14:33 (+0800), by Martin
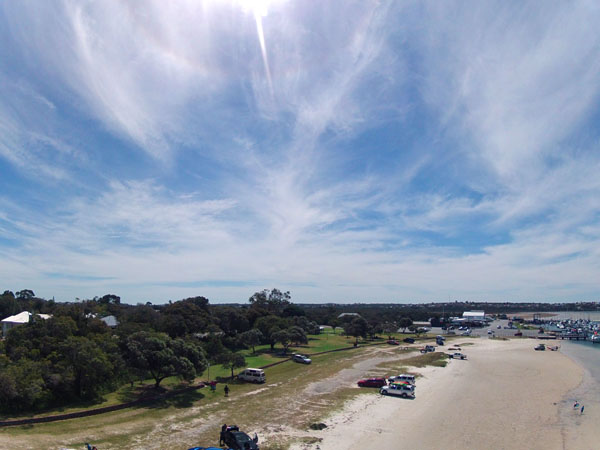
Yesterday afternoon we took the family to Kwinana Beach.
While the kids were having a lot of fun in the water,
I got my kite airborne in the gusty seabreeze, and took some
aerial photos.
Here's my favourite from the KAP session, with the camera pointing
directly down towards the beach:
straight down
Kwinana Beach, Western Australia
GoPro HD Hero2 (suspended from a kite)
After having dinner in Rockingham, as we were driving back home, we noticed
the sunset was looking very nice.
We stopped at Kwinana Beach, and got some photos of the sunset
(from the beach, without the kite this time),
with the Grain Terminal providing an interesting silhouette.
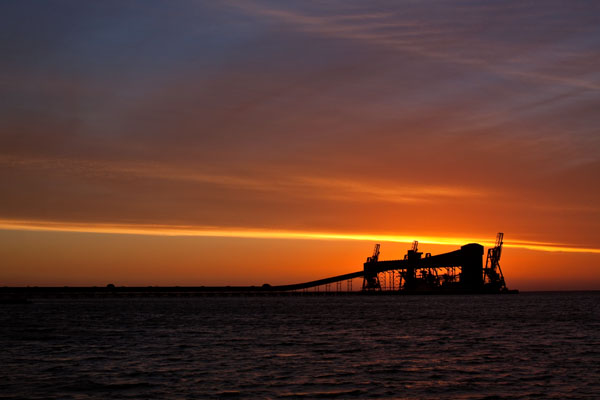
Kwinana Grain Terminal at sunset
Kwinana Beach, Western Australia
Canon EOS 50D, 35mm f/2 @35mm, 1/200 sec, f/6.3, ISO100
posted Friday, 10 February 2012, 21:17 (+0800), by Martin
While exploring Amsterdam on foot and by boat, it is hard to miss the many
different bridges over the many canals.
Here is a selection of black and white photos of some of the bridges encountered
in Amsterdam.
A boat on the Keizersgracht (emperors' canal) passing under a bridge.
This is where the Keizersgracht intersects with the Brouwersgracht (brewers' canal):

boat on the Keizersgracht passing under a bridge
Amsterdam, Noord-Holland, The Netherlands
A bridge over the Bloemgracht (flower canal), where it intersects with the Prinsengracht
(princes' canal):
bridge over the Bloemgracht
Amsterdam, Noord-Holland, The Netherlands
The narrow wedge-shaped building in the photo above, at the corner of Prinsengracht and Bloemgracht,
is an art gallery called
" Galerie Josine Bokhoven".
The shape of the building is due to the two canals not crossing at right angles.
There are signs on each side of the bridge in the photo above that say "ZINKBUIS RIOLERING".
As far as I can work out, this refers to zinc pipes used for sewerage.
If anyone can shed any more light on exactly what this means, please leave a comment.
posted Monday, 06 February 2012, 19:15 (+0800), by Martin
Mitchell Kanashkevich
is an award-winning travel and documentary photographer from Sydney.
He has written a number of ebooks on photography-related topics,
and
"Rabari - Encounters with the Nomadic Tribe"
is the first e-book of a series on travel documentary photography that Mitchell will be doing with
LightStalking.
The photos included in Rabari are from a personal project undertaken by Mitchell,
about nomadic Indian cattle herders called the Rabari. He spent 4 months
travelling on the back of a motorbike with an assistant to build his collection of photos
of the Rabari.
This ebook contains a great collection of photos of the Rabari, and Mitchell provides
detailed information on each of the photos, including:
- camera settings
- some background info on the subject(s) shown in the photo
- objectives of the photo
- light
- moment and/or pose
- composition
- biggest challenge
- how he managed it
- post-processing
posted Sunday, 05 February 2012, 22:32 (+0800), by Martin
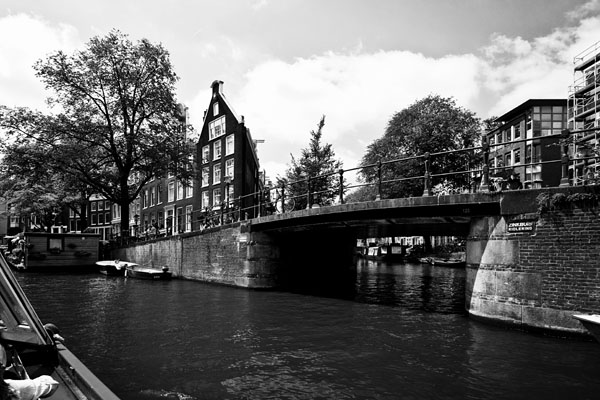
While in Holland last year, we spent a day exploring Amsterdam.
The many canals throughout Amsterdam see quite a bit of traffic,
and there are also a lot of houseboats moored along the sides of
the canal. Many of these houseboats look like they haven't been
moved for years.
boats along the Prinsengracht
Amsterdam, Noord-Holland, The Netherlands
This is a view down the Prinsengracht (Prince's canal),
with the Westerkerk visible in the distance.
This photo was taken from the bridge near where the
Brouwersgracht (brewers canal) crosses the Prinsengracht.
posted Friday, 20 January 2012, 23:07 (+0800), by Martin
This is the ninth article in a
series on "understanding your camera"
that I am writing as I teach camera basics and camera operation to my children.

Definition
Let me start with a definition of "depth of field".
Wikipedia defines "depth of field" as
"the distance between the nearest and farthest objects in a scene that appear acceptably sharp in an image".
If the entire image is sharp (ie, all in focus), it has a large depth of field.
If an image has the foreground sharp, while the background is blurred, it has a small depth of field.
A small depth of field is also referred to as "shallow focus", and a large depth of field is also known as "deep focus".
The term "depth of field" is often abbreviated as "DOF".
Factors Affecting Depth of Field
There are a number of factors that affect the depth of field in a photo.
- Distance between camera and subject
Shorter distance = less DOF; longer distance = more DOF.
The further the camera is away from the subject, the more DOF you will get.
This is one of the reasons macro photography is challenging. With very short distances between the camera
and the subject, the depth of field tends to get very small.
- Focal length
Longer focal length = less DOF; shorter focal length = more DOF.
Longer focal lengths mean less DOF, which is one of the reasons why longer length lenses can be
great for portraiture photography.
- Aperture
Larger aperture = less DOF; smaller aperture = more DOF.
Opening up the aperture reduces the DOF, while stopping down the aperture increases the DOF.
A "fast" lens with a larger maximum aperture
(say, f/2.8 or larger) allows a smaller depth of field to be achieved
than a kit lens with a maximum aperture of f/4.
- Format size (ie, sensor size in a digital camera, film size in a film camera)
Larger sensor = less DOF; smaller sensor = more DOF.
Full-frame DLSR cameras provide smaller depth of field than a crop-sensor DSLR.
Point-and-shoot cameras, with their tiny sensors, typically struggle to provide a small depth of field.
(This is due to the format size affecting the circle of confusion,
but that is a complex topic that I will leave for a future post.)
Here are some photos demonstrating different depth of field by varying only the aperture.
Both photos were taken from exactly the same location. The first photo shows a very short depth-of-field
due to the use of a large aperture, which causes the (distracting) background to be completely blurred.
The second photo shows a much larger depth-of-field due to a much smaller aperture.

very short depth-of-field due to lens being wide open at a large aperture of f/2.8
Canon EOS 50D, 24-70mm f/2.8L @70mm, 1/400 sec, f/2.8, ISO100
larger depth-of-field due to lens being stopped down to a small aperture of f/22
Canon EOS 50D, 24-70mm f/2.8L @70mm, 1/30 sec, f/22, ISO640
Why You Should Think About Depth of Field
Shallow depth of field will draw the viewer's eye to a specific part of the image,
typically desired in portrait photography.
Conversely, deep depth of field ensures all components of the image are in focus,
which is typically desired in landscape photography.
Understanding the factors that affect depth of field allow you to
be aware of the impact of varying any of those factors, and thus
have more control over the depth of field in your photos.
Because depth-of-field is one of the key aspects I like to control in my photography,
most of my photos are taken with the
mode
set to aperture priority.
This allows me to choose the
aperture,
rather than allowing the camera to select the aperture.
posted Friday, 13 January 2012, 22:12 (+0800), by Martin
Cities of Holland
Because the old cities and buildings of Holland
appealed to me while on holidays there mid-last year,
I have enjoyed looking through the black-and-white photos from this project, and thought it worthwhile
mentioning Jan-Willem's Cities of Holland project.
The Project
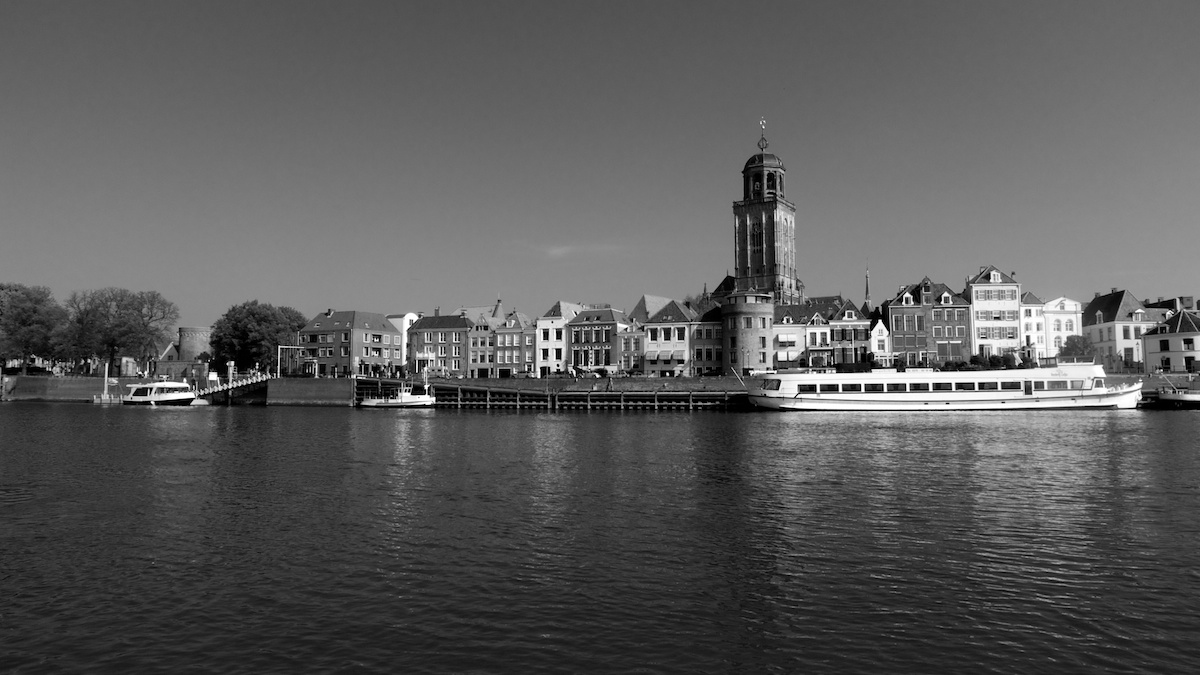
Cities of Holland is a project of the Dutch photographer Jan-Willem Eshuis.
The idea of Cities of Holland is to take a unique photo of all cities in the Netherlands
that have (or had) city rights.
City rights are a phenomenon in the history of the Netherlands,
Belgium and Luxembourg. The rights where given by a liegelord (for example a duke) to a settlement he owned.
The rights gave certain privileges that settlements without those rights didn't have.
Some examples of city rights are the right to build a city wall, have a market or the right to charge toll.
In the Netherlands there is a total of about 194 cities with these city rights.
The goal is to take a photo of each of these cities with a characteristic building or on a characteristic spot of that city.

one of the photos from the Cities of Holland project: Skyline of Deventer
Why?
The idea of this project is based on the Streets of the World project.
In this project the Dutch photographer Jeroen Swolfs is traveling around the world to make a
photo of every capital in the world. His project is taking five years and inspired me to realize a similar project.
About Jan-Willem Eshuis
Jan-Willem Eshuis is a Dutch amateur photographer who's working as a CTO at a Dutch media company named NLbuzz.
In his free time he loves to take photo's of all kind of objects. He used to take pictures with his
Nikon SLR D50 and D60 camera but in december 2010 he bought his Leica D-Lux 5.
For more information on the Cities of Holland project, check out the
Cities of Holland website,
facebook page,
flickr stream,
or twitter page.
The Little People Project

If you have never seen The Little People Project,
it is definitely worth checking out.
slinkachu is a UK-based artist who does street art installations, and photographs them.
However, these art installations are tiny!
The recently-posted
Dead Leaves series
is a great example of the type of work in The Little People Project.
The Fantastic Voyage is another of my favourites.
More photos from this series are available on
The Little People Project website
and on slinkachu's flickr stream.
New Year's Resolutions for Photographers
Lisa Bettany
has posted
6 New Year's Resolutions Every Photographer Should Make in 2012.
Every photographer should read her list and add those resolutions to your list!
Year-Long Exposure of Toronto Skyline
Year-long exposure of Toronto skyline,
taken with a pinhole camera, has produced an interesting photo.
Michael Chrisman installed the camera at the beginning of 2011, and pulled it down
on 31 December 2011.
I particularly like the interesting trails left by the sun as it moves across the sky throughout the year.
One Year in One Image
In another year-long photography project, Eirik Solheim has taken a photo out of his window every half hour.
He then used a selection of 3888 of those photos, and using a 1-pixel-wide strip of each,
created a different kind of time-lapse photo.
Have a look at his One Year in One Image
blog post for the resulting photo.
If you are interested in the technical background on the process used to capture these photos, have a look at
this blog post.
posted Tuesday, 10 January 2012, 22:17 (+0800), by Martin
Here are some photos from another KAP session in Albany - this time at Emu Point beach.
We were at the beach in the early afternoon, and the seabreeze was blowing well, so I thought I would
try flying my kite to capture some more aerial photos with the
GoPro Hero2 camera.
Once the kite was airborne, and the camera rig was attached, I proceeded to let out more line, and
captured some photos using the camera's built-in intervalometer.
looking north-west at the boat pens
Emu Point, Albany, Western Australia
GoPro HD Hero2 (suspended from a kite)
However, as the kite went higher, the wind got stronger, causing the kite to dart around the sky,
with the camera rig swinging wildly through the sky.
posted Sunday, 08 January 2012, 13:58 (+0800), by Martin
We spent a week on holidays in Albany (south-west of Western Australia) in late December.
While in Albany, I lifted my recently-purchased
GoPro Hero2
camera aloft with my kite.
My first KAP session with the GoPro Hero2 was at
Middleton Beach,
and while the wind conditions were great, the lighting wasn't ideal, as it was getting a little too dark.
The GoPro Hero2 seems to handle the low light conditions quite well, and I was quite happy with the results.
Here's a shot of the sunset over Mount Clarence, with Middleton Beach in the foreground.
sunset over Mount Clarence to the south
Middleton Beach, Albany, Western Australia
GoPro HD Hero2 (suspended from a kite)
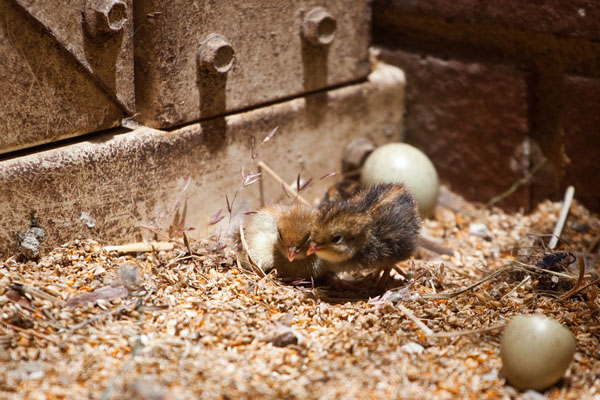
posted Tuesday, 03 January 2012, 22:04 (+0800), by Martin
Three baby quails hatched in our aviary a few days ago.
While we have had plenty of baby finches over the years, the baby finches will only
venture out of the nest when they are adult-sized.
In contrast, baby quails hatch on the ground, and are immediately mobile, scampering around
on the ground, and hiding underneath their mother's wings.
They are a lot of fun to watch, and I took the opportunity to take some photos of them this afternoon.

three baby quails
Canon EOS 50D, 70-200mm f/4L @200mm, 1/800 sec, f/4, ISO500

snuggling up to mother
Canon EOS 50D, 70-200mm f/4L @200mm, 1/1000 sec, f/4, ISO500
staying close together
Canon EOS 50D, 70-200mm f/4L @200mm, 1/1000 sec, f/4, ISO500
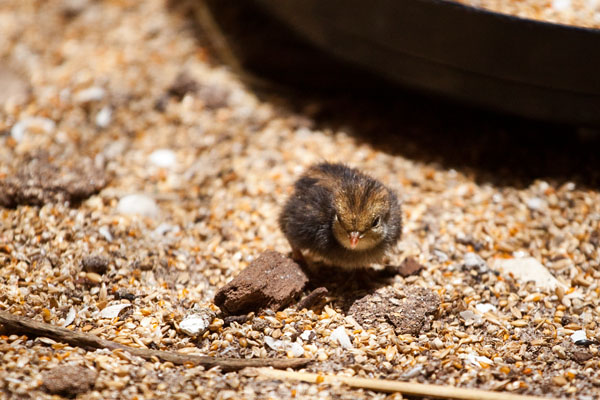
checking out the surrounds
Canon EOS 50D, 70-200mm f/4L @200mm, 1/1250 sec, f/4, ISO500

exploring
Canon EOS 50D, 70-200mm f/4L @200mm, 1/500 sec, f/4, ISO500
|
|