posted Monday, 28 December 2009, 18:38 (+0800), by Martin
Phottix Aster box
Intro
The Phottix Aster is a new product from the
Asian Phottix,
and it has some interesting features not found in the Phottix Tetra
(I reviewed the
Phottix Tetra several months ago).
The Phottix Aster is designed for triggering one or more off-camera flash units,
either wirelessly from the transmitter, or optically from any other flash.
Thanks to
HK Supplies for providing a
Phottix Aster for review purposes.
Wireless Flash Remotes?
A wireless flash trigger is designed to trigger one or more flash units that are located away from the camera,
without requiring a wired connection between the camera and the flash units.
Off-camera flash allows a photographer to get much more creative with lighting, and the
Strobist website has served to
educate many more photographers in the use of off-camera flash lighting.
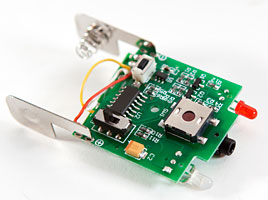
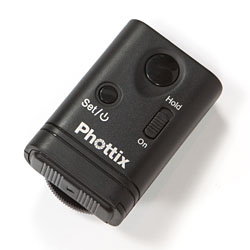
Features and Specifications
Aster receiver (left) and transmitter (right)
Features:
wireless mode - remotely trigger receiver with transmitter on camera hot-shoe
light mode - optically trigger receiver from another flash
posted Sunday, 20 December 2009, 19:45 (+0800), by Martin
Here's a list of free resources to help you learn how to better pose people for portrait photography.
The Zeltsman Approach to Traditional Classic Portraiture
Sixteen chapters containing lots of detailed information on evaluating the face, posing men and women, groups, children,
and much more. Each chapter contains many photographs demonstrating the posing techniques being described.
This is a great resource, but it'll take you a while to read through the entire guide!
The Portrait Photographer
This blog contains many valuable posts on many different aspects of posing for portraits, and is worth browsing through.
Portrait Photography Tips
A list of 22 posts from Digital Photography School on portrait photography, including a number of articles on posing.
Portrait Photography's Power Posing Part I: The Components
This post looks at the various components that need to be considered when posing people, including the hands, feet, arms, head and chin, etc,
with some comments on how techniques that can be used for each component to achieve different results.
Posing the Question
A brief look at the impact of body language on portraits, and how it should be used to ensure the pose portrays
the correct context.
Posing Samples
An 18 page PDF containing hundreds of sample poses for an individual female, individual male, and a couple.
And finally, just a quick plug for Digital Photography School's
The Essential Guide to Portrait Photography eBook.
While it's not a free resource like the others listed above, this USD$19.95 eBook is a collection of
great tutorials and articles looking at many different aspects of
portrait photography, and includes many articles on posing.
Are there any other free resources on posing people for photography that I've missed?
posted Thursday, 17 December 2009, 21:48 (+0800), by Martin
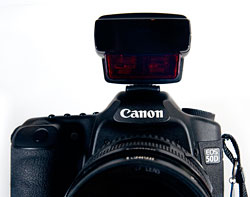
ST-E2 on a Canon 50D
I recently bought a
Canon ST-E2
wireless flash transmitter, and have been enjoying the convenience of E-TTL for off-camera flash photography.
ST-E2 Overview
The Canon ST-E2 is Canon's dedicated wireless flash transmitter, designed to be mounted on
a camera's hot-shoe, and can trigger one or more Canon flashes wirelessly in E-TTL mode.
That's right - the ST-E2 provides remote E-TTL functionality. The ST-E2 communicates with the camera
via the hot-shoe, and the ST-E2 communicates with the flashes via infrared to determine
the flash power required.
Team Digital
are offering 7 days free hire
on all photographic equipment hired over the Christmas break.
That's 10 days for the price of three!
Phottix are offering a
5% discount
off all items purchased before 24 December 2009.
I have reviewed a number of Phottix accessories in the last few months,
and can recommend them as being very good value for money.
posted Sunday, 13 December 2009, 12:40 (+0800), by Martin
Taken in my shed last week while replacing bulging capacitors in an LCD monitor.
I thought the smoke from the soldering looked interesting enough to warrant some photos.
I put the camera on the bench, with a bit of scrap wood under the lens to lift it up slightly.
A 580EX II was on a light stand at camera left, firing into a reflective umbrella, and a 430EX
was at camera right, bouncing off the shed wall. Both flashes were triggered with a Canon ST-E2.
soldering smoke
back yard at home, Western Australia Canon EOS 50D, 24-70mm f/2.8L @45mm, 1/100 sec, f/5, ISO250
There's another photo taken from a slightly different angle here.
posted Wednesday, 09 December 2009, 22:52 (+0800), by Martin
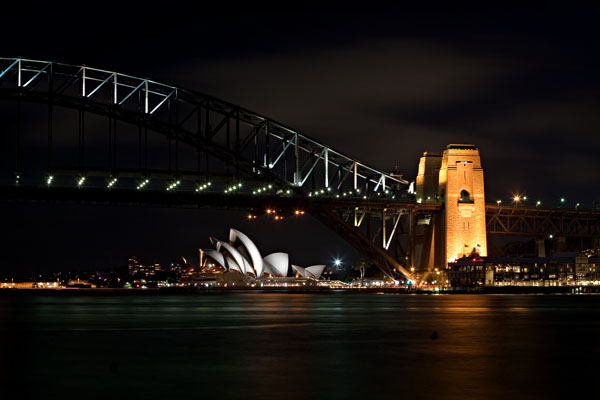
Here's a view of the Sydney Harbour Bridge and the Opera House, as seen from Blues Point.
The bridge and the Opera House are not lit up as much as they were in previous years,
but a long exposure provides some nice results.
On the evening when this photo was taken (31 October, a Saturday evening),
the biggest issue was trying to achieve a long exposure without
one of the many boats on the water intruding into the frame!
Sydney Harbour Bridge from Blues Point
Blues Point, Sydney, New South Wales, Australia Canon EOS 50D, 24-70mm f/2.8L @45mm, 20 sec, f/8, ISO100
posted Monday, 07 December 2009, 19:32 (+0800), by Martin
While on a recent shoot, my backup camera, a Canon 350D, completely locked up and stopped working.
I briefly removed the main battery to attempt to reset it, but the 350D still failed to turn on
after a freshly charged battery was inserted.
The lens and memory card were then removed, and the main battery was pulled out for a few minutes,
but after re-installing the battery, it still failed to turn on.
I had been using the camera out in the sun on a hot 37 degree day, and thought that potentially the heat
had affected it. After cooling the camera down for a while in the air-conditioned coolness of my car,
it still refused to turn on.
I gave up on the 350D for the time being, and had to resort to using a single camera body for the rest of the day.
I like to have a wide lens on one body, and a long lens on the other body, allowing a wider variety of focal lengths
without having to swap lenses.
Being reduced to a single camera body was an inconvenience, but it wasn't a show stopper,
and this experience emphasises the need for a backup camera body when doing an important shoot!
removing the internal date and time battery from a Canon 350D DSLR body
That evening, I removed the main battery, as well as the internal date/time battery
(a small 3V CR2016 battery used to maintain the camera's date and time),
and left the camera overnight.
The next morning, after re-installing both batteries, the camera still failed to turn on.
While googling for information on the problem, I found
this thread
on dpreview.com that described the same symptoms.
In that thread, someone suggested the following sequence as a potential cure for a lockup:
Turn off the camera
Remove both camera batteries
Close battery cover
Turn on/off switch to "On"
Let camera sit for at least 15 seconds
Turn on/off switch to "Off"
Re-install both batteries and turn camera on
Following this sequence caused the 350D to come to life again, thus saving me from
having to take the camera in for repairs.
Setting the on/off switch to "On" with both batteries removed appears to be the key step that I had
previously missed. I'm guessing it's required to ensure any residual power in the camera's circuitry
is completely discharged, thus allowing the camera to completely reboot.
(Closing the battery cover is also important, as the camera's on/off switch is disabled
if the battery cover is open.)
Note that removing the date and time battery will predictably reset the camera's date and time.
However, it won't cause the camera to lose any other configuration data, such as custom function
settings.
Have you ever had a camera fail at a bad time during a photo shoot?
How did it fail?
Did you have a second camera body with you at the time?
Did the failure impact the photo shoot?
posted Monday, 30 November 2009, 22:35 (+0800), by Martin
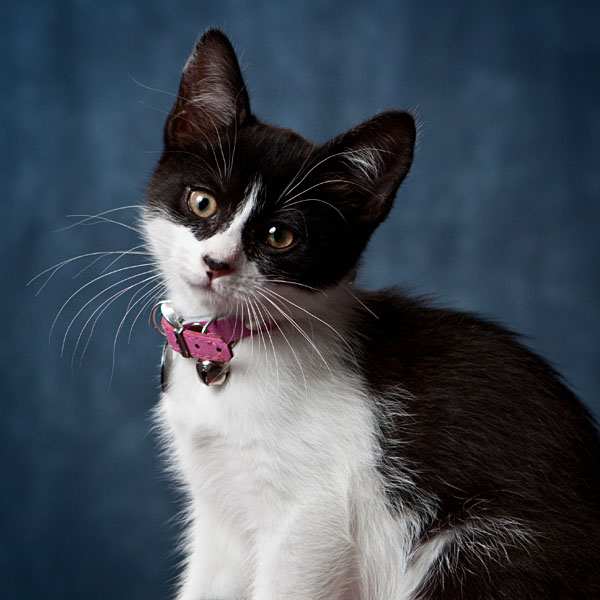
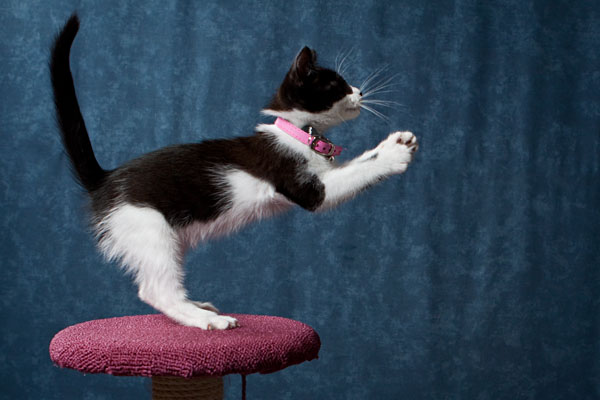
We recently added a new pet to the family - a young female kitten named "Bella".
As is typical with kittens, she has lots of energy!
On the weekend, I tried to get a photo of her in mid-air leaping from the ground
onto the top of her scratching post. However, she didn't want to co-operate...but
I still managed to get some interesting photos of her.
Here's a selection of 8 photos from the weekend session.
posted Thursday, 26 November 2009, 20:20 (+0800), by Martin
At the end of a recent
business trip in Adelaide,
some colleagues and myself finished our customer meetings at about 4pm on a Friday afternoon,
and headed to the airport, with most of us booked on a Virgin Blue flight scheduled for 7:15pm.
When checking in, we were told our flight was delayed by about an hour,
and we were told to listen for announcements about boarding times for our flight.
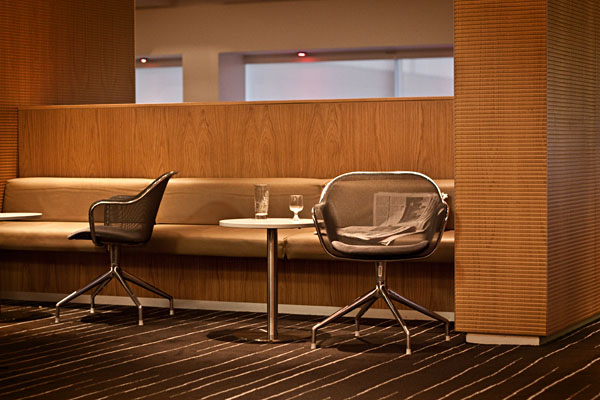
One of my colleagues was booked on a Qantas flight that evening, and managed to get us all
into the Qantas Club lounge.
It just felt wrong walking into the Qantas Club lounge with a Virgin Blue boarding pass in my pocket,
but I wasn't about to complain - I would much rather spend a few hours in the lounge
enjoying the free food and drinks, than out in the airport.
discarded
Adelaide Airport, Adelaide, South Australia Canon EOS 50D, 50mm f/1.8 @50mm, 1/30 sec, f/2.8, ISO640
posted Saturday, 21 November 2009, 22:34 (+0800), by Martin
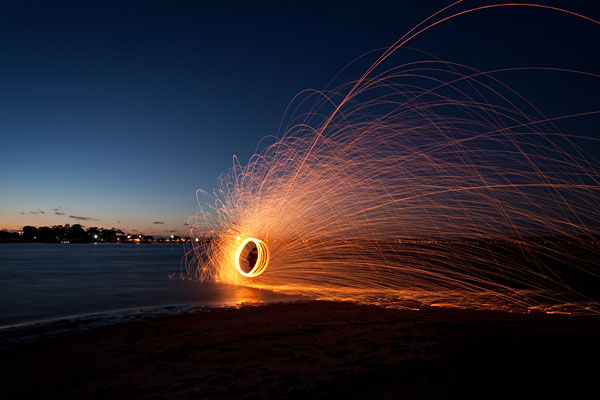
On Saturday night, I went along to a
PIPget-together in Como.
Steve
had made a few steel wool spinners,
designed to hold some burning steel wool while someone swings it around their head.
Once it got dark, the fun began! Here are a few photos:
Como, Western Australia Canon EOS 50D, 10-22mm @10mm, 5 sec, f/5, ISO100
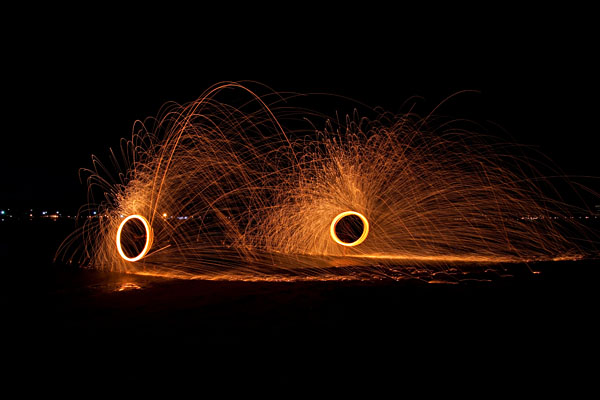
Como, Western Australia Canon EOS 50D, 10-22mm @10mm, 3.2 sec, f/5, ISO100
The previous two photos were taken using a tripod.
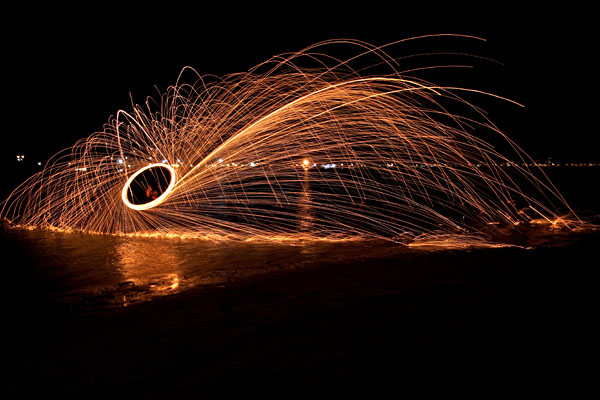
The next photo was hand-held, as my daughter was using my tripod at the time.
Como, Western Australia Canon EOS 50D, 10-22mm @16mm, 2 sec, f/4.5, ISO500
For more photos from the evening shoot, see my gallery.
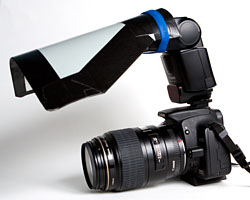
posted Thursday, 19 November 2009, 21:38 (+0800), by Martin
homemade flash reflector
Macro Photography
When taking macro photos, you need plenty of light on the subject, to allow
a reasonably large DOF (depth of field), yet keeping a reasonably fast shutter speed, and a low ISO.
As a result, ambient light is typically insufficient, requiring the use of
a flash.
However, using a bare flash will result in harsh lighting with harsh shadows, so it's
important to diffuse and reflect the light to create a more pleasing photo.
This post provides details of the very cheap homemade reflector that I use for macro photography.
Note that I can't claim credit for the idea, but I first saw it
here on flickr.
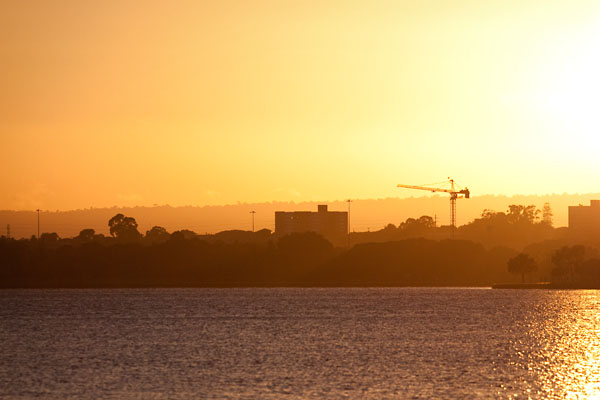
posted Sunday, 15 November 2009, 14:35 (+0800), by Martin
The Sydney Opera House and Sydney Harbour Bridge provide a stark silhouette against a
bright orange sunset sky in this photo taken a couple of weeks ago in Sydney.
sunset behind the Sydney Opera House and Sydney Harbour Bridge
Bradley's Head, Sydney, New South Wales, Australia Canon EOS 50D, 24-70mm f/2.8L @35mm, 1 sec, f/6.3, ISO100
I was in Sydney for a few weeks for work, and took the opportunity to take some photos on the weekends.
On my first Saturday in Sydney, I got together with Mitch, a fellow amateur photographer from
OCAU, and we visited a number of different locations around
Sydney, including Bradley's Head, where the above photo was taken.
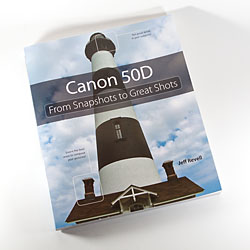
posted Tuesday, 03 November 2009, 17:48 (+0800), by Martin
Canon 50D From Snapshots to Great Shots
Intro
Jeff Revell (from PhotoWalkPro) has been
a professional photographer for 25 years.
His book "Canon 50D: From Snapshots to Great Shots", published earlier this year,
is written specifically to teach Canon 50D owners how to take great
photographs, and to learn how to use the camera's features in different situations.
Target Audience
This book is clearly targeted at people who own a Canon 50D. It focuses specifically on the
features, functionality and controls of the 50D, and as a result, would not be of much use
to anyone who doesn't own a 50D.
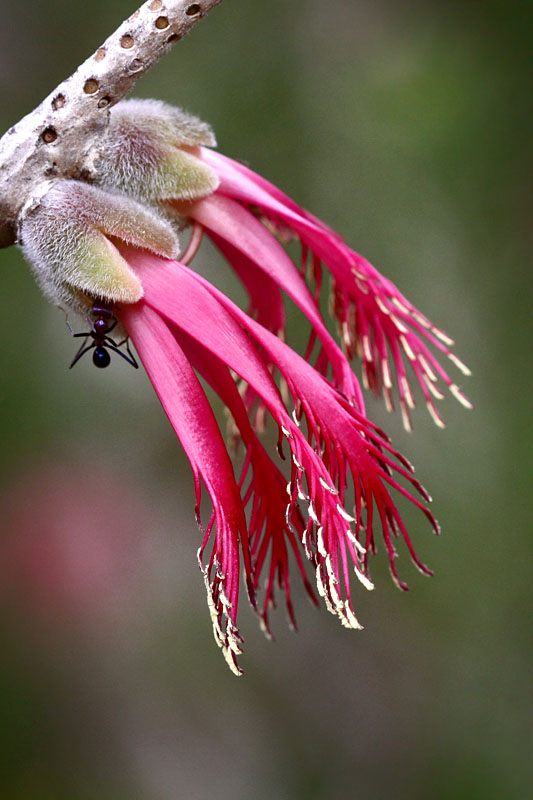
posted Monday, 02 November 2009, 19:27 (+0800), by Martin
One of the first photos I took with the Canon 50D when I first bought it last year,
I love the soft red texture of this flower.
This was taken in the Midgegooroo National Park, in Roleystone.
ant exploring Calothamnus rupestris flower
Midgegooroo National Park, Roleystone, Western Australia Canon EOS 50D, 100mm f/2.8 macro @100mm, 1/250 sec, f/5, ISO400
posted Sunday, 25 October 2009, 14:30 (+0800), by Martin
A few weeks ago, I went for a drive through Langford Park, in Jarrahdale.
In between rain showers, I ventured out of the car for a few forays into the bush.
I found the colour and texture of the pine tree bark fascinating, so here's a few photos
focussing on the pine bark.
Firstly, here's a photo showing the wide range of colours in the bark.
pine bark detail
Langford Park, Jarrahdale, Western Australia Canon EOS 50D, 17-85mm IS @41mm, 1/15 sec, f/5.6, ISO320
posted Tuesday, 13 October 2009, 22:00 (+0800), by Martin
This whale tow boat is one of the sights to see at Albany's Whale World.
The water in front of the flensing deck at the Cheynes Beach Whaling Station was too shallow for the whale chasers,
so they would tie whale carcasses to a buoy a few hundred metres offshore.
Tow boats such as the one shown below were then used to tow whale carcasses the last few hundred metres to shore.
an old whale tow boat
Whale World, Albany, Western Australia Canon EOS 50D, 24-70mm f/2.8L @34mm, 1/1000 sec, f/6.3, ISO125
posted Monday, 12 October 2009, 20:53 (+0800), by Martin
This is the final resting place of one of the whalechasers used at the Cheynes Beach Whaling Station
in Albany in the 1970s.
It's now one of the attractions at Whale World,
where you can explore the various nooks and crannies of the boat.
Cheynes IV whalechaser
Whale World, Albany, Western Australia Canon EOS 50D, 10-22mm @10mm, 1/200 sec, f/6.3, ISO200
The Cheynes IV was originally built in 1948 in Norway, and used for whaling in South Africa for a number of years.
In 1970, the Cheynes Beach Whaling Company bought it, renamed it the Cheynes IV, and used it
for whaling off Albany until the closure of the station in 1978.
It was towed to its current location at Whale World in 1981.
posted Friday, 09 October 2009, 14:17 (+0800), by Martin
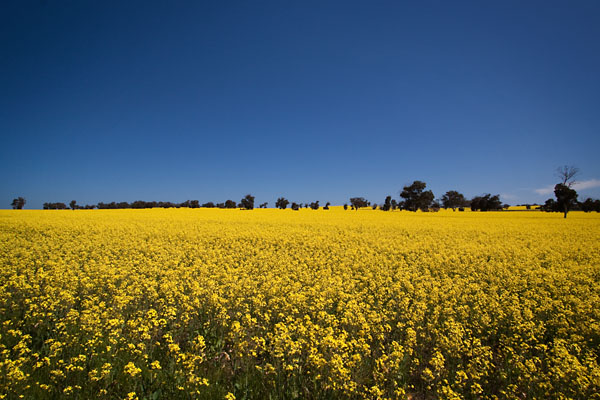
While driving down to Albany recently, the many fields of blooming Canola look like a
yellow carpet stretching over the hills.
It's a great sight - particularly if there's a clear blue sky, and the sun is shining on the
Canola.
Canola fields blooming
Cranbrook, Western Australia Canon EOS 50D, 10-22mm @10mm, 1/60 sec, f/13, ISO100
posted Tuesday, 29 September 2009, 14:53 (+0800), by Martin
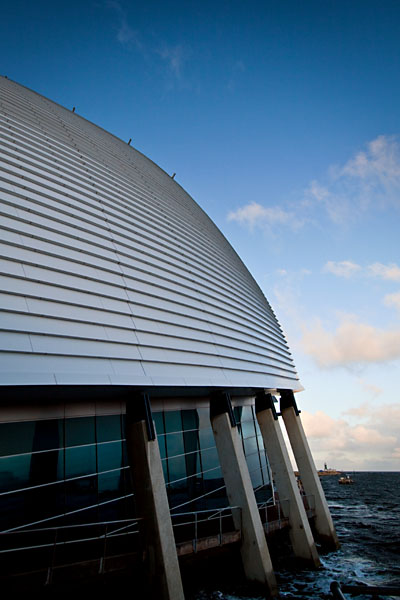
The Maritime Museum
in Fremantle is an interesting building, apparently shaped
like an upturned hull which is half on land, and half on water.
The museum is located at the site of the first landfall in Western Australia, which occurred in 1829.
Maritime Museum
Victoria Quay, Fremantle, Western Australia Canon EOS 50D, 10-22mm @14mm, 1/80 sec, f/5.6, ISO100
This photo was taken during an
early morning shoot in Fremantle with some friends and colleagues.
After a disappointing sunrise (too much cloud), we wandered along Victoria Quay for some additional
photos, including the one shown above.
posted Thursday, 24 September 2009, 22:01 (+0800), by Martin
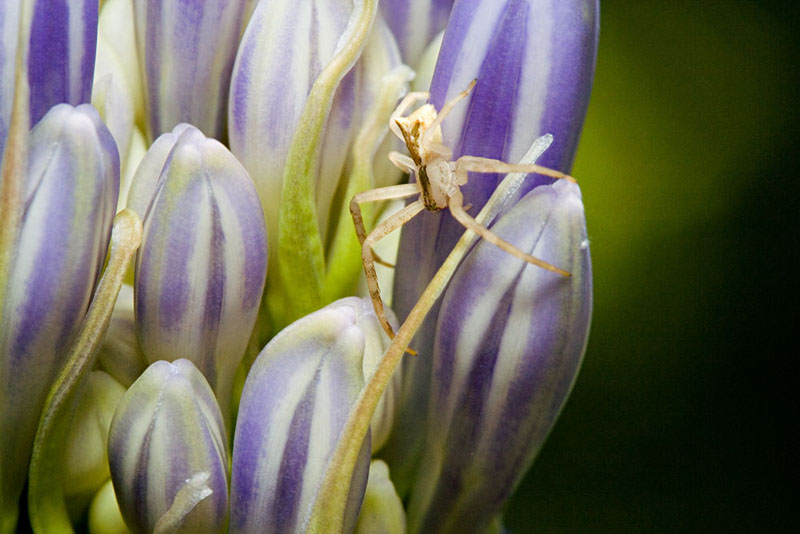
My 10 year old son Ashley received a letter in the mail today,
indicating he had won first prize in the "Plant and Animal Habitats" category for Years 4 to 7 of
Chevron Australia's
Focus Environment photography competition.
As can be expected, he was pretty excited about the win, and is looking forward to the presentation ceremony in October.
Here's his winning photo, taken in our back yard with one of my favourite lenses, the Canon 100mm f/2.8 macro lens:
explorative spider
photo by Ashley, aged 10
back yard, Western Australia Canon EOS 350D, 100mm f/2.8 macro @100mm, 1/125 sec, f/11, ISO200
Update (19 October 2009): We attended a presentation evening on 15 October, where Ashley received
a certificate, and a cheque for $200, as well as $1500 for his school.
All the winning photos from the 2009 competition have now been published on Chevron's
website,
and the winning entries for each of the categories can be seen on these pages:
People and the Environment Nature's Moods Plant and Animal Habitats
posted Sunday, 20 September 2009, 14:32 (+0800), by Martin
Last week, I recently spent a couple of days in Adelaide on a brief business trip.
After reading about Bert Stephani's 50/50 project,
where he shoots anything and everything for the next 50 days with just a 50mm lens,
I decided to travel light, and just took a
Canon 50D body
and a
Canon 50mm f/1.8 lens
(I reviewed the 50mm f/1.8 lens here).
Here's a 20 second exposure out the window of my 9th floor hotel room in the middle of the city,
taken well after sunset:
view from my hotel window at night
Adelaide, South Australia Canon EOS 50D, 50mm f/1.8 @50mm, 20 sec, f/8, ISO100
Because I was travelling light, I didn't have a tripod or remote shutter release with me,
so I had to make do with what I could find in my hotel room.
I balanced the camera on top of a can of Coke from the mini-bar, and used the camera strap underneath the
near side of the can to tilt it slightly forward, as shown in the photo below (taken with the camera on my phone).
posted Saturday, 12 September 2009, 12:10 (+0800), by Martin
Canon 430EX mounted on a clamp, triggered remotely by a Canon 580EX
Last month, I described how you can make a
cheap flash clamp
for holding a remote flash, using cheap clamps and a 1/4" bolt, available from your local hardware
for a few dollars (as per the photo on the right).
However, with the full weight of a flash attached to the end of the clamp handle,
particularly if the flash is mounted on top of a wireless trigger,
the clamp and flash isn't particularly stable.
To improve the stability of the flash clamp, another 1/4" bolt can be added to the
clamp, much closer to the jaws of the clamp.
Mounting a flash on this bolt closer to the clamp jaws provides a more stable solution,
as the majority of the weight is now attached to the clamp much closer to the jaws.
If using wireless triggers to trigger the flash, the flash can be attached to the trigger's
hot-shoe, and the trigger then attached to this new bolt on the clamp.
Alternatively, the wireless trigger could be attached to the bolt on the end of the clamp handle,
and a PC sync cable can then be used to connect the trigger to the flash, as shown in the photo below.
improved version of the cheap flash clamp for holding a remote flash,
with a Canon 580EX II being triggered by a Phottix Tetra wireless flash trigger
posted Wednesday, 09 September 2009, 22:42 (+0800), by Martin
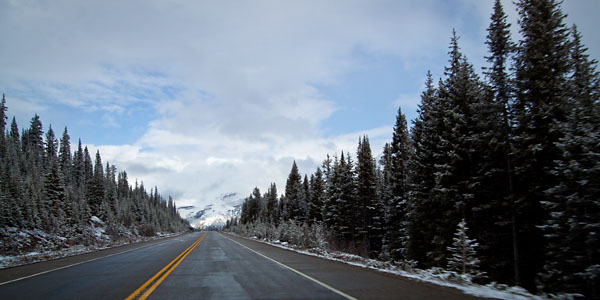
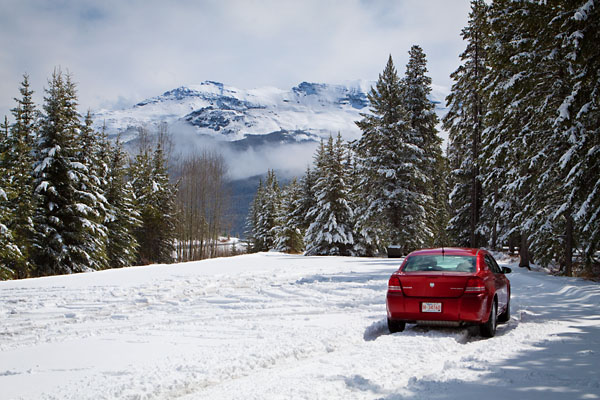
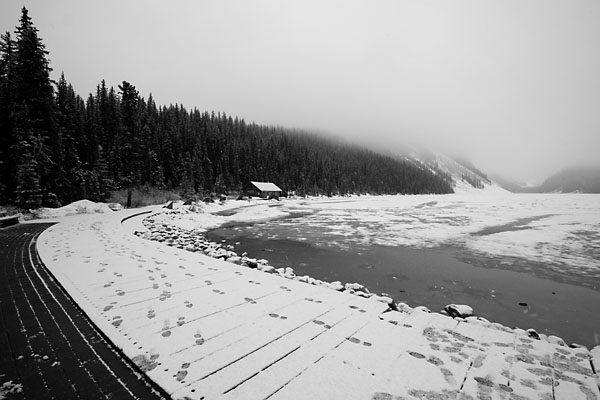
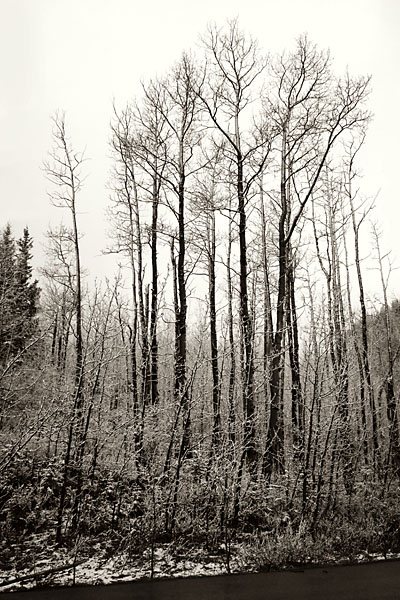
Snow-covered trees line the road in this photo, taken in Jasper National Park
in Alberta, Canada, earlier this year.
You need to view the larger version of the image to better appreciate it (click the
image to navigate to a larger version).
winter road
Jasper National Park, Alberta, Canada Canon EOS 50D, 10-22mm @17mm, 1/200 sec, f/7.1, ISO200
posted Sunday, 06 September 2009, 13:55 (+0800), by Martin
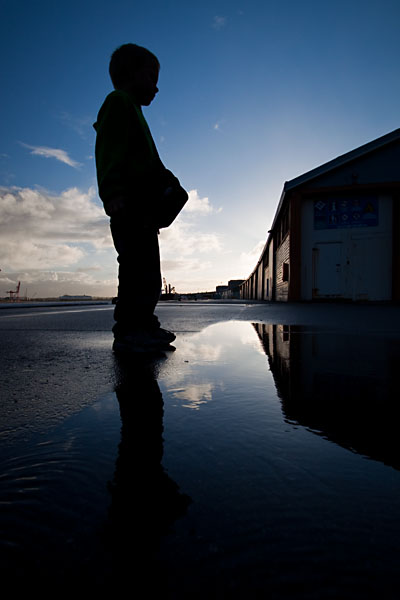
Here is another one from an early morning shoot
in Fremantle last month.
This photo was taken from almost the same angle as
this photo,
but incorporating the silhouette of my younger son, Nicholas, as well as his reflection
in the puddle.
silhouette of Nicholas
Victoria Quay, Fremantle, Western Australia Canon EOS 50D, 10-22mm @10mm, 1/250 sec, f/5.6, ISO100
posted Tuesday, 01 September 2009, 13:05 (+0800), by Martin
After a few months of rumours about the
Canon 7D,
specifications have been confirmed, and details are now
available
on on Canon's website.
dpreview.com have already published a review
of the Canon 7D.
Note that it's not a replacement for the 5D, but the 7D fits into the Canon lineup
between the Canon 50D and the 5D.
The 7D is not a full-frame body like the 5D, but has an 18 megapixel APS-C sensor (1.6x crop factor),
larger viewfinder, a new AF system with dedicated processor, can shoot at 8 fps,
and supports 1080p HD video recording.
Interestingly, it also has an integrated Speedlite transmitter, allowing the 7D's built-in flash
to control multiple groups of multiple flashes.
Here's a brief summary of the specifications of the 7D:
18 megapixel CMOS sensor (APS-C size)
dual DIGIC 4 image processors
ISO 100-6400 (expandable to 12,800)
8 fps continuous shooting
full HD (1920x1080) movie mode with manual exposure control
large viewfinder with 100% field of view
new 19 point auto-focus system
magnesium body
built-in Speedlite transmitter
3 inch rear LCD
It looks like the retail price for the Canon 7D body is going to be around USD$1699 (AUD$2020),
and amazon.com have it available for
pre-order.
Have a look at dpreview.com's review for more information on the Canon 7D,
or the Canon Australia website for full specifications.
Update (September 2009): QualityCamera Sales Australia
anticipate that the Canon 7D body price will be around AUD$2399, and they are taking pre-orders.
posted Monday, 31 August 2009, 19:18 (+0800), by Martin
Phottix Tetra box
Intro
The Phottix Tetra wireless flash triggers are yet another low-cost photography accessory
from the Asian Phottix,
and are designed for triggering one or more off-camera flash units.
The Tetra can also be used to trigger studio lights with the
included PC sync cable.
Thanks to
HK Supplies for providing a
Phottix Tetra with two receivers for review purposes.
Wireless Flash Remotes?
A wireless flash trigger is designed to trigger one or more flash units that are
located away from the camera, without requiring a wired connection between the
camera and the flash units.
Off-camera flash allows a photographer to get much more creative with lighting,
and the Strobist website has served to
educate many more photographers in the use of off-camera flash lighting.
posted Monday, 24 August 2009, 21:45 (+0800), by Martin
Note: if you are looking for a review of the
functionality and features
of the Phottix Cleon II,
then please refer to
my review.
Phottix Cleon II receiver PCB
Phottix Cleon II
Earlier this year, I
reviewed
the Phottix Cleon II.
It's a wireless shutter release that operates on 433MHz, with a range of upto 100m,
and uses a smart-code system with 16,000,000 combinations instead of DIP switches to set
the channel.
Instead of the camera cable being hard-wired into the receiver, Phottix
use a 3.5mm stereo socket on the receiver, and Phottix make cables to suit
various cameras. This allows a Phottix Cleon II to be used with different types of
cameras, providing you have cables available to suit the different cameras.
I was interested in taking a closer look at the circuitry inside the Cleon II,
and after noticing something rattling inside the receiver, I decided to open
up the Cleon II.
Here are the Cleon II transmitter and receiver before disassembly:
posted Sunday, 23 August 2009, 20:12 (+0800), by Martin
Reflections in puddles can add an interesting element to a photo.
For this photo, I had the camera very low, and used the puddle to capture the reflection
of the sky, cloud and building.
reflected symmetry
Victoria Quay, Fremantle, Western Australia Canon EOS 50D, 10-22mm @22mm, 1/250 sec, f/5.6, ISO100
LiveView can be useful in situations like this, as it allowed me to compose the shot
with the camera almost at ground level,
without having to lie down on the wet ground in order to be able to look through the viewfinder.
posted Thursday, 20 August 2009, 19:02 (+0800), by Martin
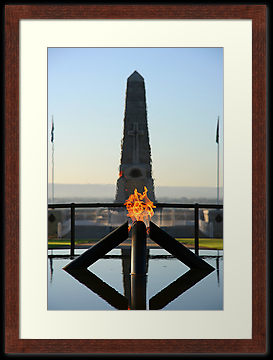
RedBubble.com are taking
15% off framed and canvas prints for 7 days.
The sale ends on 27 August, so if you've been considering
a canvas print or a framed print, now is the time to order one (or more)!
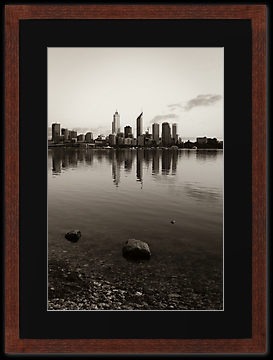
Eternal Flame and State War Memorial, King Park
Perth City Skyline in Duotone
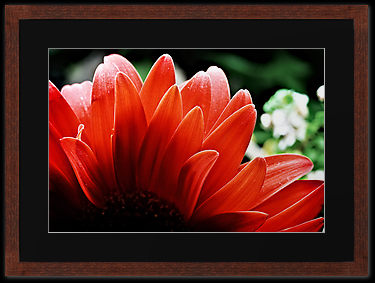
I've previously written a
detailed review of a canvas print,
and I can definitely recommend the RedBubble.com prints, as they
are very good quality.
Note that RedBubble introduced a larger sized canvas print earlier this year.
The largest size used to be 610mm on the longest side, but they
now have an extra large size at 762mm long.
Have a look through the many
canvas prints and
framed prints available
on RedBubble, and see if there's anything you would like to hang on your wall.
Many of my photos are also available as canvas prints and framed prints from RedBubble, and can be
viewed in my
RedBubble site.
posted Monday, 17 August 2009, 20:40 (+0800), by Martin
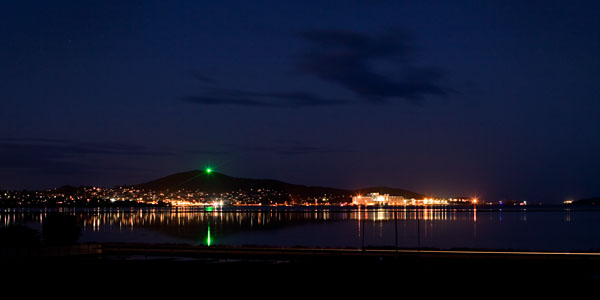
This 30-second exposure captures the lights of Albany Port, and their reflection
on the waters of Frenchman's Bay.
In the foreground, the light streak shows the headlights of a car that crossed
the frame during the exposure.
the lights of Albany Port, viewed across Frenchman's Bay
Albany, Western Australia Canon EOS 50D, 24-70mm f/2.8L @34mm, 30 sec, f/7.1, ISO100
posted Wednesday, 12 August 2009, 19:53 (+0800), by Martin
Note: This post describes the first version of my cheap flash clamp.
I have since posted details of an
improved version of the clamp.
Canon 430EX mounted on a clamp, triggered remotely by a Canon 580EX
A large clamp provides a very flexible method for mounting a flash,
and certainly won't break the bank!
Using a large plastic clamp from my local hardware store, along with a 1/4" bolt, a nut, and a wing nut,
I made this flash clamp in just a few minutes, and it only cost me a few dollars.
The built-in flash on most cameras is quite limiting, and a dedicated flash can provide
a lot more flexibility and control of the lighting.
However, moving the dedicated flash off the camera hot-shoe, and having it
remote from the camera provides a whole new range of lighting options.
The popularity of David Hobby's Strobist blog,
where he provides lots of useful information about flash photography, particularly
off-camera flash photography, confirms that lots of people are getting interested in it.
Assuming you already have a flash unit, you need some way to trigger the flash
remotely from your camera.
I have a set of the cheap
Cactus wireless flash triggers
(from Gadget Infinity),
as well as a set of Phottix Tetra wireless flash triggers.
Instead of using wireless flash triggers, I can also use the built-in infrared communications capabilities in Canon flashes,
and mount a Canon 580EX flash on my camera, and use it to remotely trigger a Canon 430EX or 580EX flash.
As you won't always have the luxury of a voice-activated light stand (ie, a person to hold the flash),
you'll often need some way of mounting the remote flash, and you may not (yet) have
purpose-built light stands in your camera bag.
I came across these plastic clamps at my local hardware, and they were less than AUD$2 each.
The handles of the clamp already had a small hole, which I drilled out to fit the 1/4" bolt.
After inserting the bolt from the inside of the handle, the nut was firmly tightened to hold the
bolt in place.
posted Thursday, 06 August 2009, 19:44 (+0800), by Martin
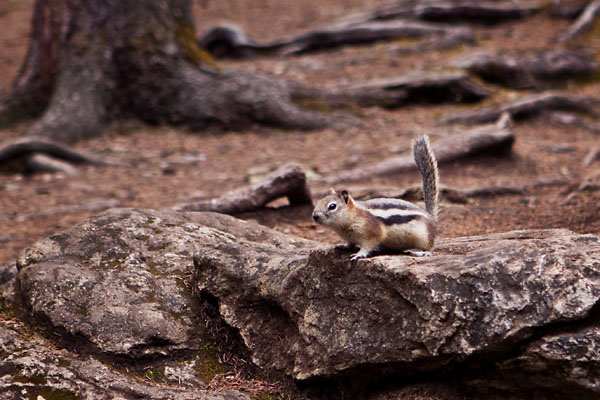
I saw this little guy while walking along Johnston Canyon, in Banff National Park (Alberta, Canada).
chipmunk begging for food
Johnston Canyon, Banff National Park, Alberta, Canada Canon EOS 50D, 24-70mm f/2.8L @70mm, 1/400 sec, f/3.2, ISO320
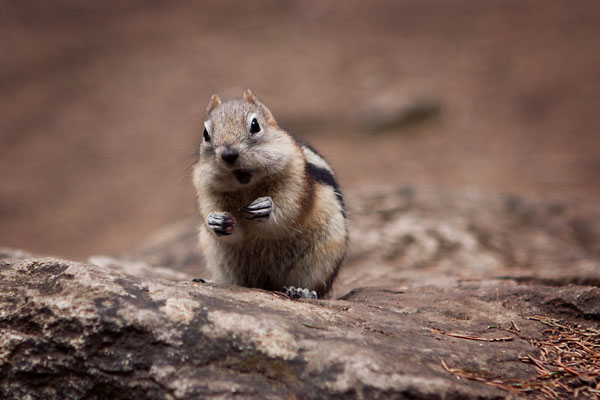
He wasn't very shy of the tourists, and one tourist, ignoring the signs,
managed to entice this chipmunk close enough for it to take a small piece of biscuit
out of her hand.
enjoying a morsel begged from a tourist
Johnston Canyon, Banff National Park, Alberta, Canada Canon EOS 50D, 24-70mm f/2.8L @70mm, 1/640 sec, f/3.2, ISO320
posted Sunday, 02 August 2009, 21:52 (+0800), by Martin
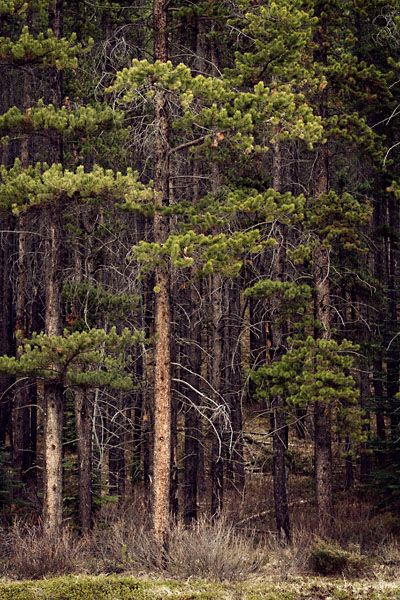
Douglas-fir trees by the side of the road, somewhere between Banff and Lake Louise, in
Alberta, Canada.
One of the great things about a roadtrip without specific deadlines is that you can
stop on the side of the road whenever you want to take some photos, and I did that plenty of times
during the few days I had to myself around Banff and Lake Louise.
Rocky Mountain Douglas-fir trees
Banff National Park, Alberta, Canada Canon EOS 50D, 24-70mm f/2.8L @43mm, 1/60 sec, f/4, ISO100
posted Monday, 27 July 2009, 23:10 (+0800), by Martin
Can You Afford To Lose Your Photos?
How important are your photos to you? What would the impact be if you were to lose
all the photos stored on your PC?
For professional (and serious amateur) photographers, there could be a financial impact,
and for all photographers, losing all your photo memories could be devastating!
Photo Losses Do Occur
Do you backup your photos regularly?
If your only copy of photos is on the hard drive of your computer, there are many
ways in which they could be lost, including:
the hard drive in your computer could crash or fail
a virus can delete or corrupt photos
your PC could be stolen
someone could accidently over-write or delete the photos
You might think the chance of one of the above is so small that it will never happen to you.
That is being a bit naive - people do lose important data regularly, and it could
happen to you when you least expect it!
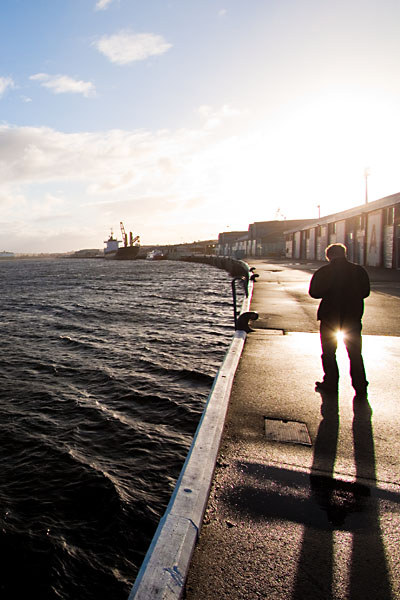
posted Saturday, 25 July 2009, 13:10 (+0800), by Martin
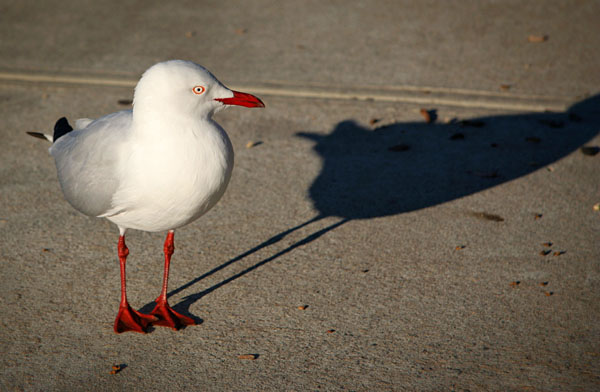
A Silver Gull (commonly referred to as "seagull" in Australia) casts a long shadow
on the concrete path, while keeping a close eye on the photographer.
Silver Gull and shadow
Crawley, Western Australia Canon EOS 350D, 17-85mm IS @85mm, 1/1000 sec, f/5.6, ISO100
This photo is from a while ago, but I am still finding some photos in my archives
that I think are worth posting.
posted Monday, 20 July 2009, 20:07 (+0800), by Martin
Boulder Rock is a great place to visit. It's located in Karragullen, in the
eastern corner of Midgegoroo National Park (formerly Canning National Park),
right next to Brookton Highway.
It's a huge granite rock outcrop, with various large boulders scattered over the top,
and provides lots of interesting angles for photography.
There's also plenty of wild flowers and scrub in the bush around the rock.
Unfortunately, the carpark and picnic area has been closed, so you'll need to park on the
side of the road when visiting the rock.
Here's a selection of photos from my recent visit.
huge boulders that look precariously balanced
Canon EOS 50D, 24-70mm f/2.8L @24mm, 1/250 sec, f/5.6, ISO200
posted Wednesday, 15 July 2009, 19:32 (+0800), by Martin
Overview
As far as Canon lenses go, the 50mm f/1.8 is probably the cheapest, smallest and
lightest (130gr) lens in the Canon range.
However, that doesn't mean it's not worth looking at!
It's a prime lens (ie, fixed focal length lens), with a maximum aperture of f/1.8.
This makes it a great lens for low light situations, due to the large amount of
light it'll let in at its maximum aperture.
This large aperture also provides a very short depth-of-field, which is great
for portraits, allowing you to have the subject in focus, but the background blurred.
Photos Of Lens
Here's some photos of the Canon EF 50mm f/1.8 II lens.
posted Wednesday, 08 July 2009, 20:51 (+0800), by Martin
I still haven't finished processing all the photos I took while in Canada in May.
Here's one I processed recently, of a ground squirrel (aka gopher) in the snow.
gopher in the snow
Banff National Park, Alberta, Canada Canon EOS 50D, 70-200mm f/4L @200mm, 1/3200 sec, f/4, ISO160
posted Sunday, 05 July 2009, 20:05 (+0800), by Martin
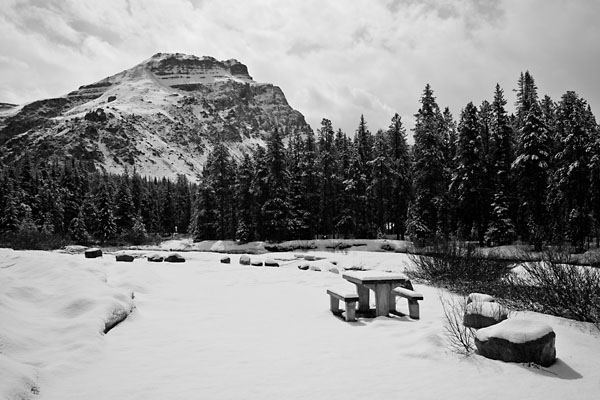
Many parts of Banff National Park were still covered in snow last month.
These two photos were taken at Mosquito Creek, in the
Banff National Park in Alberta.
The raw photos didn't have much colour, primarily due to the large amounts of snow and overcast
sky, but I was quite happy with the results of a black and white conversion on both these photos.
snow-covered picnic table
Banff National Park, Alberta, Canada Canon EOS 50D, 10-22mm @17mm, 1/64 sec, f/8, ISO200
After light snow fell for a few hours, everything is covered in white, including the picnick table, rocks,
and trees.
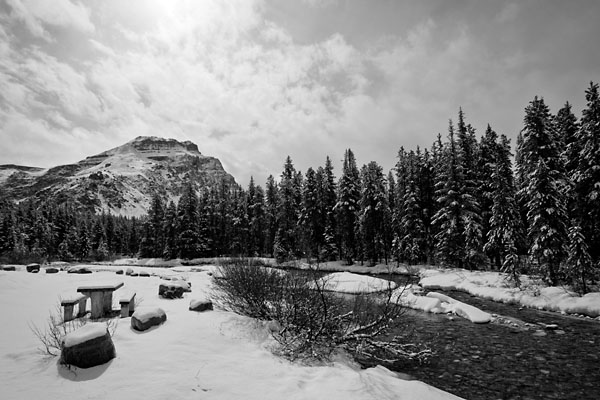
snowy banks of Mosquito Creek
Banff National Park, Alberta, Canada Canon EOS 50D, 10-22mm @10mm, 1/500 sec, f/8, ISO200
posted Saturday, 27 June 2009, 16:12 (+0800), by Martin
Another photo taken last month in Waterton Lakes National Park, in the south of Alberta, Canada.
Waterton Lakes gravel road
Waterton Lakes National Park, Alberta, Canada Canon EOS 50D, 10-22mm @10mm, 1/200 sec, f/8, ISO100
I took three lenses with me to Canada - the 10-22mm, 24-70mm f/2.8L, and 70-200mm f/4L.
I think the 10-22mm lens got the most use (including the photo above), and I kept a CPL
filter on the 10-22mm lens most of the time too.
posted Monday, 22 June 2009, 22:18 (+0800), by Martin
I thought this video was a great piece of marketing for the Olympus Pen E-P1 camera:
(If you're viewing this post through an RSS reader, you may not see the embedded video, but
will probably need to click the post header to view the article in a browser.)
The Olympus Pen E-P1 camera is generating quite a bit of interest, and I'm very interested in it
due to its compact size.
posted Monday, 15 June 2009, 22:40 (+0800), by Martin
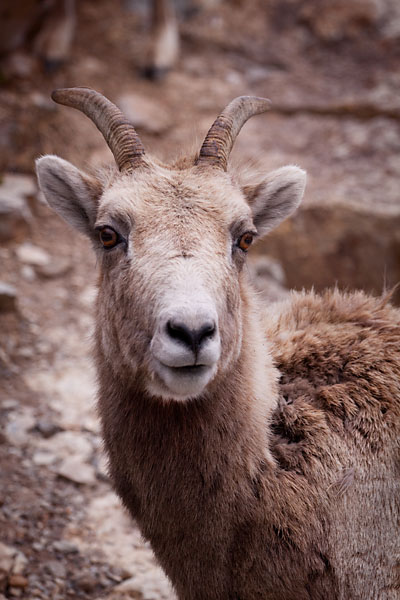
While visiting Lake Minnewanka in Banff National Park, a group of
bighorn mountain sheep wandered across the road on top of the dam wall,
and didn't seem to mind the few tourists who followed them
with cameras at the ready.
bighorn mountain sheep
Lake Minnewanka, Banff National Park, Alberta, Canada Canon EOS 50D, 70-200mm f/4L @126mm, 1/2000 sec, f/4, ISO200
posted Tuesday, 09 June 2009, 22:20 (+0800), by Martin
Phottix Plato
Intro
The Phottix Plato is another wireless shutter release for digital SLR cameras,
and was released in October 2008 at Photokina.
The Plato has some interesting new features,
including bi-directional 2.4GHz communication, and uses
commonly-available AAA batteries.
If you're not interested in reading the details of this review,
you can jump straight to my
conclusions.
Thanks to
HK Supplies for providing a
Plato C8 for review purposes.
Overview of the Plato
As with other wireless shutter releases, the Plato has two primary components,
namely the receiver and the transmitter. As with the other Phottix accessories
I've reviewed, the actual model name (ie, "Plato") does not appear on either
the transmitter or receiver, but only the company name "Phottix" appears on the front
of both, and the model number "WXD-188" appears on the back of both.
The receiver needs to be connected to the camera's remote shutter release connector
via a cable supplied with the Plato. Rather than having a cable hard-wired
into the receiver, the receiver has a 3.5mm stereo socket, and different Plato models
come with cables to suit different cameras.
Plato receiver
The base of the receiver has a plastic shoe, which allows the receiver to be mounted
on the hot-shoe of a camera body. Note that this is purely for convenience - there
are no electrical contacts in the plastic shoe on the receiver.
The Plato transmitter is a little larger than the
Cleon
and Cleon II
transmitters, and is much more rectangular.
The larger size is primarily due to the fact that the Plato transmitter
uses two AAA batteries rather than the small 23A battery used in the Cleon and Cleon II transmitters.
However, it's still a compact unit, and fits easily into my camera bag.
The Plato receiver is marginally larger than the Cleon and Cleon II receivers, and this
is again due to the use of larger batteries, ie, 2 AAA batteries rather than the much smaller
23A battery.
posted Sunday, 07 June 2009, 21:30 (+0800), by Martin
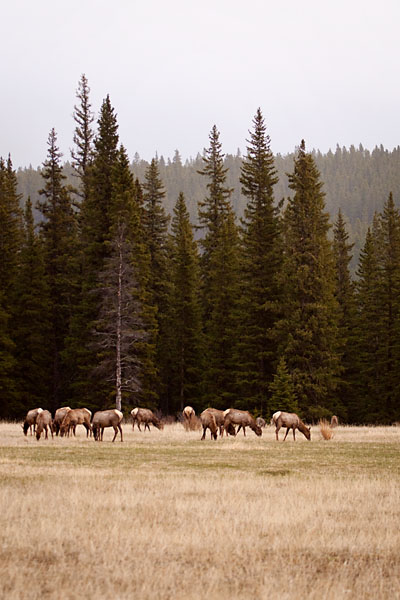
Another photo from my recent visit to Canada. This was taken
at Cascade Ponds, in the Banff National Park,
and shows a herd of elk grazing on the grass.
grazing elk
Cascade Ponds, Banff National Park, Alberta, Canada Canon EOS 50D, 70-200mm f/4L @84mm, 1/800 sec, f/4, ISO200
posted Sunday, 31 May 2009, 15:36 (+0800), by Martin
Strobist recently did a post on
How to Photograph Water Drops with One Speedlight,
with some great info, including a few videos.
It's something I've been intending to do for a while, so yesterday I pulled out my
camera, tripod, flash and remote flash trigger,
and gave it a try.
First I tried using water, dropping into a dish of water.
I experimented with different coloured reflectors
behind the water, with varying results.
posted Sunday, 31 May 2009, 14:20 (+0800), by Martin
swine flu information pack, masks, and Tamiflu medication
I was officially considered a swine flu suspect for a few days!
Because of this, I had to quarantine myself (and immediate family)
at home, until swine flu test results were available.
However, I received the test results yesterday afternoon, which confirmed that
I do not have swine flu.
I had recently returned to Australia after a couple of weeks in Canada on business,
and Canada is considered one of the countries at risk for swine flu.
When my flight from Vancouver landed in Sydney, all passengers had to remain seated
while Australian quarantine officials came on board and sprayed the cabin.
All passengers also had to complete a health questionnaire asking if they
had any flu-like symptoms, and when walking through customs in the airport,
some officials were monitoring all passengers on heat-sensitive cameras,
looking for people with signs of a fever.
A few days after returning to Australia, I came down with some flu-like symptoms
(sore throat, coughing and headache), and had to quarantine myself
at home until test results confirmed if I had swine flu, or if it was a false alarm.
A nurse dressed in full protective garb came around to take some swabs from my throat
and nose for testing, and an information pack, along with masks and Tamiflu was
left at the front door for me.
Initially, I received conflicting stories about how long it would take to get the
test results, with one person indicating it would only take 8 hours, but someone
else said it would take 48 hours, but they weren't sure if the pathology
lab would be working through the (long) weekend.
However, I received the test results about 24 hours after the swabs were taken,
and only had to be in quarantine for about 2 1/2 days.
Some people think it's an over-reaction, and this sort of response is unnecessary.
I think the government and health department are doing a good job to
try to identify any at-risk individuals, and isolate them until they can be tested
for swine flu.
Prevention is certainly much better than cure, particularly given the potential
rate at which swine flu could spread through the community!
posted Friday, 29 May 2009, 19:16 (+0800), by Martin
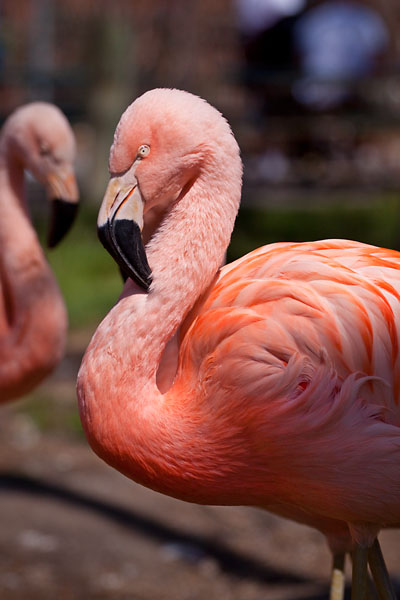
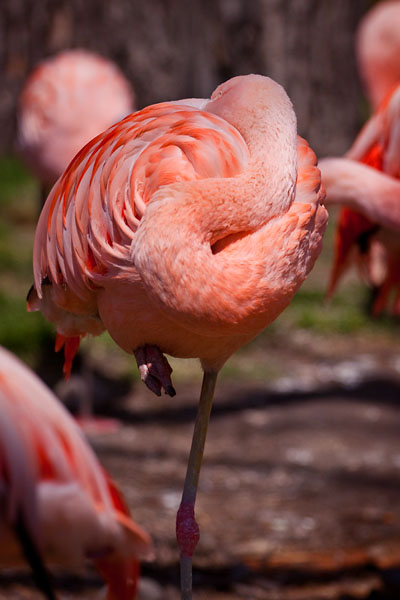
I saw these pink flamingos at the Calgary zoo.
Most of them were just standing around on one leg sleeping,
but this one was keeping a wary eye on the zoo visitors.
When they sleep, they twist their neck into some awkward shape,
and tuck their head between their wings on their back.
They also lift one leg and tuck it underneath their body,
and sleep while standing on the other leg.
They actually look very unstable, with the relatively large body
balanced on such a skinny leg.
I wonder how well they can balance when it gets windy,
or when a curious visitor tries pushing them over!
posted Monday, 25 May 2009, 21:05 (+0800), by Martin
I love the way a light fall of snow provides a light coating
on all the branches in the trees.
While making my way from Calgary to Lake Louise last week Monday, I stopped at every lake and lookout that
was sign-posted on the road.
This is a photo that I took while in the carpark at Barrier Lake.
posted Saturday, 23 May 2009, 19:53 (+0800), by Martin
More Observations
Following on from my
previous list of observations,
I thought I'd take the opportunity to jot down some more,
while seated on a plane 10km above the ocean a few hours north-east of Sydney
(but posted on my blog sometime later).
Note that this wasn't my first time in Canada - but it's the first time I've taken
the opportunity to make a note of some of the differences that struck me
while in Canada.
Here are the additional observations:
Waiting staff in restaurants and cafes provide a better level of service than in Australia. [1]
All hotels and airports I visited provided free wifi internet access. [2]
There are lots of Aussies working in Canada. [3]
Light switches are upside down compared to Australia (ie, up is on in Canada).
"Entree" refers to the main course, while in Australia, it refers to starters. [4]
When asked by waiting staff if they would like more coffee/food/etc, Canadians
typically respond with "I'm good". What does good behaviour have to do with it?
A "strip mall" isn't what I thought it was! [5]
A car with a manual gearbox is referred to as having a "standard" transmission.
Does that mean an auto gearbox is non-standard? Even though most cars have autos?
Canadian toilet bowls are a very different shape to those used in Australia. [6]
ATM machines don't seem to give out larger denominations than a CAD$20 note. [7]
Buildings don't have a level 1, but go straight from the ground floor to level 2.
posted Friday, 22 May 2009, 12:52 (+0800), by Martin
Observations
I have just spent two weeks working in Calgary (Alberta, Canada), followed by
a few days of my own time driving through the Rocky Mountains, taking lots of photos.
While I'm sitting in the airport at Vancouver
(local time in Vancouver is nearly 10pm Thursday night), waiting for my flight to Sydney,
I thought I'd take the time to jot down a few observations from my time in Canada.
Note that the last week was unseasonally cold for this time of the year, with
maximum temperatures in Banff and Lake Louise only a few degrees above zero in the last
few days (although the previous two weeks were quite a bit warmer).
It also snowed most days this week too.
On with the observations:
Snow squeaks underfoot.
Icy snow crackles underfoot.
Icy snow is very slippery to walk on.
Driving on snow makes you realise how slippery it is.
A car handbrake can be fun in an empty car park (see previous item).
The wind on a glacier is very cold! [1]
The sun shining on snow is very bright.
Sports shoes are no good for walking in the snow, as you get wet feet when the snow soaks
through the top and sides of the shoes.
When driving through falling snow, it looks like the snowflakes are coming straight towards you.
Driving on the right (wrong!) side of the road takes a bit of getting used to. [2]
The average-sized car on Canadian roads is larger than in Australia. [3]
Parking spaces in car parks are larger than in Australia (see previous item).
Cars are cheaper in Canada.
Petrol is cheaper in Canada. [4]
When paying with a credit card, never once was my signature on the receipt checked against the signature on the
back of my credit card.
Photos from Canada
I was intending to post more photos from Canada during my time here in Canada.
However, despite calibrating the screen of my (work) laptop before I left,
I'm not particularly happy with the colour rendition of it,
and hence cannot be confident that the colours of a photo are correct
(changing the viewing angle of the screen changes the colours, and particularly with photos
of snow, it's important to get the white balance correct).
Also, I don't have Photoshop on this laptop, which significantly restricts my ability
to post-process photos.
I have about 20GB of photos taken while in Canada, and
am intending to post some of them over the next few weeks.
posted Monday, 27 April 2009, 21:42 (+0800), by Martin
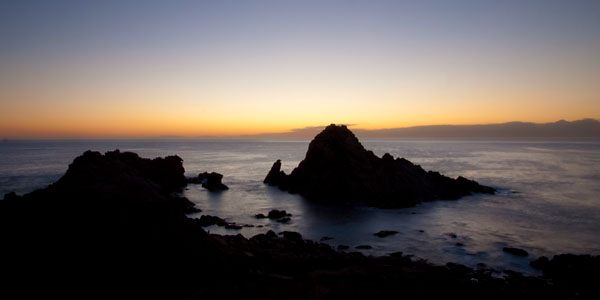
Here's a photo from the Easter weekend, which we spent in Dunsborough.
The very distinctly shaped Sugarloaf Rock is one of the attractions
in the area, and I watched the sun set behind the rock one evening.
Sugarloaf Rock after sunset
Cape Naturaliste, Western Australia Canon EOS 50D, 10-22mm @11mm, 5 sec, f/22, ISO100
At this time of the year, when viewing the sunset from the lookout near
the carpark, the sun sets right behind the highest peak of Sugarloaf Rock.
I'll be posting some more photos from the Easter weekend, once I get some time
to finish processing them.
There was a guy shooting next to me, using a 5D Mark II and 24-105 lens,
who was using blue-tac to attach filter holder with Lee filters onto the front of his lens.
I'm not sure why he was using blue-tac - I prefer to use a lens adapter,
as it's a bit more secure....as he found out when the filter holder fell off the lens
when he was moving his tripod...
Does anyone know who the blue-tac user might have been?
posted Saturday, 25 April 2009, 12:15 (+0800), by Martin
A couple of days ago, Canon released updated firmware for the
Canon 50D, 450D (Rebel XSi) and the 1000D (Rebel XS).
The firmware updates are available from the
firmware updates
page on Canon's website.
Canon EOS 50D
Changes in the version 1.0.6 firmware for the
Canon 50D include:
Supports the AF assist beam feature of the new flash, Speedlite 270 EX, which is scheduled to be released in April 2009.
In low light situations, the AF assist beam fires during autofocusing. Conditions that cause the AF assist beam to fire have been changed in Firmware Version 1.0.5 or later.If the firmware of the camera is version 1.0.3 or earlier, the AF assist beam may not fire even if the emitting conditions are met.
Changes the error indications that are displayed on the camera.
In previous firmware, if an error is detected, Err 99 is displayed on the camera in most cases. Firmware Version 1.0.5 or later further specifies the error indications as follows.
10
Malfunctions related to files have been detected.
20
Malfunctions related to the mechanical have been detected.
30
Malfunctions related to the shutter have been detected.
40
Malfunctions related to the power source have been detected.
50
Malfunctions related to the electric control have been detected.
70
Malfunctions related to images have been detected.
80
Malfunctions related to the electric control or images have been detected.
If If malfunctions in the camera are detected, "Err XX" will be displayed. A two-digit number that corresponds to the malfunctions detected by the camera will be displayed in the "XX" section of the error number. Other than the error numbers listed above, there are other numbers such as "01". In that case, provide appropriate handling and servicing by following the details displayed on the LCD monitor of the camera.
If an error code appears frequently, the camera is malfunctioning; therefore, note down the error number and contact our service center.
Addresses the vertical banding noise phenomenon.
If the recording format is set to sRAW1, vertical banding noise may become visible depending on the camera settings, subject, and background.This phenomenon is addressed by this firmware.
Canon EOS 450D (Rebel XSi) and 1000D (Rebel XS)
The only change in the firmware version 1.1.0 for the
Canon 450D
and firmware version 1.0.5 for the
Canon 1000D
is added support for the Speedlight 270 EX.
Supports the AF assist beam features of the new flash, Speedlite 270 EX, which is scheduled to be released in April 2009.
Is It Worth Upgrading?
For people who have a 450D or 1000D, there's little value in installing this updated firmware,
unless you are intending to purchase a Speedlight 270 EX later this year.
However, for 50D owners, it's certainly worth installing the updated firmware,
as the error reporting is now more detailed, providing error numbers that specify
where the error is, rather than just reporting the generic "Err 99".
(Even though this firmware version is numbered 1.0.6, it's the first publicly available
version since version
1.0.3.)
Firmware Update Procedure
Be sure to read Canon's firmware update procedure
when upgrading your firmware, because you don't want to brick your camera!
Links to the firmware downloads and firmware update procedures can be found on these pages:
posted Sunday, 19 April 2009, 09:37 (+0800), by Martin
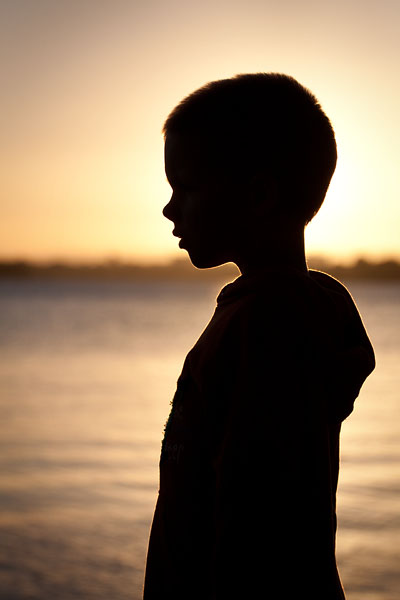
I like silhouettes, and with an early morning sun low in the sky,
I took the opportunity to take some photos of my children
with the sun directly behind them.
Here's one of my youngest son, taken in South Perth a
couple of weeks ago.
Nicholas silhouetted
South Perth, Western Australia Canon EOS 50D, 70-200mm f/4L @73mm, 1/8000 sec, f/4, ISO320
posted Thursday, 16 April 2009, 20:10 (+0800), by Martin
Phottix Hero
Intro
The Hero LiveView Wireless Remote is a very new product from
Phottix,
and was demonstrated at PMA in March 2009.
It is designed to provide the photographer with the ability to remotely
monitor the viewfinder via a 2.4" colour LCD,
and trigger the shutter remotely, from distances as far as up to 100m away from the camera.
In other words, the Hero is a remote control for your DSLR camera,
but unlike most wireless remote controls, it also provides you with
live video from your camera's viewfinder.
The Hero is designed to work with DSLR cameras that do not have any LiveView functionality,
by using a small camera to look into the camera's viewfinder.
The Hero can also be connected to a DSLR camera that does support LiveView using
an AV cable.
Thanks to
HK Supplies for providing this
pre-release sample for review.
Why A LiveView Remote?
A LiveView remote for a DSLR camera is an interesting concept, and has a number of applications.
While there are plenty of other wireless remotes that allow you to remotely trigger
a DSLR camera shutter (such as the
Cleon and
Cleon II),
those remotes do not give you any indication of what is within the camera's frame.
A LiveView remote provides the same functionality as those wireless
remotes, but also allows you to have a remote view into the DSLR,
and see exactly what is within the viewfinder of the DSLR.
This can be particularly useful for situations where you might want to set up
a remote camera, such as sports, wildlife, etc.
You can then remotely monitor whatever the camera is pointing at,
and then trigger the camera's shutter to take a photo if there's any action occurring.
The Hero may also be useful for KAP (kite aerial photography, where people hang
a camera from a kite for aerial photos), as the video feed will allow you to
easily see where the camera is pointing.
posted Friday, 03 April 2009, 19:46 (+0800), by Martin
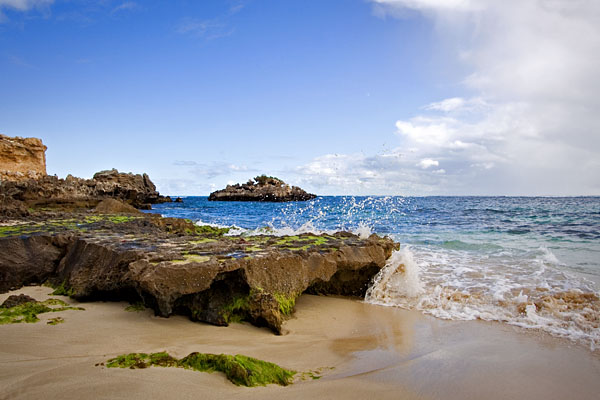
I find this photo interesting, because at first glance,
it looks like it's a composite image, with the left half from a sunny day,
and the right half from an overcast day.
However, it's definitely a single frame, and clearly shows the impact of the blue
sky on the water colour, with the ocean in the right half of the photo
looking rather dull compared to the left hand side.
waves breaking on the rocks
Point Peron, Rockingham, Western Australia Canon EOS 350D, 10-22mm @15mm, 1/200 sec, f/9, ISO100
I've previously written about how you should
Tag Your Camera
by adding a cheap pet tag containing your contact details.
If your camera is ever mis-placed, or stolen and discarded,
with your contact details attached to it, you have a chance of
getting your camera back.
That blog post continues to be particularly popular, so I thought
I'd do a followup post.
I've found a source of cheap pet tags, so there's definitely no excuse
for not having a pet tag on your camera!
The tag shown in my previous post
was a computer-engraved tag, and I wasn't particularly happy with it,
as the engraving wasn't very deep, making it a little difficult to read,
and I suspect it'll get worse when the tag has some scratches from wear-and-tear.
Egon from
Ozengrave, located in Queensland, Australia,
sells hand-engraved annodised aluminium pet tags for just AUD$5.95 each,
with free postage to anywhere in Australia.
Postage overseas is just AUD$3.
Ozengrave
provides a choice of over 40 shapes, ranging from a circle, heart, star and more,
with most shapes available in a choice of sizes and colours.
posted Wednesday, 25 March 2009, 19:58 (+0800), by Martin
RedBubble.com are having a
great canvas print sale,
with prices on all canvas prints reduced by 20%.
This sale will only last until Sunday night, so if you've been considering
a canvas print, now is the time to order one (or more)!
I've previously written a
detailed review of a canvas print,
and I can definitely recommend the RedBubble.com canvas prints, as they
are very good quality.
Note that RedBubble recently introduced a larger sized canvas print.
The largest size used to be 610mm on the longest side, but they
now have an extra large size at 762mm long.
posted Saturday, 21 March 2009, 20:35 (+0800), by Martin
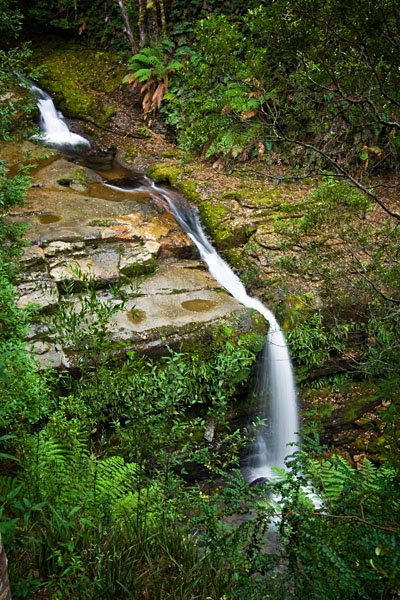
Another shot from Liffey Falls in central Tasmania, taken last year
while there on a
brief holiday.
This is one of the minor falls, namely the third cascade.
A slightly longer exposure helps smooth out the water in this photo,
giving it that smooth silky look.
Third Cascade at Liffey Falls
Liffey Falls, Tasmania Canon EOS 350D, 10-22mm @22mm, 8/10 sec, f/13, ISO100
posted Saturday, 14 March 2009, 14:02 (+0800), by Martin
We're making the most of daylight savings, which is due to finish in a couple of weeks.
With the sunrise occurring at around 7:10am, we can get some photos of the
pre-sunrise colours, and the sunrise itself, without having to get
out too early.
However, once daylight savings finishes, the sunrise will be an hour earlier,
and it'll be a bit harder to get out of bed to catch the pre-sunrise colours!
I got together with some colleagues early on Thursday morning, in South Perth.
The forecast for that morning was for a chance of a shower, so we were
hoping for some clouds over the city, along with some sunrise colours in the
clouds.
The clouds were certainly there...but the sunrise didn't produce much colour in the sky.
Here is one of the better shots from the morning.
city skyline in black and white
South Perth, Western Australia Canon EOS 50D, 24-70mm f/2.8L @34mm, 5 sec, f/10, ISO100
posted Wednesday, 11 March 2009, 20:26 (+0800), by Martin
Phottix Cleon II
Intro
I recently reviewed
the Phottix Cleon wireless remote,
which was released by Phottix in February 2008.
Since that time, Phottix have not been resting on their laurels, but
were busy designing a new and improved version.
A new model, the Phottix Cleon II, was released earlier this year, in January 2009.
It provides a number of improvements and enhancements since the Cleon.
Thanks to
HK Supplies for providing a
Phottix Cleon II C8 for review purposes.
This Review: Differences between Cleon and Cleon II Only
Most of the functionality of the Phottix Cleon II is the same
as that of the Phottix Cleon.
Having recently reviewed the Cleon, rather than duplicating much of the information
from the Cleon review in this Cleon II review, please refer to my
earlier review of the Cleon.
posted Sunday, 08 March 2009, 18:38 (+0800), by Martin
Last week, while driving down Mounts Bay Road, I noticed that as the sun rose
above the hills, it provided some interesting silhouettes of the traffic
on the Narrows Bridge that crosses the Swan River between Perth and South Perth.
With the Mandurah train line also crossing the Narrows Bridge, traffic across
the bridge includes cars, trucks, trains and cyclists.
I immediately started thinking about returning to take some photos...so
on Friday morning,
Adrian and myself
made our way to Perth, with the aim being some silhouette photos
of traffic on the Narrows Bridge as the sun rose.
We positioned ourselves on the north shore of the Swan, between the Narrows
and the old Swan Brewery, where we would be almost orthogonal to the Narrows bridge.
Narrows Bridge before dawn
(3 image stitch)
Narrows Bridge, Perth, Western Australia Canon EOS 50D, 24-70mm f/2.8L @24mm, f/2.8, ISO400
With the sun still below the horizon, some great orange colours began appearing in the sky,
resulting in some great silhouettes of traffic on the Narrows bridge.
With a train crossing the bridge in each direction every 5 minutes,
we had quite a few opportunities to capture silhouettes of the train.
The image below shows some easily-recognisable shapes, with a Transperth bus,
a van, and a train, all heading north (ie, right-to-left) into the city.
posted Wednesday, 04 March 2009, 21:28 (+0800), by Martin
Here's a shot from early this morning, looking east over
the Swan River from Kings Park.
While a sunrise can be interesting, I prefer the colours in the sky in the
45 minutes prior to the actual sunrise.
While they may look a little dull to the naked eye,
a long exposure can provide some great results.
This photo was taken about 30 minutes before the sun started to peek over the horizon.
pre-dawn Perth sky
Kings Park, Perth, Western Australia Canon EOS 50D, 10-22mm @15mm, 1/2 sec, f/8, ISO100
posted Monday, 02 March 2009, 21:38 (+0800), by Martin
Phottix Cleon
Intro
The Phottix
Cleon is a combination wired and wireless
shutter release for cameras.
It was released in February 2008 at PMA 2008
(Photo Marketing Association tradeshow).
The Cleon consists of a compact wireless transmitter and wireless
receiver, and can be configured to use any one of 16 wireless channels.
The receiver can be used as a wired remote shutter release, and supports
single shot mode, as well as bulb mode for long exposures.
Alternatively, the Cleon can be used as a wireless remote, with
the transmitter used to trigger the camera's shutter remotely.
The specifications indicate the wireless range is upto 100 metres.
Thanks to HK Supplies for providing a
Phottix Cleon C8 for review purposes.
posted Friday, 27 February 2009, 21:58 (+0800), by Martin
This is Michael, the son of some friends of ours, taken in January last year,
when he was about 10 months old.
As is clear from his facial expression, he wasn't too keen about being
in the bath!
The colour of the wall and the lighting give this photo a very retro 70s look,
and in fact, the location,
Camp Leschenaultia,
probably was built in the 1970s.
Michael - no longer enjoying the bath
Lake Leschenaultia, Western Australia Canon EOS 350D, 17-85mm IS @85mm, 1/80 sec, f/5.6, ISO200
posted Thursday, 26 February 2009, 19:00 (+0800), by Martin
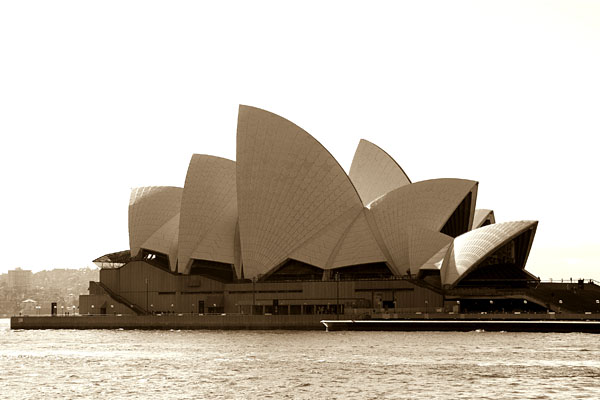
Here is a shot taken in July 2007, during a business-related trip to Sydney.
I was in Sydney for two weeks, so I used the weekend to do some exploring.
The colour version wasn't too exciting, but a sepia conversion provided a better result.
Sydney Opera House in sepia
Sydney, New South Wales, Australia Canon EOS 350D, 17-85mm IS @59mm, 1/320 sec, f/7.1, ISO100
posted Tuesday, 24 February 2009, 20:02 (+0800), by Martin
Phottix Nikos Digital Timer Remote
Intro
The Phottix Nikos Digital Timer Remote is an
intervalometer,
ie, a device that counts intervals of time.
Specifically, it is a digital timer designed to trigger a camera shutter periodically
at specified time periods.
The Nikos can be used as a simple wired shutter release for your camera,
you can use the timer functionality to add a self-timer delay,
or you can use the interval timer to take photos at periodic intervals (ie, time-lapse photography).
This review takes a close look at the Phottix Nikos digital timer remote,
including the various timer options it supports.
Phottix - the company
Phottix
is a company headquartered in Hong Kong that manufacturers many different camera accessories,
providing a cheaper alternative to the genuine accessories offered
by Canon, Nikon, and other camera manufacturers.
The items are manufactured in Shenzhen, China, and Phottix has offices
in Hong Kong, China and Poland.
Phottix has many authorised distributors in various countries,
and one of the retail outlets for Phottix accessories is a sister company called
HK Supplies,
based in Hong Kong. HK Supplies sell cameras and accessories (Phottix and others).
The motto used by Phottix on their packaging is
"You better control your camera".
Thanks to HK Supplies
for providing a Phottix Nikos C8 unit for review purposes.
Overview
The Phottix Nikos Digital Timer Remote was released in October 2008
at Photokina.
The Nikos remote is labelled as "TC-501", and interestingly, while the packaging
clearly labels it as a "Nikos", the "Nikos" label is absent from the remote itself,
although there is a prominent "Phottix" label on the front of the remote.
The model I have for review is the Phottix Nikos C8, designed to suit
Canon's N3 connector
that is used by the 10D/20D/30D/40D/50D/5D and 1D cameras.
package contents - cable with N3 connector, wrist strap, and Nikos remote
Included in the package was the Nikos timer itself, a cable to suit the Canon N3 connector,
and a wrist strap. The wrist strap also allows the timer to be hung conveniently from your tripod
when you're not shooting, rather than letting the remote dangle from the end of the cable.
The Phottix Nikos typically retails for about AUD$75 (approx USD$50),
and the Nikos C8 model is directly competing against the much more expensive Canon TC-80N3,
which sells for
USD$136.95 from B&H
(approx AUD$212)
or AUD$280 from qualitycamera.com.au
(approx USD$180).
Update: Phottix are now selling the Nikos
via their recently launched their online store.
posted Sunday, 22 February 2009, 15:10 (+0800), by Martin
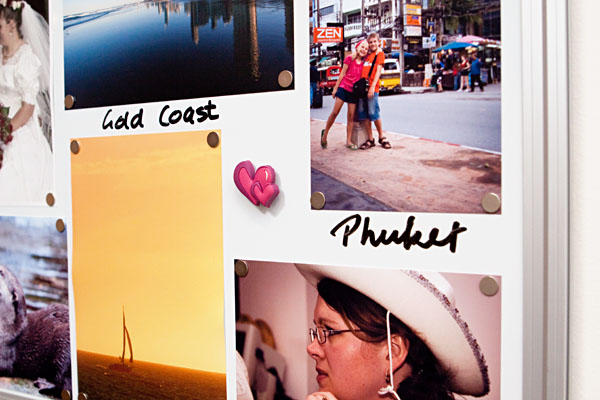
My wife and I have been looking for a good solution for displaying photos in the house,
but until recently, had not found a good solution.
A pinup board results in holes in each photo, and moving a photo to another location on the
board means you need to remove and re-insert all the pins in that photo.
Magnetic photo rope
(using magnets to hold photos onto a steel cable hanging on the wall) is a cool idea, but the photos will
blow around when doors are opened/closed, or if the wind blows in through a window.
Using Magnets on a Whiteboard
However, the use of magnets gave me an idea, and last week, I bought a magnetic whiteboard from
a local office supplies shop, along with some tiny rare-earth magnets.
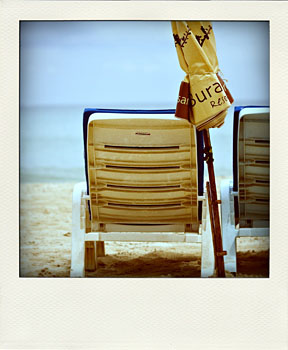
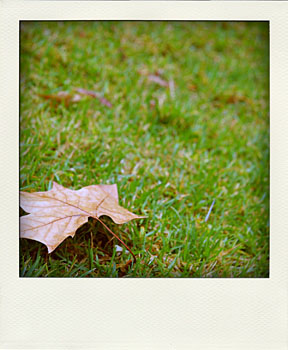
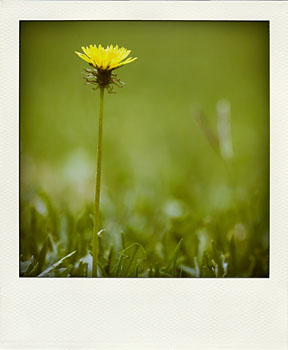
posted Sunday, 15 February 2009, 19:32 (+0800), by Martin
There is something nice about the retro look of a Polaroid photo,
and using the free Poladroid application, you can easily re-create the nostalgic
look of Polaroid photos, complete with scratches and fingerprints.
While similar results can be achieved in Photoshop or another image
editing package, the free Poladroid application provides
a very easy way to produce consistent results with minimal effort.
Some Example Polaroids
Here are some examples of the Polaroid-looking images generated by the Poladroid application:
posted Wednesday, 11 February 2009, 19:45 (+0800), by Martin
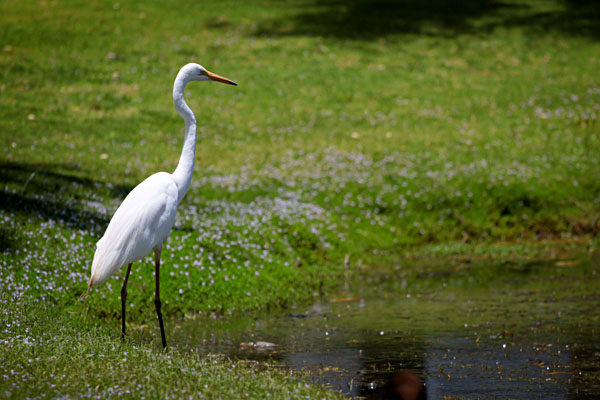
During a recent walk around Burswood with a colleague one lunch time,
we found this egret wandering around one of the lakes
behind the Burswood Casino complex.
Intermediate Egret
(Ardea intermedia aka Egretta intermedia)
Burswood, Western Australia Canon EOS 50D, 70-200mm f/4L @200mm, 1/2000 sec, f/4, ISO100
posted Thursday, 05 February 2009, 18:56 (+0800), by Martin
In recent weeks, there seems to be a growing interest in tilt-shift photography,
as well as applying a fake tilt-shift effect to photos.
This post provides some background information, as well as details on how you
can achieve a tilt-shift effect with your own photos.
Narrows Bridge into South Perth, digitally tilt-shifted
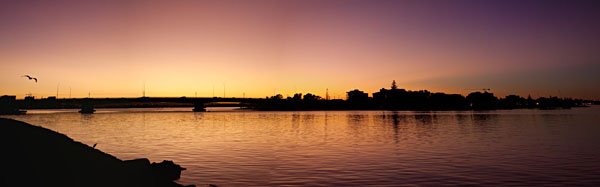
posted Thursday, 29 January 2009, 19:50 (+0800), by Martin
Sunset is one of my favourite times of the day to take photos,
and including a silhouette against the great sunset colours in the sky
can make for an interesting photo.
This silhouette is of my wife holding our youngest daughter Samantha, at Fremantle,
when my daughter was about 6 months old.
mother and daughter watching the sunset
Fremantle, Western Australia Canon EOS 350D, 70-200mm f/4L @87mm, 1/800 sec, f/4, ISO400
posted Wednesday, 28 January 2009, 18:23 (+0800), by Martin
Background
Having recently
upgraded to a Canon 50D
several months ago,
I was looking for a remote shutter release for the 50D, as it uses Canon's proprietary
N3 Connector.
After some
investigation,
I searched for the cheapest suitable remote that I could find on eBay,
intending to buy it just for the N3 connector.
The cost of the Yongnuo remote I purchased was just AUD$4.90 plus AUD$4.50 postage.
(I've since found the same remote on
dealextreme.com for USD$4.80 with free shipping.)
However, the quality of the remote, despite the very cheap cost,
was significantly better than I was expecting, so I decided to use the complete remote,
rather than butchering it just for the N3 connector.
The Remote
The remote was listed on eBay as "RS-80N3 Remote Shutter for Canon EOS 5D 20D 30D 40D", and appeared to
be a copy of Canon's RS-80N3 remote, which typically retails for USD$50 or AUD$90.
The box that arrived was labelled as "Yongnuo Remote Switch RS-C3",
and the remote itself has the words "Yongnuo Digital" on the front of it.
Here are some photos of the Yongnuo remote after it was unboxed.
Until recently, my primary camera was a Canon 350D, which uses a 2.5mm stereo socket (E3)
for connecting a shutter release.
I built a homebrew shutter release
for it, which worked very effectively.
Having recently
upgraded to a Canon 50D,
I can no longer use my homebrew shutter release, as the 50D has an N3 socket,
rather than an E3 socket (2.5mm stereo socket).
Rather than purchase a complete shutter release for the 50D, I did some research
into the Canon N3 Connector Pinout and Wiring,
to see if I could source an N3 connector, so I could modify my shutter release,
and add an N3 connector to it.
Sourcing an N3 Connector
As mentioned in my earlier post on the
Canon N3 Connector Pinout and Wiring,
there are a number of options for sourcing an N3 connector, including:
Buy a genuine Canon remote
Buy a genuine Canon or Pocket Wizard/etc cable
Buy a cheap remote from eBay
Make your own N3 connector
The genuine Canon remotes are not particularly cheap, and having previously made a
homebrew shutter release for my 350D,
I was not prepared to part with that much money for something that is just a
double-action switch.
I wanted to be able to re-use my homebrew shutter release,
and just modify it by adding an N3 connector, to allow it to be used with
the 50D.
The cheapest option for obtaining an N3 connector was to buy a cheap remote
on eBay, and cannibalise it, discarding the remote, and just using the N3 connector.
posted Monday, 19 January 2009, 20:37 (+0800), by Martin
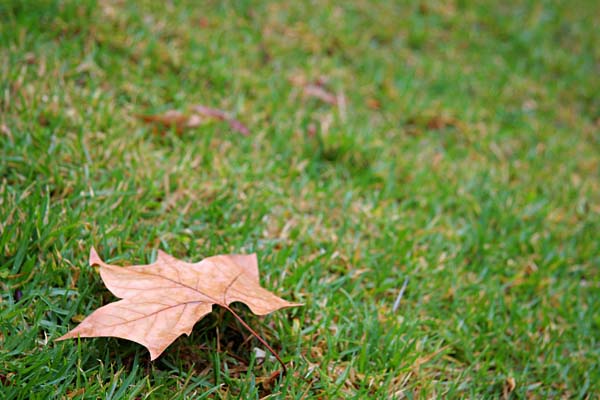
Here's another photo from the backyard yesterday, this time of a common yellow-flowering weed
called Taraxacum.
In case you don't recognise the name, it's more commonly known as the Dandelion.
As with the Grevillea flower photo
posted recently, this was also shot with the 70-200mm f/4L wide open,
providing a narrow DOF and interesting bokeh.
yellow Taraxacum flower
(more commonly known as Dandelion)
back yard, Western Australia Canon EOS 50D, 70-200mm f/4L @145mm, 1/640 sec, f/4, ISO100
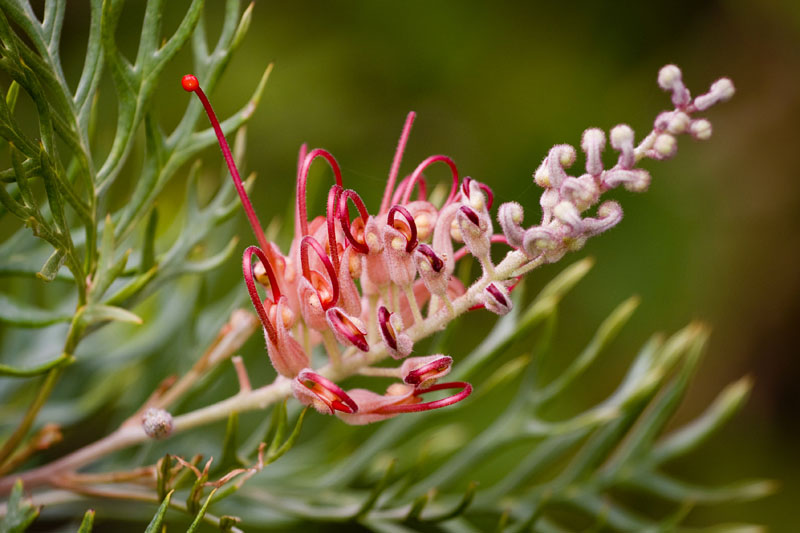
posted Sunday, 18 January 2009, 20:20 (+0800), by Martin
In the past, when I go out in the back yard to take some photos of plants
and flowers in the back yard, I normally grab my macro lens.
However, this afternoon, I used the 70-200mm f/4L lens in the back yard,
and was pretty happy with the results.
Even though the minimum distance of the 70-200 lens is about 1.3m, with the magnification
of the lens, I could still get close enough to fill the frame.
Shooting wide open blurred the background and provides pleasing bokeh.
Here's a shot of a Grevillea flower from the back yard.
Grevillea
back yard, Western Australia Canon EOS 50D, 70-200mm f/4L @131mm, 1/320 sec, f/4, ISO100
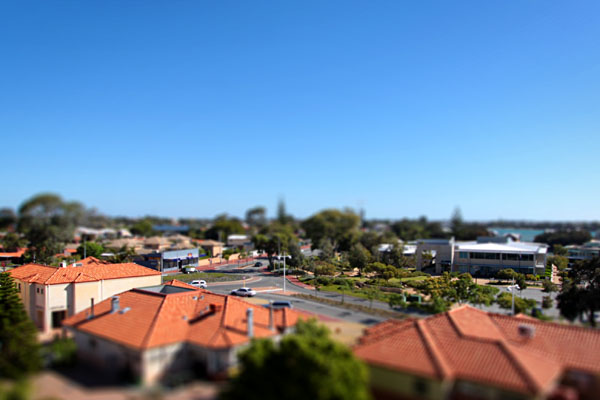
posted Thursday, 15 January 2009, 18:12 (+0800), by Martin
We recently spent a few days in Mandurah during the school holidays.
This is the view we had from the 5th floor of the Atrium Resort Hotel in Mandurah,
with a tilt-shift effect applied digitally.
The tilt-shfit
effect causes the photo to look like a miniaturised model.
That's Peel Street coming from the bottom right, and then Mandurah Terrace runs from
the bottom left to the top right of the photo,
and the white building on the right hand side is the Mandurah Visitor Centre.
Mandurah - tilt-shifted
Mandurah, Western Australia Canon EOS 50D, 10-22mm @10mm, 1/400 sec, f/10, ISO200
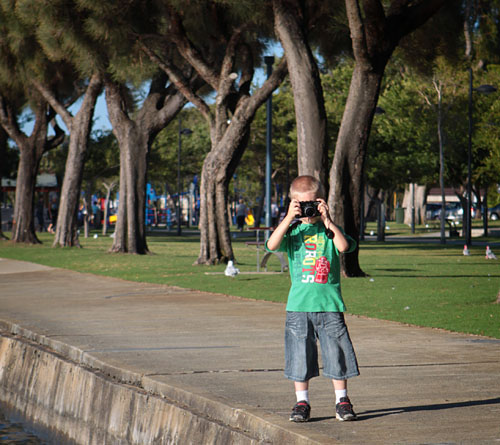
Ashley (my 10 year old son) Mandurah foreshore, Western Australia
Encourage Creativity
Photography encourages a child's creativity by making them think about colours, composition, framing,
light, depth-of-field, etc.
The creativity is not just limited to the photography either, but also extends to how the child
uses the photos they take. For example, photos can be used by the children
for scrapbooking, making bookmarks,
making cards, etc.
Keep Them Entertained
Photography has the potential to keep children occupied for many hours.
This includes the action of taking the photos, as well as post-processing,
learning more about photography by reading, etc.
Get Them Outdoors
Today's children often spend too much time indoors, behind the tv / computer / game console.
Outdoor photography provides another reason for them to enjoy the outdoors,
both close-to-home in your back yard, and the greater outdoors, in parks, forest, etc.
Share Your Passion
As you're reading this photography blog, I assume you have at least a passing interest in photography yourself.
Getting your kids into photography allows you to share your passion with them,
as well as sharing your photography gear with them.
Photography is a Great Social Activity
Photography can be a great social event, particularly if there are multiple photographers
in the family. I regularly take my two older children (aged 8 and 10) on photography outings.
I also have taken my children on a number of photowalks with other friends and colleagues.
Capture Memories
Photography allows children to capture their own memories from their own viewpoint of significant events,
such as birthdays, family outings, holidays, etc. These photos can mean a lot more to the children than
just the photos taken by a parent, as the children will often see different things to photograph,
and will see them in a different way.
Potential Source of Income
In the longer term, photography can potentially provide some income to the child, either
via micro-stock agencies, print-on-demand prints (such as
redbubble.com), or by taking photos of events and people
and selling prints.
As the children's photography prowess improves, there may be opportunities for
doing family/group photos of friends and family, and possibly also weddings of friends and family.
Photography Doesn't Have To Be Expensive
You don't need to spend a lot of money to start your children in photography.
A cheap new or second-hand point-n-shoot camera is all that's needed to get started.
With digital cameras, the on-going costs are minimal, as there's no film-developing costs.
Photography Requires Less Manual Dexterity than Other Visual Arts
Compared to other visual arts such, as painting and sculpture,
photography depends least on manual dexterity, making it ideal for kids of all ages.
Photography Has No Age Boundaries
There are no age limits for starting photography. Children of any age can enjoy it.
Nicholas (my 5 year old son), Mandurah foreshore, Western Australia
posted Sunday, 11 January 2009, 15:35 (+0800), by Martin
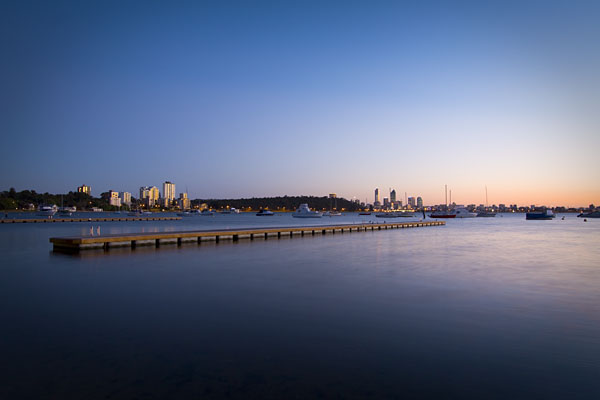
Taken during an early morning shoot in Matilda Bay,
this 4 second exposure shows one of the jetties at Matilda
Bay, with the Perth city skyline in the background on the right hand side.
peaceful waters
jetty at Matilda Bay before sunrise
Matilda Bay, Crawley, Western Australia Canon EOS 50D, 10-22mm @16mm, 4 sec, f/7.1, ISO100
posted Monday, 05 January 2009, 20:57 (+0800), by Martin
Here's another shot from our get-together at Cottesloe Beach on Saturday evening.
This concrete pylon, just off the Cottesloe beach, was originally built in the 1930s to anchor a shark net.
However, after being battered by wind and waves for many years, it is looking rather worse for wear.
Apparently the Cottesloe town council were intending to remove it, believing it was
a dangerous to swimmers.
However, after a public backlash, they are now intending to spend $172,000 to restore it.
This shot was taken just after sunset, with a strong sea-breeze blowing, and a very hazy sky.
windswept pylon
Cottesloe Beach, Western Australia Canon EOS 50D, 70-200mm f/4L @200mm, 1/125 sec, f/4, ISO400
posted Sunday, 04 January 2009, 20:45 (+0800), by Martin
Last night, I met up with some friends at Cottesloe Beach, with the aim of getting some sunset photos.
Despite the rather blustery sea breeze, it was a great evening, and the cloudless sky provided some
interesting colours just after the sunset.
Here's a shot of the some people fishing on groyne, silhouetted against the sunset colours
in the sky. This 1-second exposure was taken about 40 minutes after sunset.
sunset silhouettes at Cottesloe
Cottesloe Beach, Western Australia Canon EOS 50D, 24-70mm f/2.8L @70mm, 1 sec, f/3.5, ISO100